


How to Reverse a Video on iPhone Without an App
Reversing videos is still a popular editing technique to help clips stand out on social media, but did you know how to do it without an iPhone app? Here's how.
This guide on how to reverse a video on an iPhone without an app can help you flip your clips in no time.
Over the past few years, reversed videos have made quite a splash on social media.

The fastest, simplest and most fun way to improve your smartphone photography skills this year.
Use link to save 80%
People on TikTok and Snapchat use filters to make their clips appear to be moving backward in time.
That makes for a particularly interesting effect that can be incredibly eye-catching.
However, when you’re using an iPhone, achieving this effect may be a little tricky.
So, at this point, you may wonder how to reverse a video on an iPhone without an app. If that’s the case, I can help.
In this article, I’ll walk you through everything you need to know about reversing videos on iPhones.
Table of Contents
Can I Reverse a Video Clip on an iPhone Without an App?
The simple answer to this question is yes, you can reverse an iPhone video without an app.
When you want to edit a video on an iPhone, your first instinct is to go to iMovie. There you’ll have access to countless editing tools that can help you perfect your clips.
Yet, the application can only do so much. Just like any other software, it has its limitations.
For example, iMovie doesn’t have a reverse function. So, you won’t be able to use it to achieve cool flash-back effects.
However, that doesn’t mean you can’t reverse videos on an iPhone. It only signals that you’ll need to be a little more creative.
At this point, you have one of two options. The first involves you installing a third-party video editing app.
While this may be a quick fix, it’s not always applicable. That’s because video editing apps can be quite large in terms of size.
So, with a limited internal storage capacity, you won’t be able to install the software.
In that case, you can rely on online tools. There are countless services that can help you flip clips in a flash.
What Are the Best Tools to Reverse an iPhone Video?
There are several online tools on the market that can help with video reversal. All you have to do is find one you like and get to editing.
Although, with many options on the market, it can be tricky to choose just one. So, to make your life easier, I’ll walk you through some of the best tools.
I’ll also cover how you can use each one to reverse an iPhone video.
1. Using Media.io
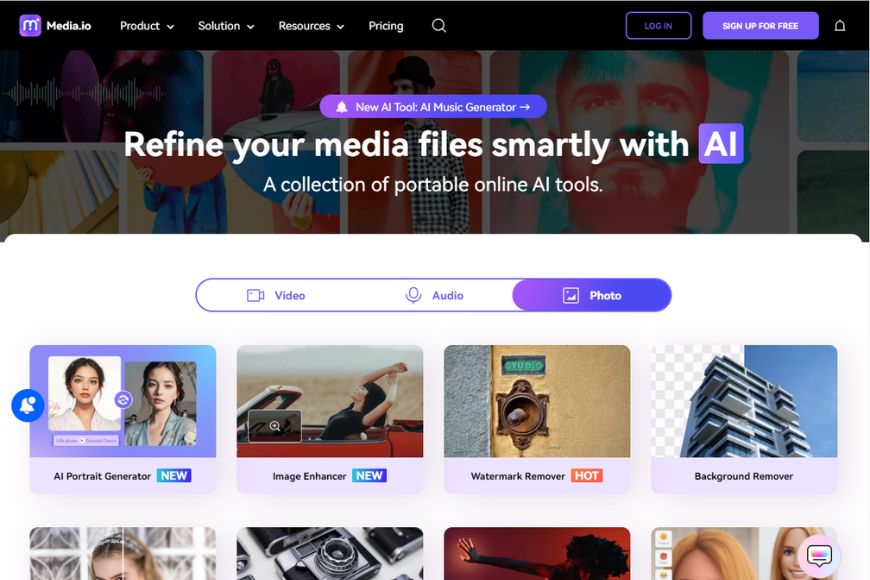
Media.io is one of the best video editors on the market. Using this service, you can convert, compress, and reverse videos with a few clicks of a button.
You can even alter audio files and add interesting sound effects to your clips. So, without further ado, let’s find out how to use the service.
Step 1: Relocate Your Video File
When using Media.io, you’ll need to access the video file from the Photos/Camera Roll app. Unfortunately, if you filmed the video using a third-party app, it may be saved in a different location.
So, the first thing you should do is transfer the clip to your internal iPhone storage.
To do that, all you have to do is launch the Photo app. Then, go to the Albums tab and select the Import option.
A drop-down menu should appear with all the video files on your phone.
Next, navigate the list until you find the clip you plan to edit. Finally, select the video and choose your import location.
Step 2: Upload Your Video to Media.io
Now, you can focus on uploading the clip to the online video editor. So, launch Safari or your preferred browser, and go to the Media.io Video Reverser page.
There, you should find a button in the middle of the screen prompting you to pick a video. Tap on the Choose File option to reveal a drop-down menu.
Then, select the Photo Library tab and navigate your gallery to find the video to reverse. Once you find the clip, you can highlight it and click on the Choose button in the bottom-right corner.
Give your phone a few moments to upload the video, and you’re ready to move on.
Step 3: Select Output Preferences
As soon as you upload the video file, the tool will redirect you to a preferences page. Here, you’ll be able to choose the clip settings.
For instance, there’s a Reverse Speed option section. It’ll help you decide on a playback speed for your flipped video.
Other than that, you’ll find a Mute Video setting. This will remove the audio file that’s attached to the video.
That way, you don’t have to listen to the glitchy reversed sound.
Spend a little time fiddling with the settings until you get your video just right.
Step 4: Export Your Reversed Video
When you’re happy with the reversed video, it’s time to export it. So, turn your attention to the bottom-left corner of the screen.
There, you’ll find a Save to option. This allows you to choose the output format of your clip.
You can pick between MP4, AVI, and FLV, among many other options. Next, click on the Reverse button on the bottom-right of the screen.
Finally, tap the Download button and choose your preferred storage location.
Once you get the hang of using Media.io, you should be able to reverse videos in a few seconds.
On top of that, with Media.io you won’t have to worry about strange labels or stamps. The editor will export videos without any visible watermarks.
2. Using Ezgif

Ezgif is another excellent video editor that can help play a video in reverse. It’s incredibly easy to use, and you get several customization options.
Here’s a quick look at what you can do to use Ezgif.
Step 1: Visit the Ezgif Video Reversal Tool Page
Right off the bat, the first thing you need to do is launch the video reversal service. So, go to the Safari app and navigate to the Ezgif Reverse Video page.
As soon as you log on, you’ll find a group of tabs at the top of the page. These are all the editing tools that are available for you to use.
Make sure that you select the Reverse option before you move on to the next step.
Step 2: Upload Your Video File
On the Ezgif homepage, you should find an upload video file section. Here, you have the option to choose a file from your gallery or paste a video URL link.
Both of these services work well, but choosing a file from your Photo app is more reliable. That’s because URLs can sometimes crash or not work properly.
So, go to your Camera Roll, find the video you want to flip, and click Select.
Finally, tap on the Upload Video button at the bottom of the screen.
Step 3: Reverse Your Video File
At this point, you should find yourself in the Video Reversal Studio. There, you’ll find a few editing options to play with.
For instance, there’s a Reverse Audio service. This allows you to match the sound file with the flipped video.
Although, the audio function isn’t all that great. It can sound a little robotic, which can be distracting.
So, if you want to avoid bad audio, it’s best to click on the Mute Sound option.
Then, you can choose the output format of your video. Navigate to the drop-down menu at the bottom of the page and pick the file extension that works best for you.
After that, click on Reverse Video and sit back while the online tool works its magic.
Step 4: Download Your Reversed Video
Reversing the video should only take a few seconds. Once the process is complete, you can export the file to your internal storage.
To do that, turn your attention to the top of the screen. On the top right corner, you should find a Save button.
As soon as you click it, your phone will prompt you to download the file. Select the Export tab and choose a storage location for your video.
The entire process should only take a couple of minutes, even if you’ve never used Ezgif.
However, there’s one drawback to using this online tool. The platform can only reverse videos that are 100 MB or smaller.
So, if you want to flip a particularly large clip, this may not be the ideal online tool for you.
What Apps Can Reverse a Video on an iPhone?
If you don’t want to use online tools to reverse a video, you may have a couple of apps on your phone that can get the job done.
For example, Snapchat offers a built-in video reversal tool. So, if you already have the social media platform installed, all you have to do is upload your video to the app.
Then you’re free to edit it as much as you like.
Other than that, TikTok also offers a version of video reversal.
The fastest, simplest and most fun way to improve your smartphone photography skills this year.
Use link to save 80%


Jeff Collier is an experienced film photographer who enjoys experimenting with modern digital photography equipment, software and apps. He’s also an ex-world champion triathlete and avid cyclist, clocking hundreds of km each week in the beautiful Tweed Valley of northern NSW, Australia.

WELCOME TO SHOTKIT
Enter your email to be sent
today's Welcome Gift:
19 Photography Tools
🔥 Popular NOW:


Shotkit may earn a commission on affiliate links. Learn more.