


What is EV on a Camera? (Exposure Value in Photography)
Unravel the concept of EV in photography, delving into its significance, impact on exposure, and its role in capturing perfect shots.
Learn | By Ana Mireles
If you’re confused about what is EV in camera, what’s an exposure calculator, or how to use the EV compensation, you’re not alone.
Here, I’ll explain what is exposure value, where it comes from and how we use it today in digital photography.
I’ll also show you what’s an EV chart, how to create your own, and how to use it to find the right exposure for your photographs.
Once all that is clear, I’ll move on to more practical things. I’ll explain why cameras don’t have an EV anymore and what features we use instead.
I’ll also explain how the EV is relevant in semi-automatic modes and how to use the EV compensation feature.
That’s a lot to cover. So, let’s get started.
Table of Contents
What is Exposure Value (EV)?
Nowadays, it’s not very common to talk about exposure values. This is because it’s a term that comes from film photography.
Let me start by saying that talking about EV can get quite confusing. Mostly, this is because there are two types of exposure values – absolute and relative EV.
Before we dive into either one of these concepts, it’s important to explain what is exposure. Exposure is simply the amount of light in your photo.
You can control the exposure by using the exposure settings – aperture, shutter speed, and ISO. These camera settings are known as the exposure triangle.
The aperture value regulates the size of the aperture to control how much light comes through the lens. The shutter speed determines how long is that light going to reach the sensor or film.
Lastly, the ISO refers to the light sensitivity of the sensor or the film. Achieving the perfect combination of these factors results in a well-exposed photo.
If we talk about relative EV value, that perfect exposure corresponds to zero. On a digital camera, you can see this in the light meter that shows up when you press the shutter button halfway.
There, you’ll see a scale that usually goes from -3 to +3 with one-stop increments. This is the EV scale in your camera.
When you change the aperture, shutter speed, and ISO, you can see the pointer moving across the scale. In most cases, you’ll want to find a combination that gets the pointer in the middle – in the zero. That’s an EV0 exposure.
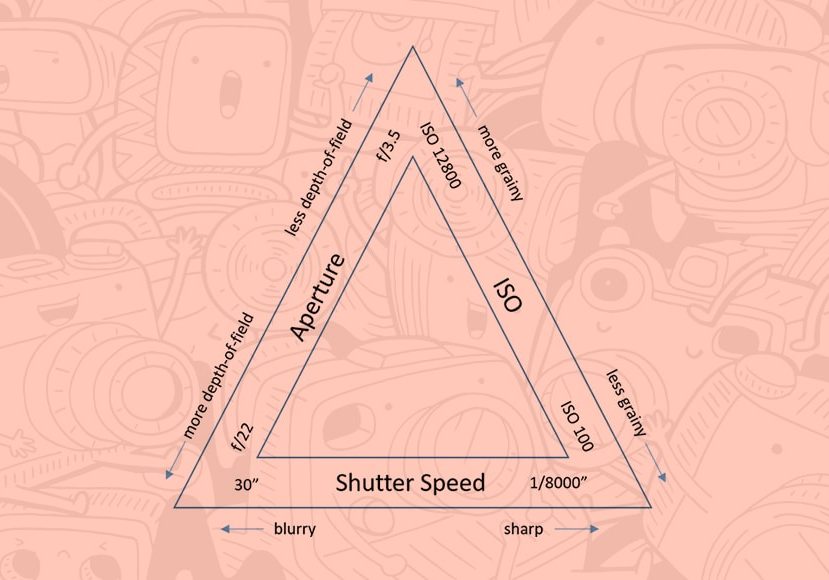
Exposure triangle
If you underexpose your photograph by one stop, then you would have an EV-1, and if you overexpose your photo by one stop, then it’s an EV +1.
You can move across the EV scale by adjusting the camera settings manually, or you can use the exposure compensation feature if you’re working in an auto or semi-automatic mode.
Now, let’s talk about absolute EV. Back in the 1950s, the camera shutter manufacturer Friedrick Deckel wanted a simple way to understand how to use different aperture and shutter speed combinations.
So, he came up with an exposure value formula that assigns a light value that would remain the same if you change either the aperture or shutter speed as long as you compensate it with the other one.
So, the exposure value (EV) is a number that measures the brightness of a photo. He called this system the Exposure Value Scale (EVS or EV scale), and it was adopted by all the major brands.
Using it, they invented lenses where you could adjust the lens aperture, and it would adjust the shutter speed and vice-versa.
When the manufacturers introduced a light meter, we talked about earlier into their cameras – they used Deckel’s EV scale.
As you can see, even if we don’t talk much about the exposure value, it was a major stepping stone for the development of photographic gear.
How is Exposure Value Calculated?
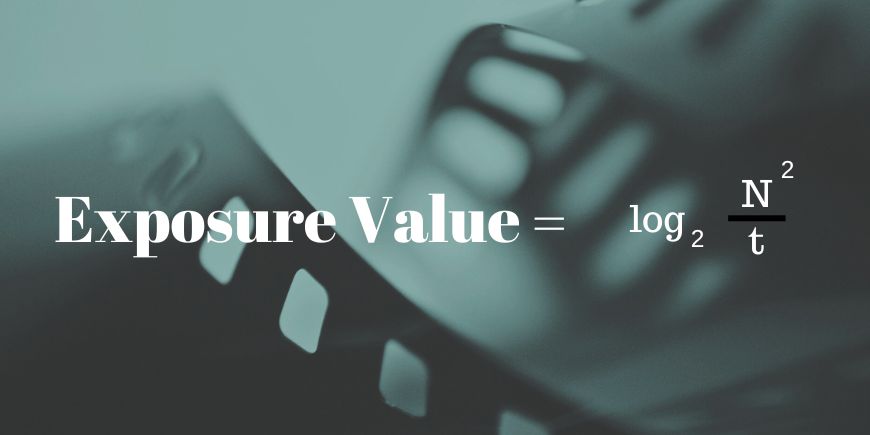
What you see here is the exposure value formula. This formula refers to the absolute EV, and it assigns a number to different brightnesses of a scene using the aperture and shutter speed settings.
The EV chart is based on a 100 ISO value because it comes from before digital cameras, where 100 is the most common film speed.
Fortunately, you don’t need to do any math, as there are exposure value charts all over the Internet. I’ll add one in the next section, where I’ll also explain how it’s used.
Basically, it illustrates the combination of shutter speed and aperture settings you can use to achieve the same EV value.
In the EV scale, the higher the number, the brighter the scene – for example, subjects in direct sunlight have an exposure value of 15, while home interiors range between 5 and 7EV.
The reason why you would want to use a different combination of camera settings to achieve the same EV is for creative reasons.
Let’s say that you want to keep the same amount of light, but you want motion blur in your picture. You would need to use slow shutter speeds.
As you adjust the shutter speed value, you need to compensate with the aperture setting to keep the same exposure.
So, let’s move on to the EV chart, as promised to see how you can use it to find the equivalent settings achieving the proper exposure while keeping creative control.
How to Use an Exposure Value Chart
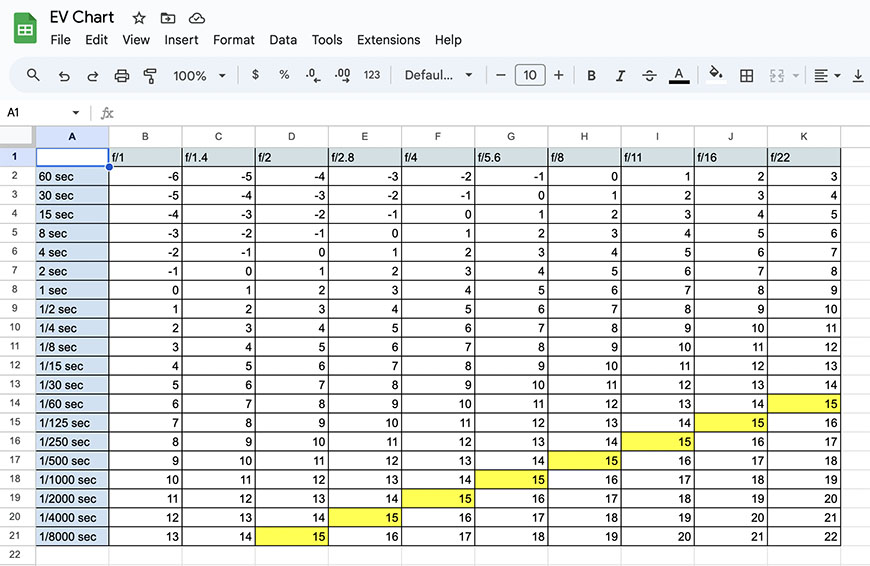
EV Chart | Shotkit
An exposure value chart or EV chart helps you to use a different f-stop and shutter speed while keeping a constant exposure.
As I mentioned, there are many charts online, but it’s also easy to make your own like I did. An EV chart has two axes – on one of them, you put the shutter speed values, and on the other, you put the f/numbers.
The point where each f/stop and shutter speed intersect has an exposure value (EV) corresponding to the photographic exposure scale.
To use an EV chart, you need to find the EV of the current lighting conditions. You’ll notice that it shows up in many aperture-shutter speed combinations.
So you can choose the one that better fits your creative needs.
How to Use Exposure Value in Photography
Let’s take the usual example of shooting during a sunny day to see how you can use EV charts to take photographs.
According to the EV calculation, sunny days have an EV value of 15. As you can see in the chart, the number 15 can be photographed with many aperture-shutter speed combinations.
You can use an aperture of f/2.8 and a shutter speed of 1/4000, or you can do it with an f/22 and a shutter speed of 1/60. You’ll get the same light.
The difference is that with the first choice, you’ll have a shallow depth of field and freeze any moving subject. Instead, with the second combination, you would have a deep depth of field, and fast-moving subjects would be blurry.
Exposure Value Examples: What is a ‘good’ exposure value?
I’ve mentioned a few times that sunny days have an EV of 15, but what are other examples?
I found a very complete guide in Yutaka Tsutano’s EV chart on Flickr. You can check it out if you’re interested in the complete list. Here, I’ll just tell you about the most common situations.
- Light sand or snow: 16
- Hazy sunlight – soft shadows: 14
- Sunset: 12
- Home interiors: 5 to 7
- Christmas tree lights: 4
- Night vehicle traffic: 5
- Bright street scenes at night: 8
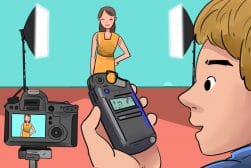
If EV charts aren’t for you, you can use an exposure wheel. Back in the day, they would sell them at any photographic shop. Today, you might still find them used. However, you can also use an app with a digital version of it.
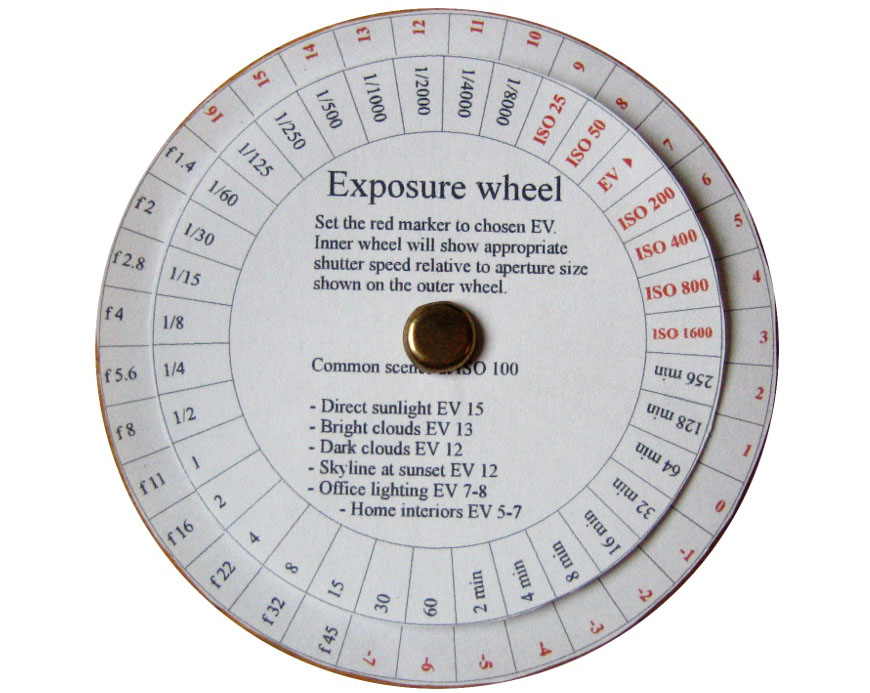
Credit: Sakaris Ingolfsson, CC BY-ND 2.0 DEED, via Flickr
When Would You Want to Modify EV in Camera?
We already mentioned the EV number refers to the correct exposure. In your camera, the EV scale represents the exposure on the light meter.
While most scenes are well exposed at EV0, some situations are better exposed at EV- or EV+. Here are some examples.
Shooting in the snow or at the beach. Bright scenes and highly reflective subjects may cause your camera to underexpose your photo. To avoid a greyish, dull photograph, you’ll want to up the exposure by one or two stops.
Backlit subjects. Unless you’re looking for a silhouette effect, you’ll want to overexpose your shot by 2/3 to 1 2/3 of a stop.
Night or low light scenes . Opposite to the previous examples, when the camera sees a dark scene, it overexposes. So, you’ll want to set the exposure compensation to -1EV or -2EV depending on how dark is the scene and how bright are the highlights.
How to Use EV Compensation
There’s a camera setting called exposure value compensation. Most modern cameras have it, and it works in combination with any automatic or semiautomatic exposure setting.
This means that you can use it in auto, program, aperture or shutter speed priority, or manual with auto ISO. Let’s see what it is and why you wouldn’t need it if you’re using the camera in full manual.
As you know, your camera has a light meter that you can use to calculate exposure. When the camera meter is zero, it means that you have the correct exposure – at least, according to your camera. However, this isn’t the case for all lighting conditions.
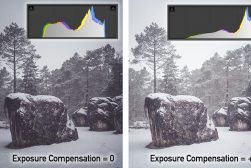
This is because light meters assume that things should be middle grey. So, in a very dark scene, it will ask for more exposure to get the meter to zero. This will result in greyish blacks and overexposed highlights.
The same thing happens with bright scenes. The camera will try to get less exposure so that the brightness fits the middle grey. Let’s say that you’re photographing a snowy landscape – you would end up with grey snow.
So, what do you do if you want your dark scene to stay dark or your bright scene to stay bright?
If you’re working in full manual, you simply adjust the settings to what the camera considers to be under or overexposed.
However, this isn’t possible to do if you’re working with an auto or semi-auto mode. This is because the camera will keep trying to compensate by adjusting the settings to always keep the meter at zero.
So, you need to tell the camera that you want to over or underexpose the image. You can do this using the exposure compensation.
To underexpose a photograph, simply set the exposure compensation in one of the negative EV values – to overexpose it, move it to the positive side of the scale.
You should also read our complete guide to exposure compensation.
How Does ISO Affect the Exposure Value?
The ISO sensitivity is one of the three camera settings from the exposure triangle. You use them to control the camera exposure. Although, the ISO doesn’t affect the exposure itself, as it’s the same amount of light.
The exposure is controlled by the aperture and shutter speed. The ISO controls the sensitivity of the camera sensor to the light level. However, they all affect the brightness of the photo.
So, in terms of the exposure value, changing the ISO is like changing any of the other camera settings. If you increase the ISO by one stop, you’ll have EV+1. If you lower the ISO by one stop, the EV becomes -1.
Why Don’t Modern Cameras Have an EV Setting?
Digital cameras don’t need exposure values because they have multiple other features that help you achieve the right exposure.
You have an integrated light meter and multiple metering modes to use for a more accurate reading. You also have semi-automatic modes to help you compensate for the exposure settings automatically.
There’s also an exposure compensation feature that helps you modify the exposure value in unusual conditions, such as backlit subjects.
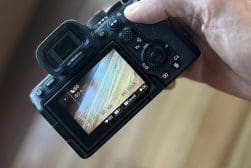
Last but not least, you can immediately see how the photo turns out with different camera settings. Not only do you see the image, but also the histogram. This way, you can determine which are the best settings for the current lighting conditions.
Exposure Value and Semi-Automatic Modes
At the beginning of the article, I told you how camera and lens manufacturers invented lenses that would connect with the camera shutter so that by moving the aperture, you would adjust the shutter speed accordingly.
You could also move the shutter speed and adjust the aperture in the lens. Does this sound familiar? I bet it does! That’s exactly what the semi-automatic modes do in digital cameras.
If you set your camera to Shutter Priority mode, you’ll be able to regulate the shutter speed, and the camera will automatically choose the right aperture according to the amount of light.
In the same way, Aperture Priority mode lets you choose the f-number you want, and the camera controls the shutter speed to regulate how much light is entering the camera. This way, you’ll have the proper exposure.
How Do Neutral Density Filters Change the EV?
Credit: Robert Emperley from Strasbourg, Alsace, France, CC BY-SA 2.0, via Wikimedia Commons
Neutral density (ND) filters reduce the amount of light entering the camera. This is because they’re made of dark glass.
This is useful when you need less light, but you can’t use a fast shutter speed – maybe because you want to introduce motion blur.
Then, you could compensate with the ISO and aperture, but what if there’s too much light to control with those settings?
That’s when the ND filters come into play. These filters have different densities, and they’re graded with an EV scale.
A 1EV filter would reduce the camera exposure by one stop, a 2EV by two stops and so on.


Ana Mireles is a Mexican researcher that specializes in photography and communications for the arts and culture sector.


WELCOME TO SHOTKIT
Enter your email to be sent
today's Welcome Gift:
19 Photography Tools
🔥 Popular NOW:


Shotkit may earn a commission on affiliate links. Learn more.