


How to Use Light and Shadow in Photography
Explore the dynamic interplay of light and shadow in photography, honing techniques to create compelling compositions and evoke powerful emotions.
Learn | By Jeff Collier
In this guide, we discuss the importance of light and shadow in photography, as well as how to use light and shadow to capture compelling and evocative images.
Light and shadow are the Yin and Yang of photography.
Light shapes and defines a photograph, serving as a painter’s brush in a photographer’s hands.
Shadow is its silent counterpart, adding depth, contrast, and dimension to an image. It can obscure details, add an element of drama to a scene, or soften the harsh lines of a subject.
Read on as we delve into the technical and creative aspects of working with shadows.
Table of Contents
Importance of Light and Shadow in Photography
In photography, light and shadow coexist harmoniously.
While it’s possible to have light without shadows or shadows without light, the balance between the two is often purposely adjusted to achieve certain visual effects.
Individually, light and shadow play an equally crucial role in composition.
Light influences mood, tone, and atmosphere and dictates the darkness or brightness of the final image.
Shadows, defined as the absence of light, exist to draw a viewer’s attention to a specific point in the composition or hide features that may be better left unseen.
They can also be used to emphasize light or add a hint of drama and emotion to a photo.
What Is Shadow Photography?

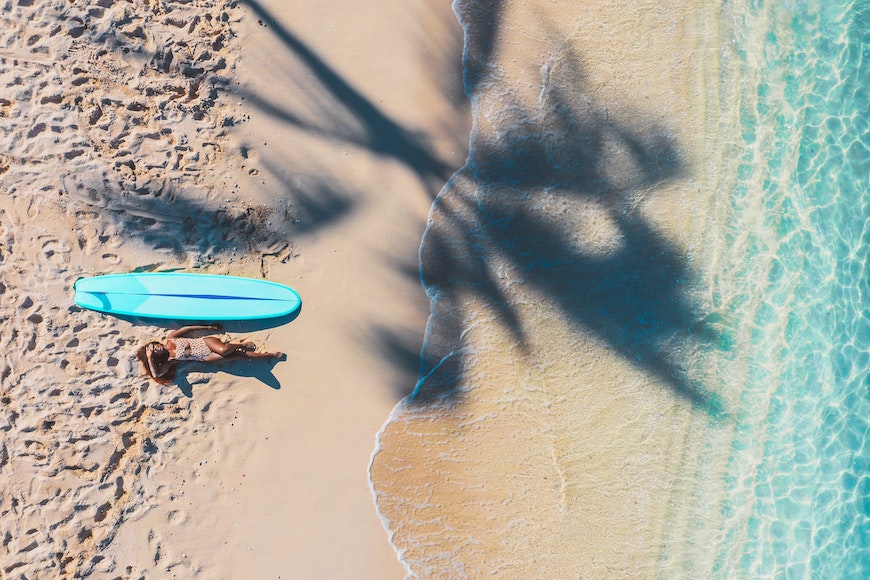
Credit: Yusuf Celik
When it comes to the use of light and shadow in photography, none does it better than shadow photography.
As the name suggests, shadow photography focuses on the intentional use of shadows as a prominent part of the composition.
It aims to create abstracts, patterns, and a combination of masterfully placed silhouettes with the intention of telling a story.
Shadow photography is as creative a medium as any other form of photography, if not more so in some respects. It encourages you to explore the boundaries of symbolism and abstraction, pushing the limits of what a camera can capture.
With light and shadow photography, the sky’s the limit.
You can use artificial lights to create intricate and controlled shadows or natural light to take advantage of the ever-changing patterns of the sun.
Your output can be multi-colored to produce ethereal or dreamlike images or monochrome to add mystique and drama.
Mastering the Art of Shadow Photography: Tips, Tricks, and Ideas
Shadows don’t have a fixed form. They vary in shape, size, and intensity depending on the direction and angle of the artificial or natural light source.
This is what makes shadow photography so exciting and rewarding: it encourages experimentation and creativity, pushing you to think on your feet.
Here are some tips to improve the quality of your shadow photography:
Use the Right Camera Settings

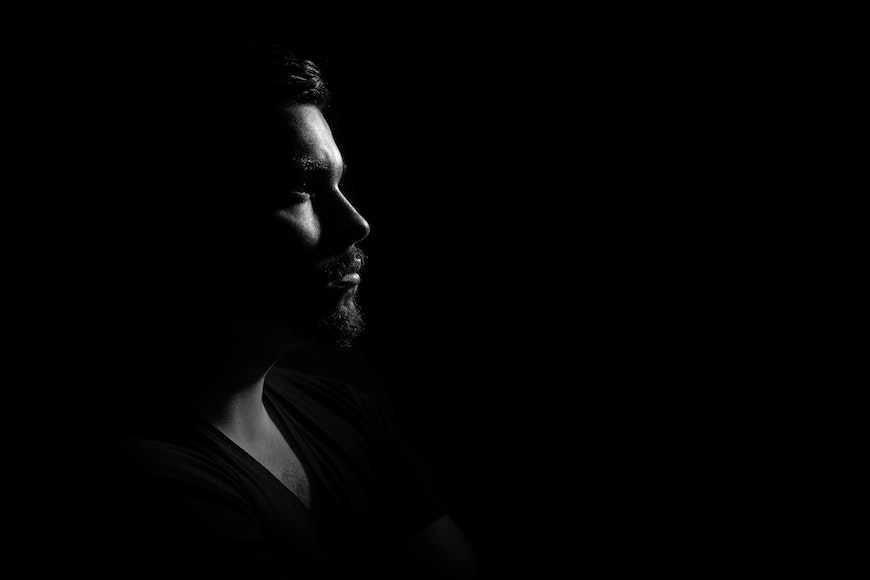
Credit: Mumtahina Tanni
Capturing light and shadow in photography starts with the right camera settings.
For shadow photography, you want a wide aperture of around f/8 or higher. A wide aperture creates a large depth of field, reducing background blur and chromatic aberration.
You’ll also want to adjust your shutter speed to at least 1/125 for still subjects. The faster the shutter speed, the less motion blur and the sharper the image.
If you want to create dark shadow photos, adjust your ISO to as low as possible, ideally between 100 to 200. High ISO adds noise to the photograph, which you want to avoid.
Take Note of the Inverse Square Law
If you’re unfamiliar with the term, the inverse square law is a scientific law stating that the intensity of a force is inversely proportional to the square of the distance from that force.
In other words, the intensity of your light source decreases the farther the subject moves away from it.
Through the inverse square law, you’ll be able to predict how light and shadows will behave as you change the distance between your subject and the light source.
Moving your subject closer to the light will result in sharper, more defined shadows, while placing it farther away will produce softer, more gradual shadows.
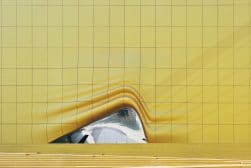
Experiment With Patterns
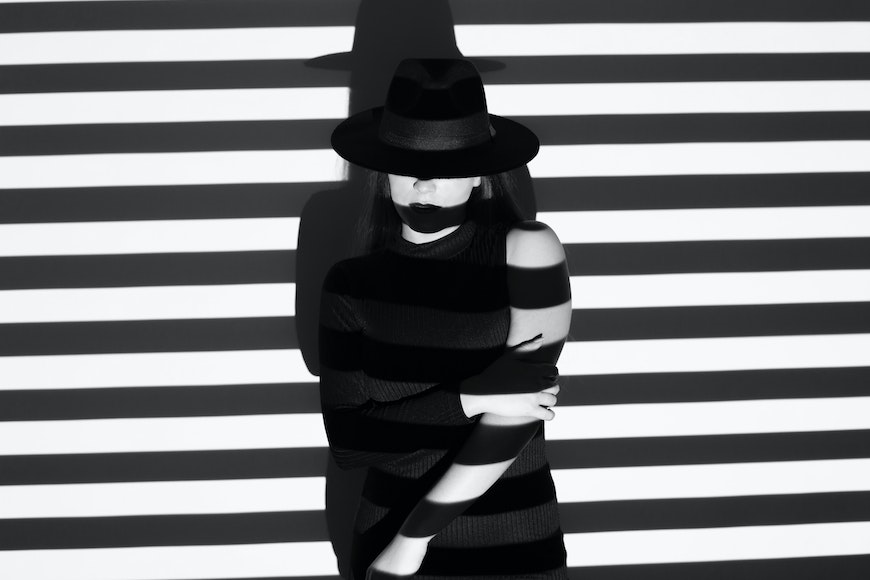
Credit: Cleyton Ewerton
One of the best ways to add patterns in shadow photography is to make use of gobos, AKA go-between objects.
Gobos are accessories that fit between the light source and the backdrop.
When positioned between the light source and a surface, they let the light rays project the desired shape onto the subject.
By using patterns in shadow photography, you’re adding drama, narrative, and interest to a flat scene.
They can be shaped to whatever context you see fit: geometric patterns, the outline of a person’s silhouette, or a clump of trees casting long, slender shadows. The possibilities are endless.
Gobos are typically made of opaque metal or glass panels, but you can make your own DIY gobo using fabrics (like lace), window blinds, house plants, or even a roll of toilet paper.
You can also purchase professional gobos that feature various patterns, shapes, and attachments.
Use Shadows to Frame Your Subjects
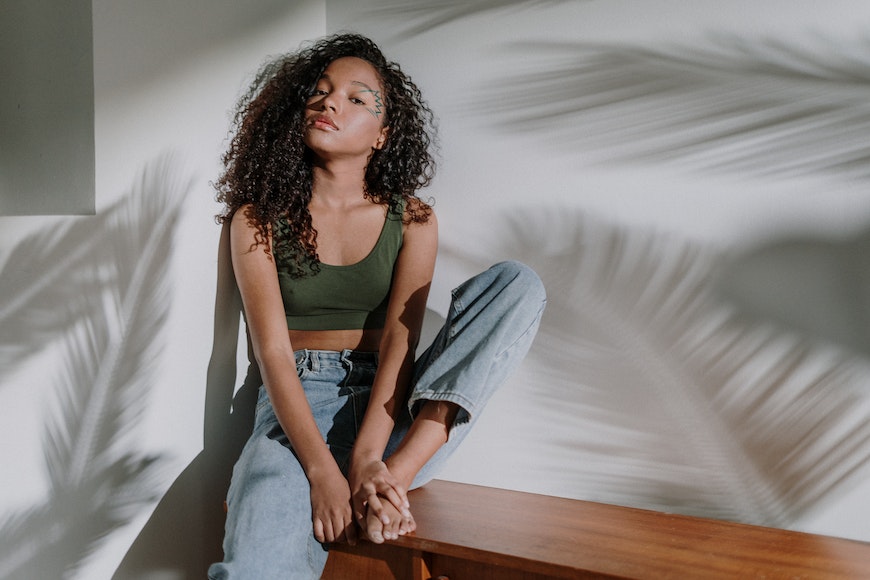
Credit: Cottonbro Studio
In photography, sub-framing is a technique wherein a photographer marks a smaller frame within the image to emphasize a subject or a particular element of composition.
The goal is to draw the viewer’s attention to the subject’s emotions, details, or significance, separating it from the other elements of the image.
One of the easiest ways of achieving this effect is by using light, shadows, and negative space.
The human eye is naturally drawn to the brighter aspects of an image, and negative space—an empty space around and between the subject—can help accentuate this contrast.
Use Shadows as Your Main Subject
Credit: Shvets Production
Shadows don’t only exist to complement another element; they can also take center stage in a photograph.
When shadows are used as the main subject, they leave much to the viewer’s imagination.
The outline of a person can hit a story waiting to be discovered. Is the person in deep thought, contemplating the mysteries of life, or lost in a moment of introspection?
The play of light and shadow in their silhouette offers just enough information to set the tone but not give everything away.
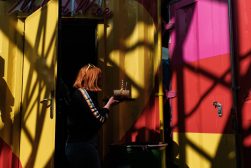
Understand the Direction and Quality of Light
Credit: Anna Shvets
The angle, direction, and quality of your light depend on your shooting style and the intended result.
Soft light is diffused light that creates soft, feathered edges that gradually dither away, making it suitable for minimizing texture and detail.
Hard light is focused light that sharpens texture and detail, producing shadows with defined edges. By enhancing the depth and texture of the subject, hard light can add drama and impact to architectural or landscape photography.
Front lighting, where the light source comes from behind the camera, creates evenly lit scenes with few shadows.
Side lighting, where the light source comes from the side, casts shadows that reveal form and contours.
Backlighting, where the light source is behind the subject, produces silhouettes or a halo effect, creating an airy, dreamlike feel to an image.
Don’t Be Afraid to Shoot in Harsh Sunlight
Credit: Jess Loiterton
Outside shadow photography, shooting under harsh sunlight is a bit of a taboo.
The all-too-bright light creates sharp contrasts, casting harsh shadows that can be difficult to work with.
But with shadow photography, strong shadows are precisely what you’re looking for. This is especially true if you’re shooting architecture and other geometric structures.
The sharp shadows add depth and dimension to these structures, making them look all the more dramatic.
That said, timing is everything. When taking pictures under sunlight, it’s best to do it before or after 12 p.m. when the sun is at an angle.
Taking pictures when the sun is directly overhead (around noon) creates strong highlights on subjects, leading to overexposure and loss of detail.
Familiarize Yourself With Rembrandt Lighting
Credit: Pixabay
Rembrandt lighting, named after the 17th-century Dutch painter Rembrandt, is a portrait lighting technique that consists of a single light source.
The light source is positioned on a 45-degree offset from the subject, about five feet away. This positioning results in half of the subject’s face fully illuminated while the other half is in partial shadow.
The Rembrandt lighting technique is a brilliant way to add a moody and dramatic effect to an image.
It often features a black or dark background, with the subject positioned front and center.
This lighting style requires a controlled artificial lighting setup, such as that found in a studio. Outdoor environments are too unpredictable, making the contrast of dark and light harder to control.
Enhance Shadows With a Monochrome Setup
Credit: Andre Estevez
To make shadows easier to see, shoot in black and white.
When you shoot in black and white, you’re removing the distraction of color and allowing the interplay of light and shadow to take center stage.
Shadows created by the absence of light become more pronounced, relieving intricate details and textures that might be less noticeable in color.
It also simplifies the composition, letting viewers focus more on the fundamental elements of form, shape, and contrast.
In black-and-white photos, shadows can define the contours of a subject’s face, and emphasize the lines and structural details of architectural elements.
Fine-tune Your Shadows With Editing
In an ideal world, in-camera techniques and lighting setups would create the perfect balance of shadows and highlights in photographs.
But in reality, photography often involves fine-tuning your images in post-processing to achieve the desired level of shadow detail and contrast.
During the editing phase, look into increasing the darkness of your shadows to make them look rich and dramatic.
You can also adjust the shadow’s exposure, brightness, and highlights to create perfect silhouette pictures.
 15 Tips for Creative Shadow Photography in 2023
 How to Add a Realistic Drop Shadow To Images in Photoshop
 Hard Light vs Soft Light (Differences & How to Create them)
 Guide to Using Pattern in Photography
 Mastering Light and Shadow: Techniques for Dramatic Street Photography

Jeff Collier is an experienced film photographer who enjoys experimenting with modern digital photography equipment, software and apps. He’s also an ex-world champion triathlete and avid cyclist, clocking hundreds of km each week in the beautiful Tweed Valley of northern NSW, Australia.

WELCOME TO SHOTKIT
Enter your email to be sent
today's Welcome Gift:
19 Photography Tools
🔥 Popular NOW:


Shotkit may earn a commission on affiliate links. Learn more.