


Mastering Off Camera Flash: A Beginner’s Guide
Learn essential off-camera flash techniques to elevate your photography skills, from setup, gear selection, creative techniques and shooting like a pro.
Learn | Lighting Guides | By Brenda Bergreen
This beginner’s guide to mastering off-camera flash will help you identify when, why, and how to implement flash into your photography.
As a professional photographer for over a decade, I’ve used a variety of flash photography techniques to handle the wide range of lighting situations I’ve come across.
Learning off-camera flash was a process that forced me to dig deeper into understanding how light impacts my photography in general.
Eventually, you can transition from the desperate addition of light to achieve properly exposed photos in low-light conditions to the creative utilization of various flash techniques.
Free the flash from its attachment to the camera body, and you free your creativity as well!
Table of Contents
What is Off-Camera Flash?
Off-camera flash is a lighting technique used in photography where the flash is positioned off-camera instead of on top of the camera body.
This allows for more control and creativity of the flash angle.
On-camera flash is when you use a flash that is connected to the camera.
\When the flash is mounted directly on top of your camera, you are severely limited in the type of light you can create.
Sure, there are ways to bounce the flash by pointing it in different directions, but once you get the flash off the camera, the real creative possibilities arise.
Why Use Off-Camera Flash in Photography?

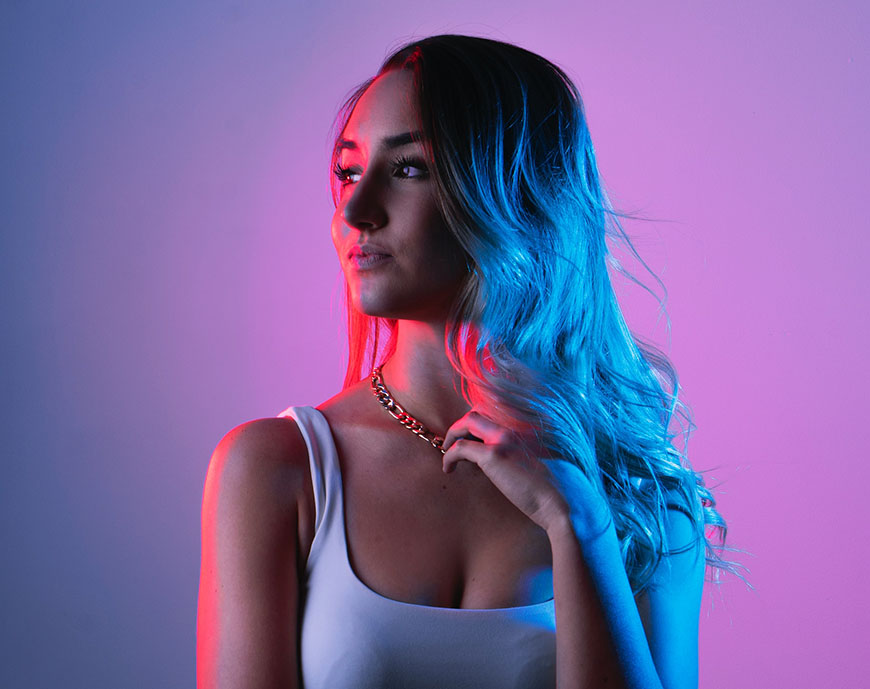
Off-camera flash is a great technique to use in your photography because it creates interesting light. You’re no longer stuck with boring flash photography that looks flat and evenly lit.
With on-camera flash, there is less flexibility to control flash angle and distance because you can’t move the flash very far.
You can use bounce flash techniques to change the angle and soften the light from an on-camera flash.
However, bounce flash has limitations. It’s only one light source, and you don’t always have a bounce surface that suits your needs. If you’re shooting outdoors, you’ll quickly realize how limiting on-camera flash is.
With off-camera flash, you gain more control of your lighting setup because you can use multiple lights with complete control of their distances and angles from your subject.
There are nearly unlimited possibilities once you get the flash off camera. It takes some planning and practice, but you’ll quickly realize how dynamic the lighting can be once it’s off-camera.
Types of External Flashes to Use Off-Camera

The most common type of external flash is what’s called a speedlight. Most commonly, you can just get a second speedlight or flash that has wireless control.
Speedlights are small battery-powered portable lights that can be mounted on or off the camera in both TTL (through the lens) and manual modes.
A strobe or mono light is a larger light with an independent power source that is more powerful and more expensive, often seen in studios.
In recent years, there has been a development of a wide range of options between speedlights and strobes. There are now a lot of small battery-powered flashes that still pack enough punch to overpower the sun.
These small, powerful, and portable options have expanded the world of off-camera flash photography – you can find the best camera flash models for all the major brands.
I have come to love the lights from Godox. There are a variety of options that are cross-compatible and affordable.
If you’re looking for a Speedlight with wireless capability, you could start with a Godox V860. To get this speedlight off your camera, you could get a second V860, or you could get a wireless trigger like the Godox XPro.
These units are camera brand-specific, so look for the Sony, Canon, or Nikon labeling when you choose the model. This will ensure compatibility.
Stepping up from a basic speedlight, you could look at something like the Godox AD200. This is equivalent in power to about three speedlights.
Having more power will give you the output you need to overcome the bright midday sun and light your subject purely with an off-camera flash. In the brightest situations, I find that two Godox AD200s are usually enough to overcome the sun.
If you require more power or want further to darken the background in relation to the subject, you might look at the Godox AD300, AD400, or AD600. These lights are not only going to overpower any ambient light.
They will have a much faster recycle time than the Godox AD200 at max power.
Although a Godox AD200 might have enough light at the highest power setting, you’ll quickly realize the limitations because the recycle time (time for the light to recharge between photos) gets too long.
This is when you will want to upgrade your off-camera flash setup to a more powerful light.

Additionally, you will only get about 500 full-power flashes on a single charge of the Godox AD200. If you get a more powerful light that is only operating at 1/2 power to get the same output, you’ll get many more frames on a single charge.
Another accessory that I like is the Dual Power Flash Bracket for the Godox AD200. This allows you to take two AD200 units and combine them into one more powerful light.
Although I focused on Godox in this section because I think they are the best balance of price/value, there are a number of other brands in the market. You can also check out off-camera flash products from Geekoto, Neewer, Westcott, and Profoto.
Deciding which flash unit to get really depends on how much power you will need. Let’s jump into settings to figure out how much off-camera flash power you might need to overcome the natural light.
How to Use Off-Camera Flash
Dialing in the Best Off-Camera Flash Settings
To understand how to use off-camera flash, we’ll need to dive into the different flash settings that will be the variables of your setup.
With natural light, you’re looking at three variables to control your exposure: shutter speed, aperture, and ISO.
With off-camera flash, you’ll add one more variable: flash power.
If you mainly shoot in bright sunlight and want to add flash photography to help create softer light, you’ll use more power. If you’re shooting in evening or nighttime settings, it will take much less power to get proper exposure.
Understanding Flash Power
It’s important to understand the relationship between flash power, aperture, and ISO to balance flash with ambient light.
The first step in determining flash power is finding a proper exposure with the flash turned off. Once you choose a shutter speed, aperture, and ISO that looks good for your scene, you’ll need to add flash to figure out the flash exposure.
If you’re overcoming the sun, you might have the added challenge of staying below your flash sync speed. This can force you to use a shutter speed value below about 1/250.
Many flash makers offer high-speed sync (HSS) settings that will allow you to go above the flash sync speed, but you will sacrifice a significant amount of light.
Alternatively, you can add an ND filter to your lens, which can help bring your shutter speed back down below 1/250.
In some situations, you can push your aperture to the maximum value (usually f/22) to get the proper exposure. If you want to shoot at a lower aperture to get beautiful bokeh, you’ll need an ND filter or high-speed sync.
Whichever route you decide to go (ND filter or HSS), it’s now time to adjust your flash power. This is usually a bit of trial and error.
I will often position my subject and pick a flash exposure in the middle of the range. Once I take a test shot, I will evaluate if I need to increase or decrease the flash power. Another way to adjust the amount of light hitting the subject is to move the light closer or farther away from the subject.
Once you get a nice flash exposure that is not too bright or too dark, you’ll have the power set on the flash unit. If you have a smaller light and you’re overcoming bright sunlight, you might have reached the maximum power of your light.
This is a situation when the recycle time will go way down, your flash might be close to overheating, and you will want to consider a more powerful off-camera flash. I.e. you may need to upgrade from an AD200 to an AD400.
Sync Speed and Why It Matters
As described above, you’ll want to know what your sync speed is when you purchase an off-camera flash. The most common value is 1/250.
Additionally, if you plan to utilize a high-speed sync (HSS) feature on your flash, you’ll want to know how many stops of light you’ll be losing from the full power of the light.
Let’s say you want to shoot at 1/8000 of a second to overcome bright sun. Although the Godox AD200 may have provided enough light at full power at 1/250 shutter speed, you may need an AD600 because the power when using HSS at 1/8000 shutter speed is significantly reduced.
With a very fast shutter speed like 1/8000, you could see a reduction in power of more than 75%. There is a complicated formula for calculating equivalent power. Still, I would keep it simple and consider picking up a variable ND filter to keep your shutter speed in sync range.
Flash Zoom and Beam Angle

Other flash settings to consider are flash zoom and beam angle. These are often settings found on a speedlight that will allow you to modify the light slightly.
Zoom is a way for on-camera flash to match the focal length of your lens. With the most advanced flashes, your zoom will change as you zoom in or out on your lens.
This allows the beam angle of the light to match the focal length.
For wide shots, the flash will give a broad angle to match the wide view of the scene. For telephoto shots, the flash will zoom in, giving a narrower beam of light and concentrating the power of the flash in a smaller area.
Other modifiers can be added to speedlights that will change how the light hits the subject.
I will often put a grid on my flash units to narrow the light and keep it from hitting unwanted subjects, such as in the example image above.
I have also used gels to change the color of the light and match the ambient light to look more natural.
When it comes to larger flash units, you’ll often modify the flash output with things like umbrellas or softboxes.
Light modifiers are a whole world of their own within flash photography and are the subject of another article. I will, however, provide some basic suggestions in the following section.
Advanced Off-Camera Flash Techniques
There are so many off-camera flash photography techniques that I will just touch on some basics here.
When you have a trigger and two or more flashes off camera, the options really become infinite.
Let’s touch on a few basic techniques:
Multiple Flash Setups
Using multiple flash setups is a great way to create depth and interest in a scene.
Using one light off camera will start to add some character to your images, but when you add several lights, you can create unique images.
For a simple example, taking a portrait with a nice large light source from the front combined with a hair/rim light from the back will create much more depth.
Similar to window light, having a large light source will create a soft, evenly lit front light (i.e., a large softbox). Having a flash in the back to light the subject’s hair will provide separation from the backdrop, making the image feel more three-dimensional.
Another common scenario for multiple flash setups is my wedding photography dance floor lighting setup.
In this case, I use multiple lights to ensure that no matter what direction I’m shooting the dance floor from, I always have a light stand with a flash, adding fill light to the scene.
Placing one light off each corner of the dance floor also gives me a nice backlight and separation.
As you experiment with more complex multi-light setups, you’ll realize how much equipment you need.
You’ll need light stands, remote triggers for each camera, multiple flash units, and some modifiers to make the light look how you want. All these will give you greater control of their background and shadows and allow you to add light to the correct areas of the scene.
Combining Ambient and Flash Lighting
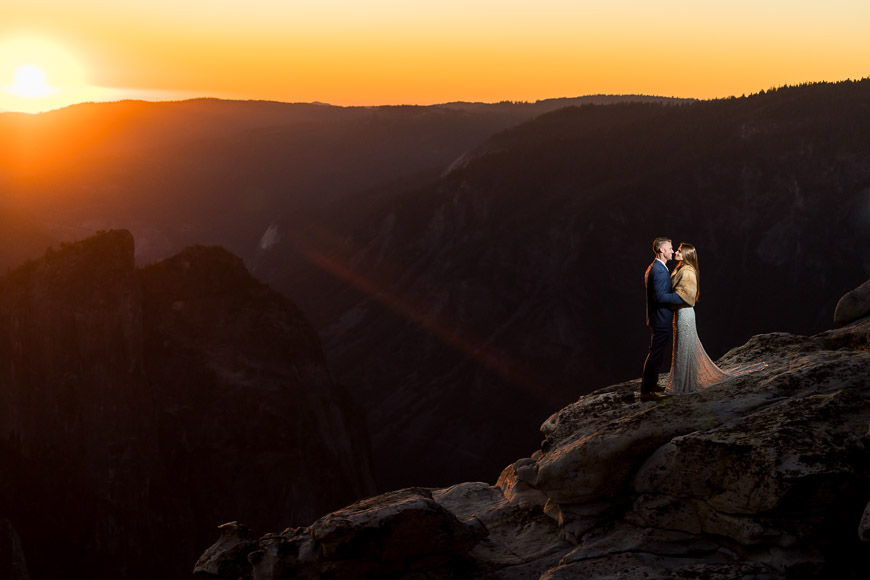
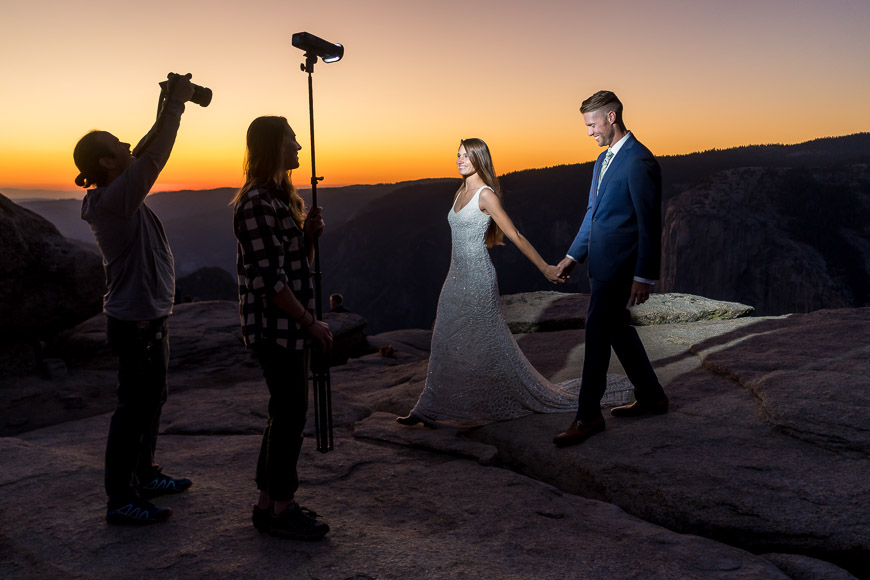
When you can seamlessly combine available light with one or two flashes to create a good exposure, you will appreciate the flexibility of off-camera flash photography. Some of my favorite images mix beautiful natural light (i.e., golden backlit sunset) with a flash burst to light the subject.
Without the flash, I would be capturing a silhouette, but adding flash fills the shadows on the opposite side of the sun. This allows you to control shadows and make a much more dynamic image.
Adding a correct exposure of a subject with a dramatic landscape through an off-camera flash is one way to make ordinary images extraordinary. Be sure to dial in your flash power settings so you don’t have too much light on the background or the subject.
Another fun way of combining flash with ambient for creative effect is called dragging the shutter. This technique of using low shutter speeds (i.e., 1/10 of a second) allows you to capture light streaks of ambient in dark situations.
You’ll want to manually adjust your flash and shutter speed to get enough ambient light, but not so much that it washes out your images. This technique can also be combined with an on-camera flash manually zoomed in to direct the viewer’s attention toward the middle of the frame.
This technique is sometimes popular among wedding photographers looking for a simple way to turn an on-camera flash image into something a little more interesting.
To get a good overview of techniques, I strongly recommend learning all your flash modes and experimenting with different subjects.
Be curious and learn to get your flash out of the hot shoe. Don’t pigeonhole yourself as a natural light photographer because you don’t know how to tackle off-camera flash.
You should also read my guide to using flash in wedding photography for a more complete understanding of the process.
Creative Techniques with Gels and Modifiers
Brian Lawson
Once you’ve thoroughly experimented with the basic settings of your flash, it might be time to add some other tools to expand your creative options.
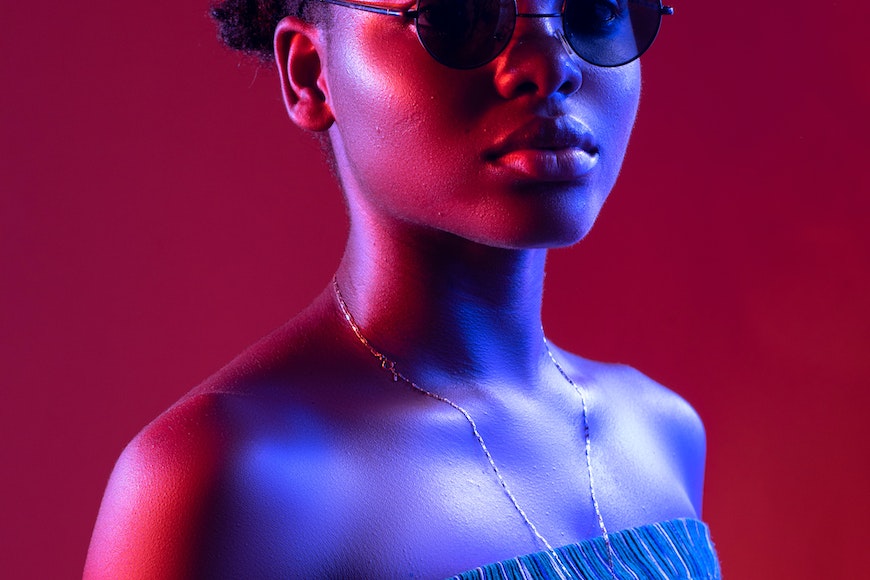
These can come in the form of colored gels (thin sheets of transparent plastic) that can create mood or atmosphere. You might want two flashes with opposite colors to create separation in your image.
A fun experiment is to light a subject with a warm flash color gel (i.e., CTO or orange gel) and a background with a cool gel (i.e., CTB or blue gel).
The eye will be drawn to the warm subject, and the cool backdrop can make the image feel more three-dimensional.
Other fun modifiers to consider are:
- Snoots: dramatically narrows the light to create a spotlight effect
- Grids: narrow the light and keep it from spilling onto other subjects
- Gobos: similar to grids but have creative effects built-in (i.e., window blind effect)
Regarding light modifiers, there is no shortage of options to consider. I’ve tried a number of modifiers over the years, but now I keep things pretty simple and work with only a few basic tools (softboxes, grids, and gels).
If you attempt to modify the light before you fully understand how to control the light, it can get overwhelming. I suggest simple camera settings and accessories until you can master the basics.
Troubleshooting Common Issues with Off-Camera Flash
As you begin to incorporate flash into your images, you’ll likely encounter some common issues.
My first suggestion when troubleshooting is to get everything in manual mode. This will put all the control in your hands and avoid variables constantly changing as the camera adjusts to the scene.
Through the Lens (TTL) mode is great, but it can be wildly variable, making it difficult to nail down exactly what the problem is. The same goes for your ambient exposure. Lock in your settings so you don’t have settings changing without your control.
With everything in manual mode, you can adjust one variable at a time to figure out exactly what the problem is.
Most cameras want to control your settings automatically, but getting things in manually will allow you to troubleshoot challenges more easily.
Some common challenges are listed below, along with suggestions on how to deal with them.
Dealing with Harsh Shadows

Greg Cromie
Harsh shadows occur when your light source is small compared to whatever you photograph (i.e., your subject’s head). The best way to fix this is to make your light source larger.
This could be using an umbrella or softbox and pointing it toward the subject. This could also be bouncing the flash on camera off the white ceiling to provide a much broader source of light. You could also consider feathering the light for smoother transitions.
Dealing with harsh shadows can be done in various ways, and once you begin to understand the characteristics of light, you’ll be able to overcome this challenge quickly.
Avoiding Overexposed Highlights
Nikolo Zi / Nardo
Overexposed highlights are a common problem when first experimenting with flash. It can be easy to throw a flash on your camera and quickly get blown out by bright spots in your image.
The solution is to check your exposure and metering. Make sure that your exposure without the flash is accurate. Then, add the flash and make sure your flash isn’t too bright. If needed, manually decrease the power setting.
One thing that sometimes trips people up is not realizing their camera automatically dropped back down to the flash sync shutter speed.
You might have a correct exposure at 1/2000 shutter speed, but it gets overexposed when you attach the flash because it forces your shutter speed back down to 1/250.
To solve this, I recommend increasing your aperture, decreasing your ISO, or adding an ND filter to reduce the overall exposure. When you look at your histogram, make sure to avoid a large spike on the right side of the chart, which would indicate overexposed highlights.
Reducing Flash Reflections in Glasses
Chidimma Peace
Another common challenge with flash photography is reflections. It can be difficult to avoid having the flash reflect off mirrored or glass surfaces.
To avoid this, you’ll need to adjust your flash angle/position or adjust your composition.
Another option is to use very diffused light and make sure that it won’t hit the reflective surfaces by using a grid.
You can also flag off the light with a large black cloth so it doesn’t hit any reflective surfaces or use any number of other flash diffusers.
This tricky challenge will be easier to overcome as you gain experience and learn how lighting works.
Off-Camera Flash Photography | Final Words
I hope you found this guide helpful and informative. If you have any specific questions or need guidance on this topic, I encourage you to leave a comment below.
Don’t be a natural light photographer forever – get out there and learn to use off-camera flash!


Brenda Bergreen is a photographer, videographer, writer, and storyteller based in Colorado. She specializes in Colorado wedding photography and adventurous storytelling. When she’s not behind the camera or the keyboard, you can find her adventuring with her family.

WELCOME TO SHOTKIT
Enter your email to be sent
today's Welcome Gift:
19 Photography Tools
🔥 Popular NOW:


Shotkit may earn a commission on affiliate links. Learn more.