


How to add Keyframes in Premiere Pro
Learning how to use keyframes effectively in Premiere Pro is an essential skill in your video editing toolkit. Here's how to add them like the professionals.
Premiere Pro | Software | By Ashley Darrow
Getting started with any video edging software can be challenging, but one of the basic skills you should know is how to add keyframes in Premiere Pro.
Keyframes are used to change the value of an effect over time.
Your first keyframe marks where the effect begins, and the second keyframe marks where the effect ends.
Download the latest version of Adobe Premiere Pro to follow along with this simple tutorial.
Start a free 7-day trial today
I’m going to show you how you can create keyframes for video and audio tracks and give you a few tips on how you can make the most out of keyframes in Premiere Pro.
Table of Contents
How to Add Keyframes in Premiere Pro
Keyframes are a vital part of working with any video editing software.
Today, I’ll be walking you through the basics of Premiere Pro by editing some text that I’ve added to a Super 8 film project I’ve been working on.
Step 1—Get Ready to Add Keyframes
Every effect has its own set of parameters that you can adjust with keyframes!
Your first step is going to be to open up the effects control panel. By default, the Effects Controls panel is going to be on the left side of the Premiere Pro workstation.
If your Effects Controls panel isn’t open, you can navigate to the Windows menu and enable Effects Controls.
You’ll see a stopwatch icon next to different parameters of the effect or video you’re adding keyframes to. Each of these covers a different aspect of the image such as rotation, opacity, or anchor points.
I’m going to be using keyframes to adjust the opacity of my text effect.
Before we can start inserting keyframes, you want to make sure that the current time indicator is on the right frame.
Step 2—Set Your Current Time Indicator

The Curren Time Indicators, also known as the playhead, will always lock onto the currently selected frame.
You’ll notice that there are two different current time indicators. The bottom current time indicator allows you to scrub through your entire project while the current time indicator inside of the effect controls panel is where we’ll be setting our keyframes.
The effect I’m editing lasts about 10 seconds so I’m choosing to add my first keyframe at the five-second marker.
Step 3—Add Your First Keyframe

We’re going to start off easy by fading out this title graphic using keyframes.
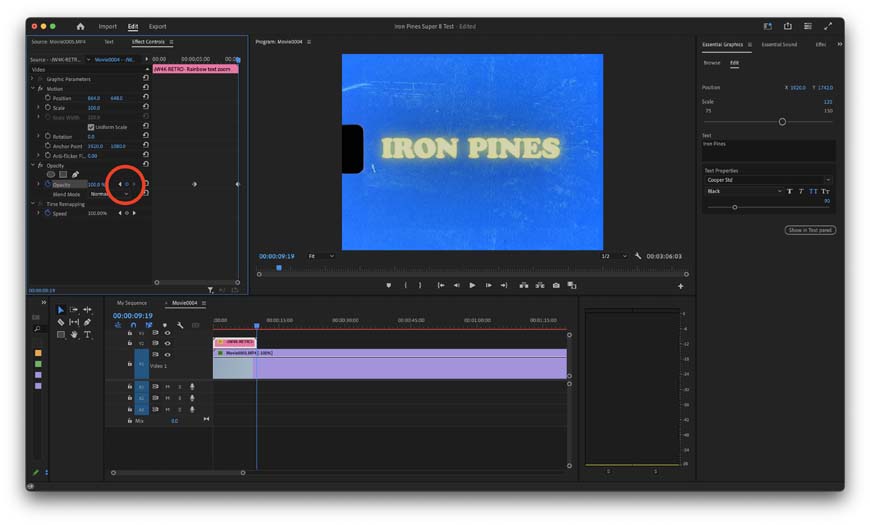
Once you have the playhead right where you want it, all you need to do to insert your first keyframe is to click on the stopwatch icon next to the control that you want to adjust.
Step 4—Add the Second Keyframe
You’ll be using a fistful of keyframes during any project longer than a short form video.
Keyframes are a lot like shoes or glasses, they work best in pairs.
A second key frame will set an endpoint for the effect that you’ll be adjusting.
Clicking on the stopwatch a second time will not add a new keyframe. You need to click on the add/remove keyframe button which looks like a hexagon. This button is just to the right of the stopwatch icon.
The keyframe navigator arrow on either side of the hexagon jumps you back and forth to the nearest keyframes. This saves you time rather than trying to click on existing keyframes.
Step 5—Control Your Effects

Changing the value at either end of two keyframes scales the parameter uniformly between two of them.
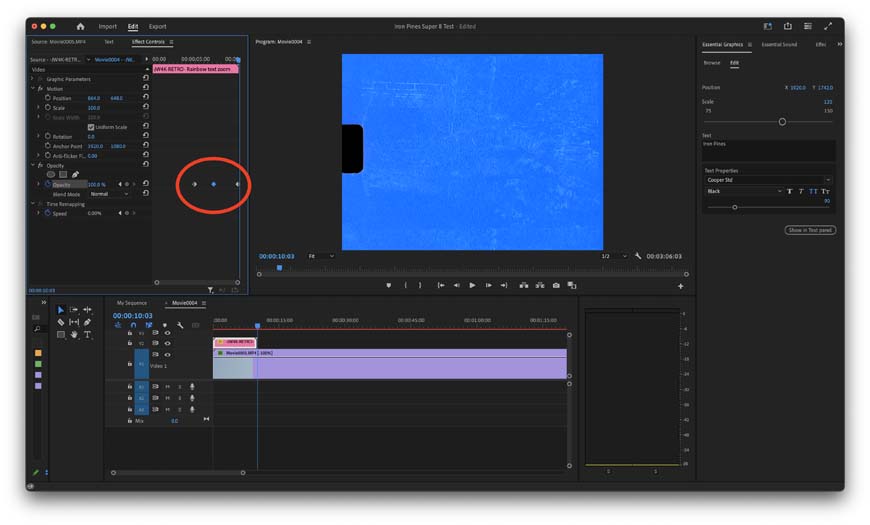
With your second keyframe selected, you want to make a change to the parameters of the effect that editing.
In this case, I’ve dropped the opacity to 0% by the time it reaches the second keyframe. This means that my title graphic will fade from 100% opacity to 0% opacity during the 5 seconds in between each keyframe.
Step 6—Adding One or Multiple Keyframes
For a few keyframes more, you can create some impressive effects!
You can add as many keyframes as you want in a single sequence or throughout your entire project.
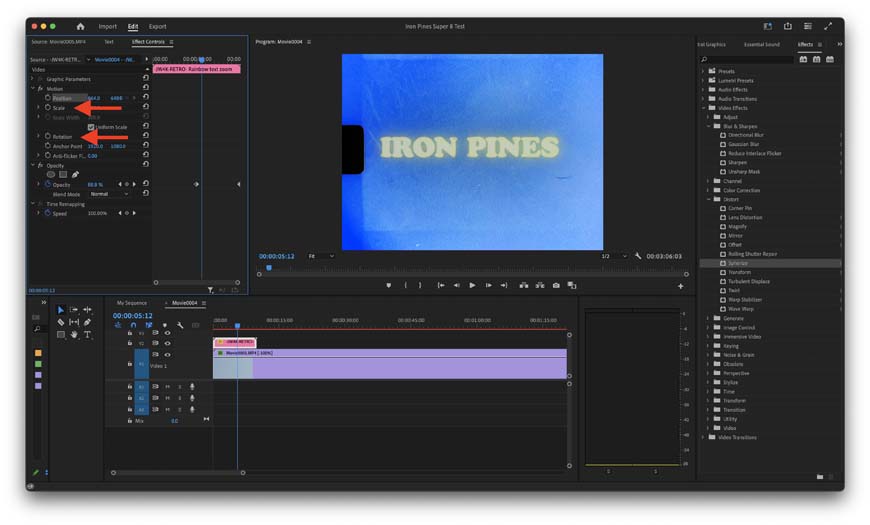
Here I’ve added a third keyframe that will restore my title graphic to 100% opacity.
I don’t think I’ll stick with this one for the final edit, but it is useful to demonstrate the nuanced controls that keyframes give you.
How can Keyframes Help With Video Editing
Keyframes are one of the most important tools in your film editing toolbox.
I’ve shown you the basics of what you can do to fade an object in and out using keyframes, but this is just the tip of the keyframe iceberg.
Move Objects

Slide shapes or even entire clips around the frame with this keyframe control.
One of the best uses for keyframes is to move the position of objects in your video composition over time.
If you’ve ever wondered how to make a graphic slowly slide off frame, for example, the answer is keyframes.
Rotate and Scale Footage
Keyframes can also allow you to rotate and scale video clips.
This doesn’t have to be slow either. You can use keyframes to create dramatic effects that happen quickly on screen just as easily as you could do something a bit more restrained.
Control Effects

These effects unlock entire worlds of video editing magic!
Nearly all of the effects in the essential effects and essential sound windows can be controlled with keyframes.
You can combine these effects to create unique transitions that go beyond what Premiere Pro has stopped by default. you can also use keyframes to gain Precision control over effects so that your footage always looks the way you want it to.
Create Motion Graphics
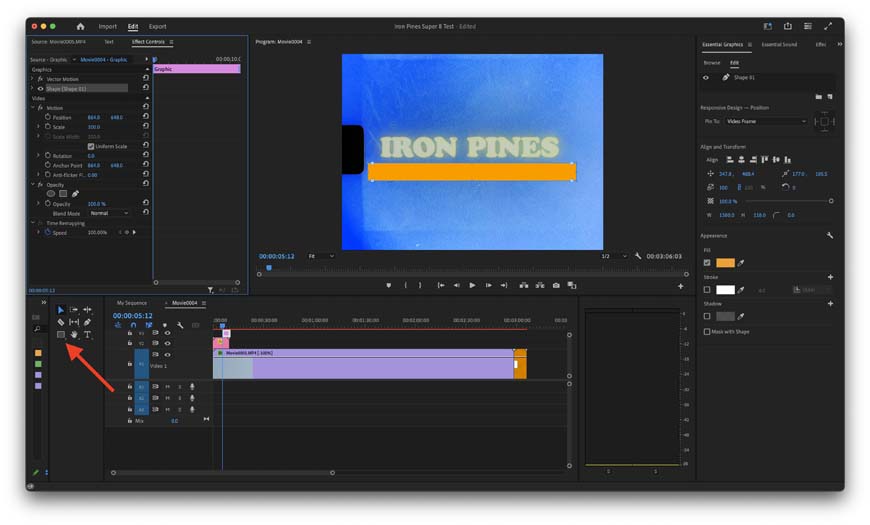
Creating shapes and manipulating them with keyframes is the basics of motion graphics
The topic of keyframes and motion graphics is really more of an After Effects thing, but I’ve definitely had to make do with creating some quick motion graphics and Premiere Pro.
Here I’ve used the create shape tool to make a basic orange rectangle. I can then use keyframes to make this shape look like it grows to its full size before fading away similar to what you would do with proper motion graphics.
This is a simple implementation of what you can do with keyframes. Imagine adding in multiple shapes and then a few audio layers and you can have your title sequences looking like they came right from a newsroom or studio project.
FAQ’S
Why can’t I add a keyframe in Premiere?
You might not be able to add keyframes because your video track is too small which can hide the keyframe buttons, you might also be selecting the wrong track, or your keyframe options have been turned off in the Timeline Display Settings.
What button do I add a keyframe in Premiere?
You can also add keyframes by moving the current time indicator, or playhead, to the frame you want to add a keyframe to, then press the keyboard shortcut Option (Alt on Windows) plus the letter A, P, R, S, or T depending on which type of keyframe you’d like to add.
How do I get the Insert keyframe menu?
Keyframes do not have their own menu in Premiere Pro. Instead, you’ll be able to find the controls for your keyframes inside of the effects control panel.
Wrapping Up Adding Keyframes in Premiere Pro
Knowing how to set keyframes is an essential skill for working with video in Adobe Premiere Pro, but it can also help you out in a variety of other Adobe applications that edit video or animations.
This quick guide gave you everything you need to know to get started with keyframes, but I want to know other Premiere Pro topics you need help with.
Let me know in the comments if you have any questions about keyframes or anything related to working with video in Premiere.
 Best Video Editing Software Tools for Movie Making
 10 Best Video Editing Software Programs for Youtube
 Final Cut Pro vs Adobe Premiere in 2023: Which Video Editor?
 How to zoom in on Premiere Pro (3 Simple Methods)
 How to Buy Adobe Premiere Pro in 2023 (Options for all Budgets)
 10 Best Adobe Premiere Pro Alternatives in 2023 (FREE & Online)

Ashley is a photographer, writer, and film critic. When Ashley’s not writing essays on photography, cinema, and theory, he’s out taking pictures with retro film cameras.

WELCOME TO SHOTKIT
Enter your email to be sent
today's Welcome Gift:
19 Photography Tools
🔥 Popular NOW:


Shotkit may earn a commission on affiliate links. Learn more.