


How to Edit in DaVinci Resolve (Tutorial for Beginners)
Learn all the basics of editing in DaVinci Resolve, so you can start creating professional-looking videos today.
DaVinci Resolve | Software | By Jeff Collier
Learning how to use DaVinci Resolve to edit videos is a great way to put together professional-standard videos with impressive effects and transitions.
Popular among professional editors and hobbyist videographers, it boasts many user-friendly video editing features alongside more advanced processes.
I’ve been using its comprehensive suite of tools to edit compelling content that showcases my filmmaking in the best possible light.
In this DaVinci Resolve tutorial, I’ll walk through everything you need to know, from importing media to exploring the timeline viewer and much more.
Table of Contents
How To Edit in DaVinci Resolve – Everything You Need To Know
DaVinci Resolve makes editing videos intuitive and easy to accomplish thanks to its use of different pages for each stage of the workflow.
Creating a new project, importing and trimming media files, and then adding them to a timeline for transitions, effects, and other features follows a clear structure.
I’ll break down this process in detail and explore everything you need to know to use DaVinci Resolve to create impressive videos.
Create a new project

Before you begin editing, you can alter a broad selection of project settings, including resolution and frame rate.
The first thing you need to do before you can get to work editing your videos is create a new project to work from.
To do this:
- Open DaVinci Resolve.
- Select New Project from the program’s Project Manager screen.
- Click on the cog icon to bring up your Project Settings.
- Set the Timeline Frame Rate of your project to match your footage.
- Ensure the Video Format and Playback Frame Rate settings match the Timeline Frame Rate.
You’re now ready to start importing clips to the media pool and get started editing.
Import your video clips
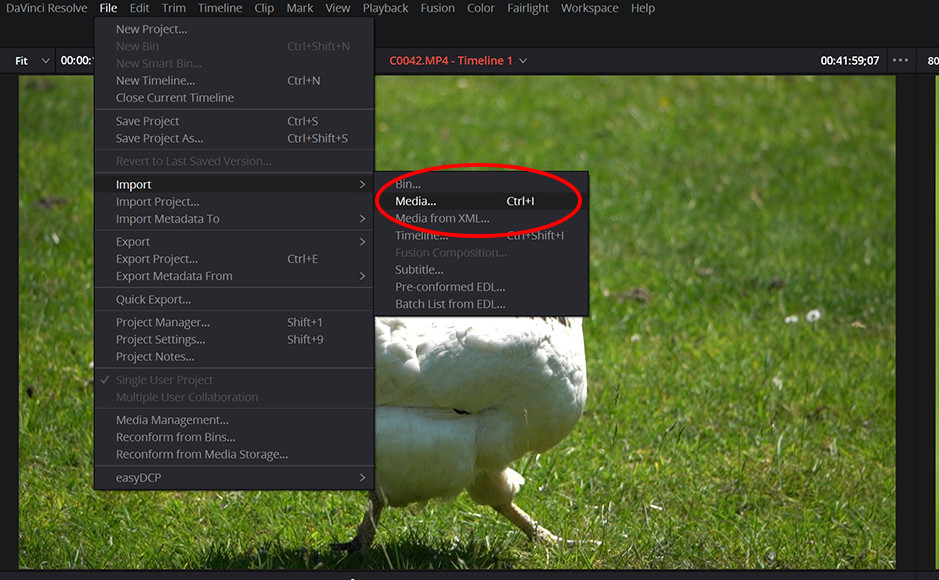
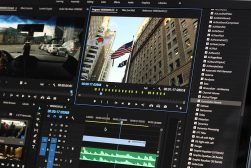
Importing video clips to your project’s media pool can be done from the main menu.
Importing clips into DaVinci Resolve can be achieved in a variety of ways, either using the Media Page or while viewing the Cut Page or Edit Page.
For this tutorial, I’ll show you how to do this on the Edit Page so you can immediately begin trimming the clips ready for editing.
- While on the Edit Page, head up to the main menu and select File > Import > Import Media.
- From the Finder window, head to the folder on your computer where the desired clips are located.
- Select the video files you wish to use in your project and click Import.
Trim the video clips
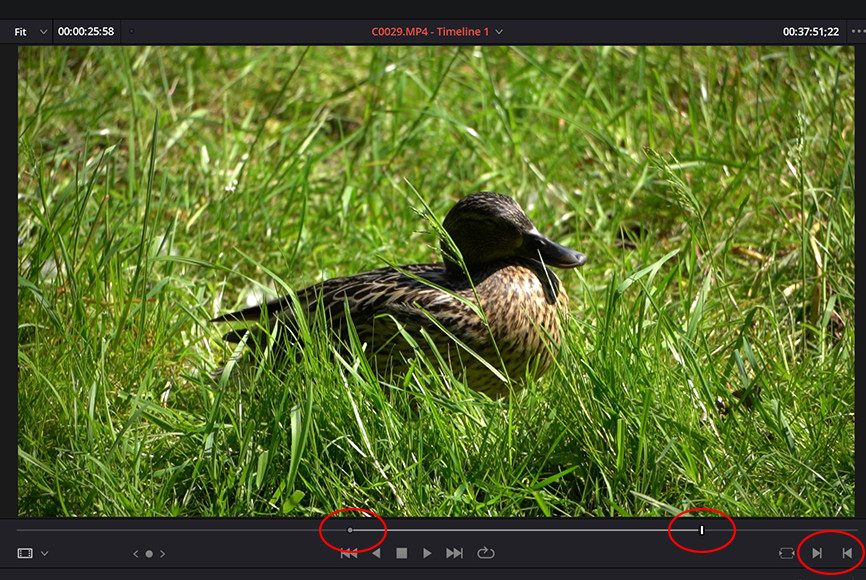
You can trim video clips in DaVinci Resolve by setting in and out points in the preview window.
Once your clips are loaded into your project, you can cut them to remove any unwanted elements from the footage.
To do this:
- In the Edit Page, simply drag the desired clip onto the timeline to view it in the preview window.
- Select the clip in the timeline so it’s displayed in the top left-hand preview window.
- Play the clip in the preview window and locate the position where you want the clip to begin.
- Click on the Mark In icon to set the starting point.
- Continue playing the clip until it reaches the edit point where you want the video clip to end.
- Click on the Mark Out icon to finish adding the in and out points and trim the clip.
You can fine-tune these in and out edit points by using the left and right cursor keys to move through your video tracks frame by frame.
- Related: How to Zoom in DaVinci Resolve
Drag the clips into the Timeline
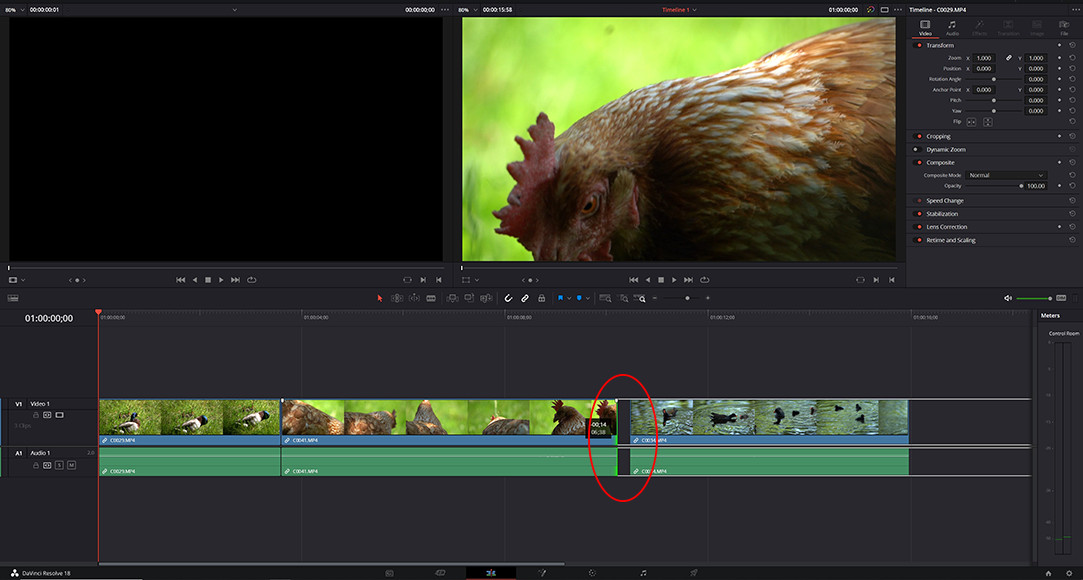
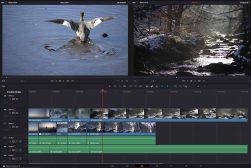
By clicking and dragging at the end of a clip on the timeline, you can quickly make further adjustments.
Once you’ve finished trimming your original videos using the adjustment clip tools, you can start editing multiple clips in your timeline.
This is accomplished by dragging and dropping the clips from the media pool directly onto the timeline in the Edit Page.
You can make further adjustments to any clip in your timeline by doing the following:
- Position the cursor at the beginning or end of the clip in the timeline you wish to expand or reduce.
- Click and hold the mouse button, dragging left or right to alter the clip’s length according to your needs.
- If you shorten a clip, you can drag any adjacent clip to the left or right to fill in the gap.
Include an audio track

Dragging and dropping music onto the timeline is easy, with audio options available in the Inspector panel.
Once you’ve added a selection of clips, you may want to introduce different music to the project.
Adding separate music can also be a great way to help with the editing process by giving you a rhythm and tempo when selecting your cuts.
Introducing music and other sound effects is done in the same way as adding a video track via the edit pages to your media pool.
- Follow the same steps outlined for importing your video footage into the project.
- Drag and drop the audio clip onto the timeline’s Audio channel.
- In the Inspector tools, select Audio and make any necessary adjustments to the track’s volume.
- Select the audio from the other videos and click on the Mute button to cancel out its audio.
You can also view the audio waveforms in the timeline to see how these are affected when changing the volume.
Add titles
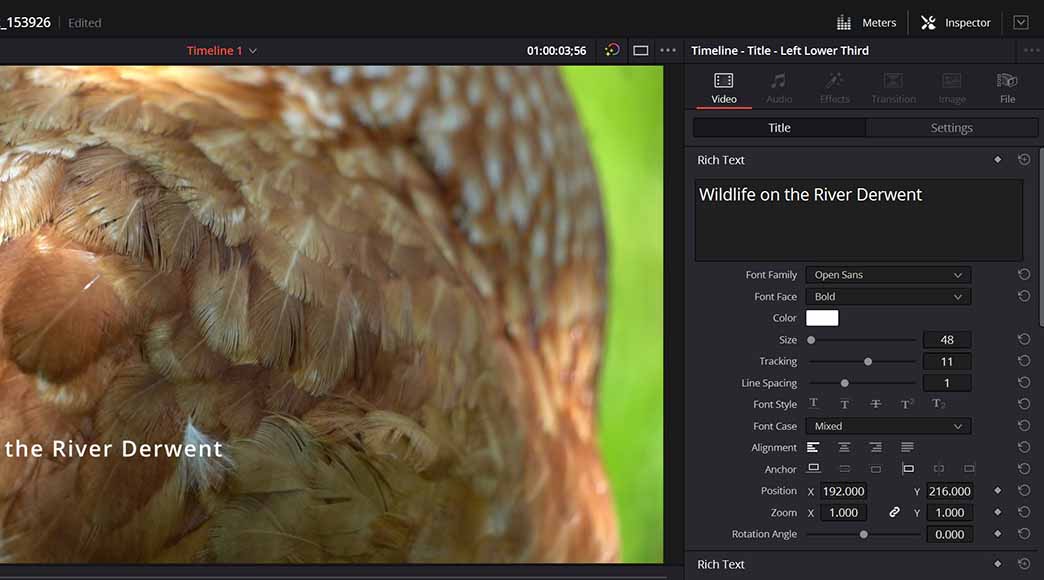
Once you’ve added titles to the timeline, you can adjust their settings in the Inspector panel.
There’s a range of tools available you can use to include titles in your finished video, with many options for special effects such as dynamic lighting.
To add text and titles:
- Head over to the Toolbox and open up the Titles menu.
- Choose the style of the title you wish to apply, and drag this over to the timeline above your clips in a new layer.
- With the title selected in your timeline, open the Inspector and adjust any attributes you wish to change.
- Shorten or lengthen the duration the title remains on screen by clicking and dragging the edges of the title in the timeline.
Add transitions
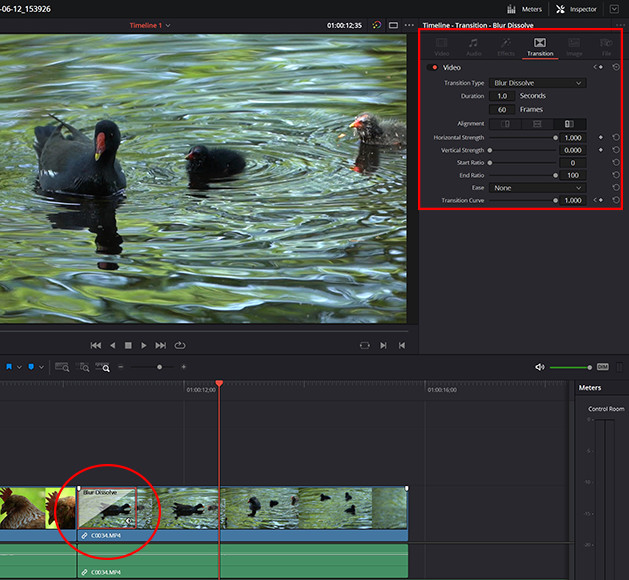
DaVinci Resolve also features a broad selection of transitions you can drag between clips on the timeline.
Video transitions and visual effects are a great way to bring additional interest to your projects, with an extensive effects library available in the free version.
- Select the Transitions Library panel located in the top-left corner of the interface.
- Choose the transition you wish to apply, then click and drag this into position between the two clips you want it to be applied to.
- Select the Transition icon in the timeline and open the Inspector panel.
- Make any necessary adjustments to its duration or alignment in the Inspector panel options.
Adding effects can be accomplished by following the steps above but choosing the Effects Library instead of the Transitions Library in the upper left-hand panel of the interface.
Add to the render queue and export your project
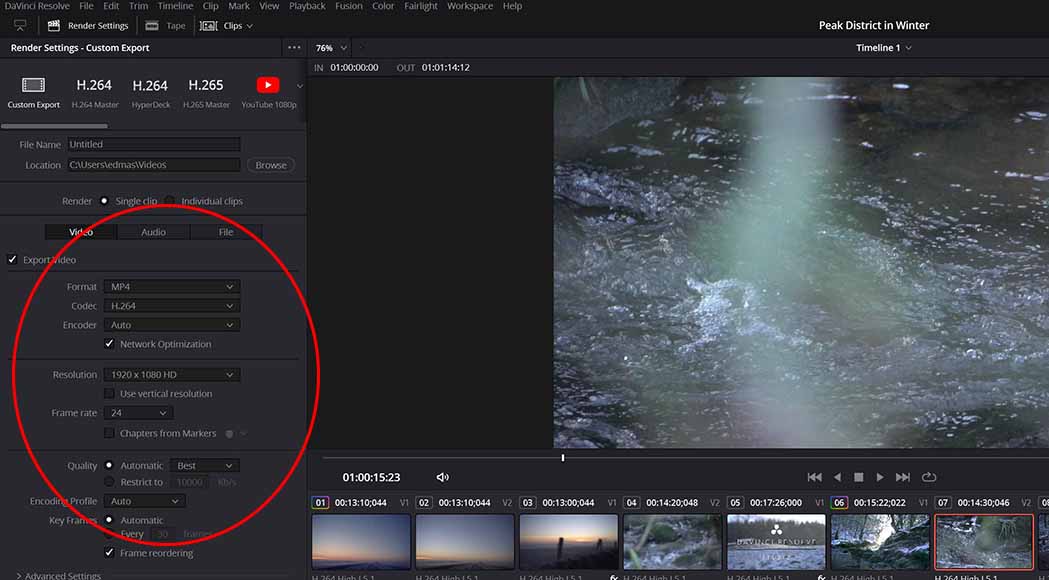
When rendering your final video, you can select from a list of presets or input custom settings.
Once you’ve added visual effects from the effects library, you’re ready to finalize the project and export it ready to upload onto your platform of choice.
To render and export your final video:
- Head over to the Deliver Page in DaVinci Resolve’s user interface.
- Choose the export preset that matches your desired outcome, for example, YouTube 1080p.
- Make any alterations to the settings in Custom Export you need to make, for example, altering the resolution or frame rate.
- Input the file name you wish the video to be exported under and the folder where you’d like it to be saved.
- Click on the Add to Render Queue button.
- Head over to the Render Queue on the right-hand side of the interface and select Render All.
Once the video has been fully rendered, it will be available in your computer’s folder and ready to use.
Is DaVinci Resolve Good for Beginners?
When first loading up the video editing software and viewing the many panels and options available, beginners might initially feel daunted.
DaVinci Resolve is, after all, widely used by professional video editors in the movie industry, with many advanced tools and features.
With that said, beginners who are unfamiliar with video editing can quickly learn the basics when using the software’s basic editing features.
By following online tutorials such as this guide to editing with DaVinci Resolve, they can edit outstanding videos with just a few hours of practice.
Do you need a good PC to run DaVinci Resolve?
DaVinci Resolve delivers a range of powerful editing and color grading tools, and integration of multiple audio tracks in its package that can become processor-intensive.
It is, however, possible to run the software using a computer with a 64-bit processor and an AMD or NVIDIA GPU with just 8 GB of RAM.
As with other professional editing software such as Adobe Premiere Pro, the more powerful your GPU and the more RAM your computer has, the better it will perform.
While a lower-spec PC may suffice for smaller projects, if you’re planning on editing longer videos, you should consider upgrading your computer if necessary.
Do professionals use DaVinci Resolve?
Blackmagic’s DaVinci Resolve and Adobe’s Premiere Pro are two of the main video editing programs used by professional editors in the movie and television industries.
DaVinci Resolve has become increasingly popular among professionals for its full suite of tools, including color correction and color grading, keyframing, and Dolby Atmos audio mixing.
Deadpool 2, Avatar, Pirates of the Caribbean, and Alien: Covenant are just a handful of movies in which DaVinci Resolve was used for post-production.
FAQ’S
How do I edit a clip in DaVinci Resolve?
There are several ways you can quickly edit a specific clip in your project when using DaVinci Resolve.
The quickest way is to select the Razor Blade tool from the icons above the timeline, then use this to cut a clip.
You can also use the Razor Blade tool without the need to select it by using the CRTL + B keyboard shortcut.
Is editing in DaVinci Resolve easy?
With a long list of editing options available, users have plenty of scope for editing their video projects.
While it may appear complicated at first glance, it doesn’t take long to work through the processes and develop a speedy workflow.
There are plenty of informative tutorials and guides you can refer to in order to build up your knowledge and edit amazing content.
Is DaVinci Resolve good for editing?
DaVinci Resolve began life first and foremost as a color grading program before expanding to include the full range of editing tools and features.
As such, it’s an exceptional software for editing capable of delivering professional quality results when used optimally.
How much does DaVinci edit cost?
While alternative video editing programs such as Adobe Premiere Pro are available through a subscription model, DaVinci Resolve comes with a one-time flat fee.
At the time of writing, DaVinci Resolve Studio costs US$295 or GB£245, with a lifetime of software updates included in the price.
 How to Use DaVinci Resolve in 2023: Beginner’s Guide
 How to Color Grade Footage in DaVinci Resolve
 DaVinci Resolve vs Premiere Pro (Key Differences to Know)
 How to Cut a Video in DaVinci Resolve (and Delete)
 10 Best Video Editing Software Programs for Youtube
 How to Render in DaVinci Resolve (+ Best Export Settings)

Jeff Collier is an experienced film photographer who enjoys experimenting with modern digital photography equipment, software and apps. He’s also an ex-world champion triathlete and avid cyclist, clocking hundreds of km each week in the beautiful Tweed Valley of northern NSW, Australia.

WELCOME TO SHOTKIT
Enter your email to be sent
today's Welcome Gift:
19 Photography Tools
🔥 Popular NOW:


Shotkit may earn a commission on affiliate links. Learn more.