


Photoshop AI Generative Fill Tool (Tutorial + Tips)
AI Generative Fill is by far the most exciting update to Photoshop that we've ever seen. Here's how to use it and some examples for your inspiration.
AI | Photoshop | Software | By Judyth Satyn
This guide will help you understand how to use the new Adobe Photoshop AI Generative Fill Tool.
I’ve been playing with it for a week, and am blown away with what it can do!

Download the latest version of Adobe Photoshop to try the magic of Generative Fill today.
Start your free 7-day trial
One thing’s for sure – with Generative AI, image editing will never be the same again…
To use the Generative AI Fill tool, you need a paid subscription to Photoshop, but I’ll show you a way you can try it out for free.
So, let’s take a closer look at the Photoshop Generative Fill tutorial and some examples for your inspiration.
Table of Contents
What is Photoshop AI Generative Fill?
Photoshop AI Generative Fill is a Photoshop AI-powered editing tool capable of generating an object, or background, filling empty space, or removing objects.
This AI photo tool is drastically changing the photo editing world with its capacity for lightening speed edits and designs.
A breakthrough in design and editing as it gives photo editors and designers the option to rapidly create a plethora of new works.
AI Generative Fill will add, extend or remove content based on the text prompts you give.
If you have an image you wish to increase the dimensions of Photoshops AI Generative FIll will detect and gather the surrounding design information needed to extend the background into the empty canvas.
Need to add a cupboard, person, or another object to your image, enter your text prompt and Generative Fill will generate a selection of items for you to choose from.
Thanks to recent updates, Generative Fill also makes Photoshop the best program to restore old photos.
How Do I Access Photoshop Generative Fill?
Adobe AI Generative Fill, currently in beta, is only accessible to paid Photoshop subscribers.
This means you need to have a paid Creative Cloud subscription which includes Adobe Photoshop.
Here are your options:
- Photography Plan (Recommended): includes both Photoshop and Lightroom. This Photography Plan is actually cheaper than subscribing to Photoshop alone and is a good option for photographers.
- All Apps Plan Subscription: includes every Adobe Creative Cloud app.
- Photoshop (only) Plan: I don’t understand why anyone would opt for this, since for less money, you can get the Photography Plan which also includes Lightroom.
- Student and Teacher Discount: If you’re a student or a teacher, you can get a significant discount on Adobe Creative Cloud, which includes Photoshop.
- Business Plans: Adobe offers business plans that include Photoshop, which might be a good option if you’re part of a team that needs access to the software.
You also must be at least 18 years old to access the Adobe AI Generative Fill feature, and not be located in China (Adobe plans to bring the feature to all customers in the second half of 2023.)
Can I use Generative Fill for free?
Even if you don’t have a paid subscription to Photoshop, you can try Generative Fill for free on this website.
Then log in to a free Adobe Firefly account and play around with the Generative Fill tool.
However, if you want to use Generative Fill from within Photoshop, you won’t be able to do this for free – see above for your options.
How Do I Use Adobe Photoshop AI Generative Fill Tool?
Download Photoshop (Beta)
To use Photoshop’s AI Generative FIll you will first need to download and install Photoshop (Beta).
Photoshop (Beta) includes AI options including Generative Fill, if you already have installed this version of Photoshop you can skip this step.
To install head to your Creative Cloud account and in the left-hand side menu of the homepage you will find the Beta Apps button, click on this.
Once clicked a page will open with a list of Beta apps.
Click the Install button beside Photoshop (Beta) and it will begin to install on your desktop.
Once installed open the new version of Photoshop.

Now the design fun begins like magic Generative Fill will follow your text commands to gather information, create, and design to your wishes.
In mere seconds Generative Fill will surprise you with its ability to source an object, create extra or extend the image’s background to your specifics.
Generate an Object
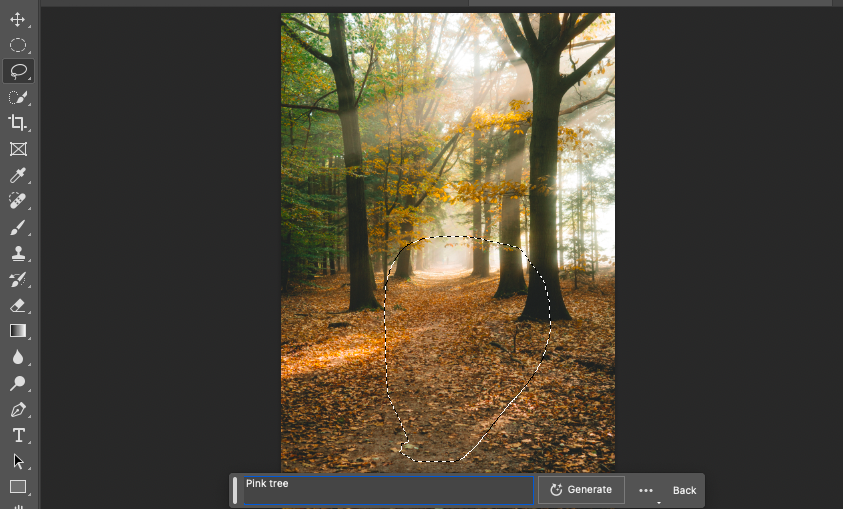
Step 1: Create a Selection
Create an active selection around the area you wish to fill with an object using your choice of selection tool, square, circle, or lasso.
Generative Fill will only work when there is an active selection.
Step 2: Open Generative Fill
The Gerenative Fill button will automatically appear when you have an active selection.
Click the Generative Fill button and a contextual taskbar will appear.
If the button doesn’t appear, you can find the Generative Fill tool by heading to Edit > Generative Fill.
Alternatively, you can use your keyboard and press CTRL while simultaneously right-clicking with your cursor.
Once clicked a drop-down menu will appear, click on the Generative Fill Tool to open the taskbar.
Step 3: Enter a Prompt
Enter a description of the object you would like to have generated in the Generative Fill taskbar.
To effectively communicate with AI it is important to be directive and concise with your text commands
So use descriptive nouns and adjectives such as “Tall Oak” or “Pink Bolder”, instead of loose descriptions such as “fill the background”.
Below in the example image we have entered the text prompt “Pink Tree” to create Generative Fill.
To create a more concise image more adjectives can be entered to help better define the object you desire, such as “Pink Cherry Blossom Tree”.
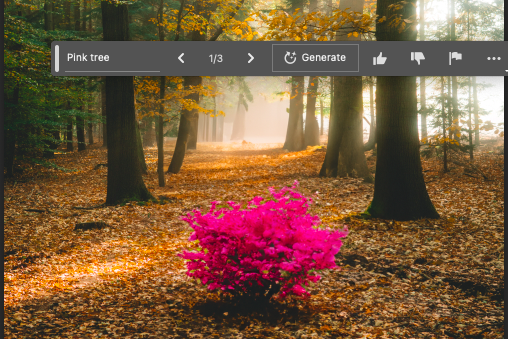
Step 4: Click Generate
When you have entered a text prompt click the Generate button in the taskbar.
In seconds the AI Generative Fill tool will work its magic and devise a design for you based on your text.
When the Generate button is clicked thumbnail previews will be generated in the properties panel based on your text prompt.

You can click on the previews to see which one best fits your image design, alternatively, you can click the arrows in the taskbar and the preview will be displayed in your workspace.
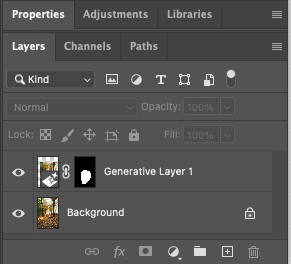
Step 5. Revise and Redefine
Each time a Generative Fill is created a Generative layer will appear in the layers panel.
This layer is separate from the original layer, thus allowing you to revise your AI Generative Fill edits.
At any time when working on the image, you can click on the Generative Fill layer to edit without affecting the original image.
If you are not satisfied with the generated image you have created start again and enter new text prompts.
Each time you wish to re-edit you can change your text command to create a new AI fill, you only need to envision dictate and AI will obediently create.
For example, if the pink tree created by AI fill is too small for your purposes you can add “large” or “tall” as a new adjective.
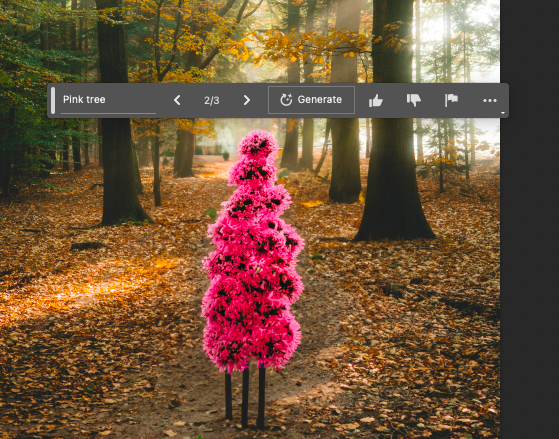
Beside the Generative Fill taskbar is the option to rate the resulting design, click the thumbs up or down to send your feedback.
Generate Background
Step 1: Create a Selection
As in the steps above you will need to create a selection of the area you wish to fill with AI Generative Fill.
Select your subject by heading to the top menu bar here choose Select > Subject, then reverse the selection by clicking Select > Inverse.
Alternatively, use the magic wand or lasso tool to select the fill area.
Once you have an active selection you can follow the same steps 2-5 above for generating an object.
Generate Extended Background
Generative Fill can create a new background to fill empty canvas space by detecting information in the available background and simulating it.
If you have an image and you wish to extend the background you will first need to increase the canvas size.
Step 1: Create Extra Canvas Space
To create extra canvas select the Crop tool from the toolbar.
Extend the bounding borders of the canvas by dragging Crop tool into the empty workspace around your image.
When you have created extra canvas space click Enter.
Step 2. Create Selection
Create an active selection of the new canvas space using the Marquee tool.
Step 3. Open Generative Fill
The Gerenative Fill button will automatically appear when there is an active selection.
Click the Generative Fill button to open the contextual taskbar.
Step 4. Click Generate
When you do NOT enter a text command in the Generative Fill taskbar the AI Generative Fill tool will make a calculation to fill and design the new background based on the surrounding information.
So instead of entering a text command leave this space empty and click the Generate button.
Once clicked AI will create the extra background to replicate the existing background.
Now you know all you need to generate an abundance of spectacular new works, essentially you are still the boss so let AI know what you want.
Adobe Photoshop Generative Fill Examples
Generative Fill is revolutionizing photo editing don’t get left behind, jump on board and see where it takes your design practice.
Below are some before and after images to demonstrate what Photoshop’s Generative Fill tool is capable of.
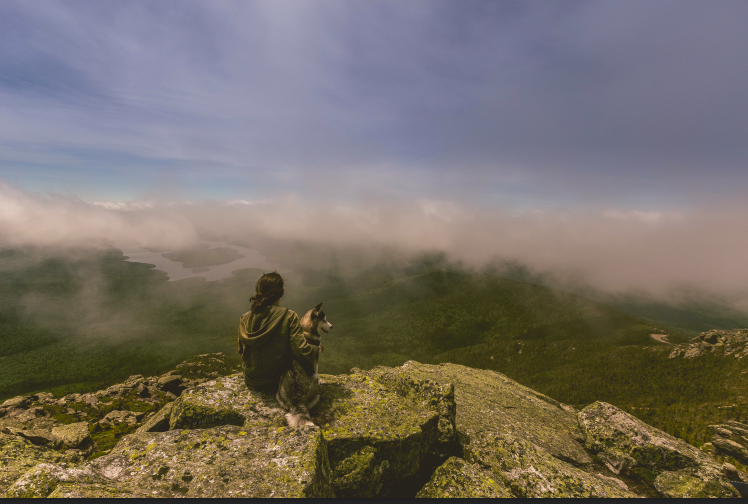
A selection was made of the above background and the text prompt “Vivid Sunset” was given.

The Generative Fill tool created the above background fill of a sunset, including landscape and ocean.
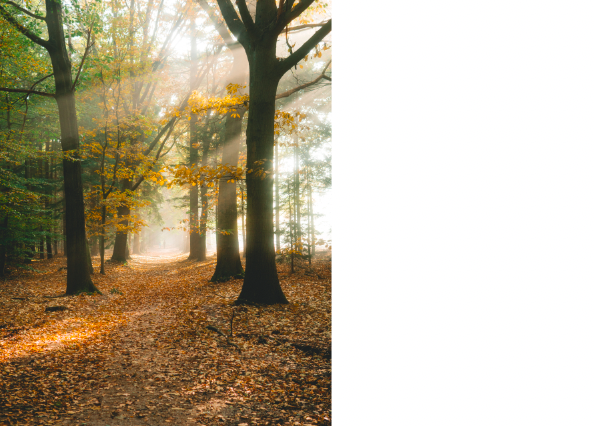
Some extra canvas was created to the right of the image above and the Generate button was clicked when the text prompt box was empty.
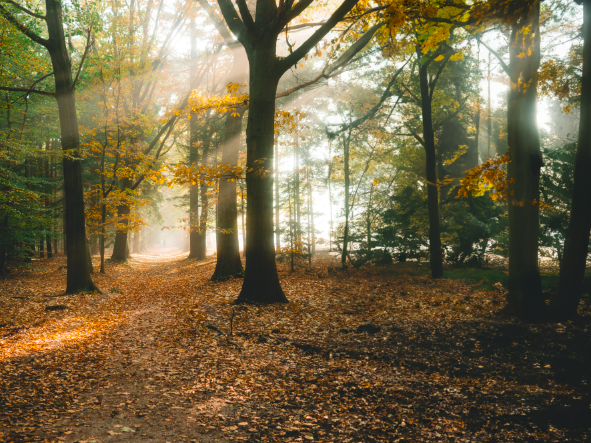
Photoshops Generative Fill tool created forest and ground based on the surrounding information to create an incredibly realistic scene.
What are the limitations of the Photoshops AI Generative Fill, why not test it out and see?
Adobe Generative Fill FAQs
What version of Photoshop will have Generative Fill?
Photoshop (Beta) is the Photoshop version that includes the new AI Generative Fill tool.
How can I download Adobe Photoshop Generative Fill?
You won’t be able to download the Adobe Photoshop Generative Fill tool as a separate tool.
To download the Adobe Photoshop Generative Fill tool you will need to download the latest version of Photoshop, Photoshop (Beta).
The Generative Fill tool will be included with the new version of Photoshop.
Generative Fill isn’t showing in Photoshop – How can I fix it?
First, make sure you are online, the Generative Fill tool only works when you are online.
Another reason why the Generative Fill tool might not be showing in Photoshop is because the layer is locked, unlock the layer and you should be set to go.
Likewise, it won’t be possible to access the Generative Fill tool if the layer is a smart object or an adjustment layer.
And finally, is your selection active? You must have an active selection to prompt the Generative Fill tool into action.
 Photoshop AI Generative Expand Tool (Tutorial & Tips)
 How To Use Content Aware Fill In Photoshop
 What’s The Best Way to Buy Photoshop in 2023? (Price Guide)
 How to Wrap Text in Photoshop (Three Different Ways)
 67 Best Photography Books of 2023 for All Levels
 33 Most Famous Film Photographers in 2023

Judyth is an experienced studio photographer and glass artist. When she isn’t Photoshopping comedians into the bellies of sharks, you can find her cooking delicious treats for her guests.

WELCOME TO SHOTKIT
Enter your email to be sent
today's Welcome Gift:
19 Photography Tools
🔥 Popular NOW:


Shotkit may earn a commission on affiliate links. Learn more.