


How to Focus Stack in Photoshop (Simplest Way)
If you want to achieve the greatest possible depth of field with digital photography, you'll need to focus stack your images. Here's how to do it in Photoshop.
Photoshop | Software | By Ana Mireles
Do you want to learn how to focus stack in Photoshop?
In this article, I will show you the simplest way to do focus stacking in Photoshop once you have all your bracketed images.
I’ll also give you some alternative methods, including other recommended focus-stacking software you can use.
So, if you already have the multiple photos required for the focus stacking technique – let’s get started.
How to Focus Stack in Photoshop | Summary
- In Photoshop, go to File > Scripts > ‘Load Files into Stack’ to load your bracketed images.
- Select all layers and apply Edit > Auto-Align Layers > Auto.
- Apply Edit > Auto-Blend Layers > Stack Images.
- Perform any final edits then save your final stacked image.
Table of Contents
Simple Focus Stacking in Adobe Photoshop | Steps
Step 1: Edit one of the photos
Once you did the multiple shots required to do a focus stacked photograph, you need to process them. You could do this with any photo editing software. I recommend using Lightroom because batch editing is easier.
It also has a feature that connects with Photoshop focus stacking, but I’m getting ahead of myself. Let’s start by importing all the images into Lightroom.
Now, select one image and move on to the Develop module to edit it. It doesn’t matter if you’re working with raw files – Lightroom lets you edit them in the same way.
So, apply the global edits you want on your photo. You can adjust exposure and color, correct lens distortion and chromatic aberration, etc.
Step 2: Sync the edits on the stack images
To do focus stacking, it’s important that all your images have the same edits, just as they needed the same composition and the same camera settings.
This is very easy to do in Lightroom, and that’s why I like to use it to edit my photos in it when I’m doing a focus stacked image.
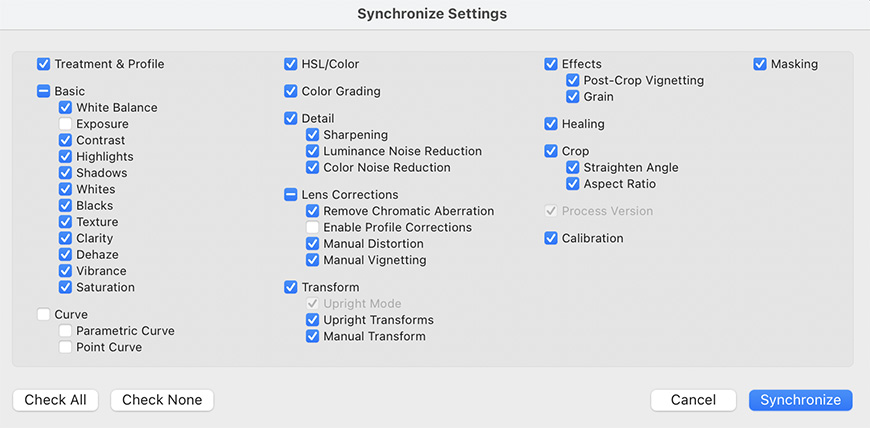
To achieve this, all you need to do is sync the edits of the photo you just did, with all the photos. To do so, select all the stack images by clicking on the first image, then press the Shift key and click on the final image.
Next, right-click on any of the selected images and select Sync on the pop-up menu. This will launch a dialog box.
Here, choose to select all – or check all the boxes manually and click on Synchronize. That’s it, all your images will have the same adjustments and they’ll be ready for focus stacking.
Step 3: Open images in Photoshop
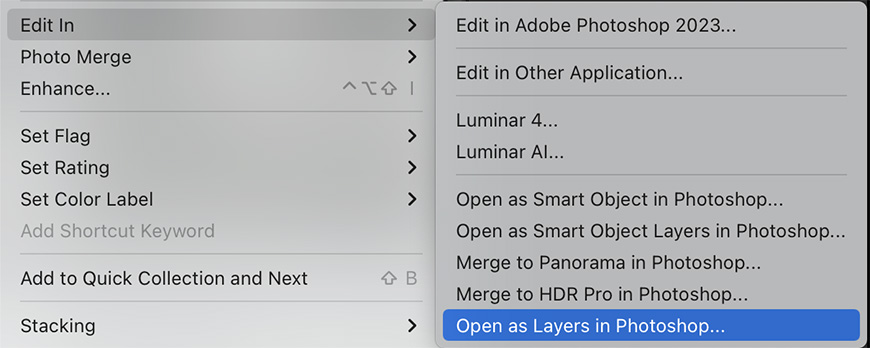
To do focus stacking in Photoshop, you need to open the stack images in the same document. Lightroom has an option that allows you to do this automatically.
While the multiple images are still selected from the previous step, right-click any of them. This will open a pop-up menu. Here, select Edit in > Open as layers in Photoshop. You can also find this option in the Edit menu.
This will launch Photoshop and load the files in the same document.
However, if you prepared your stack images in a different photo editing program, here’s what you need to do.
Launch Photoshop. Then, go to the Files menu and select Script > Load Files into Stack.
Step 4: Auto-Align Layers
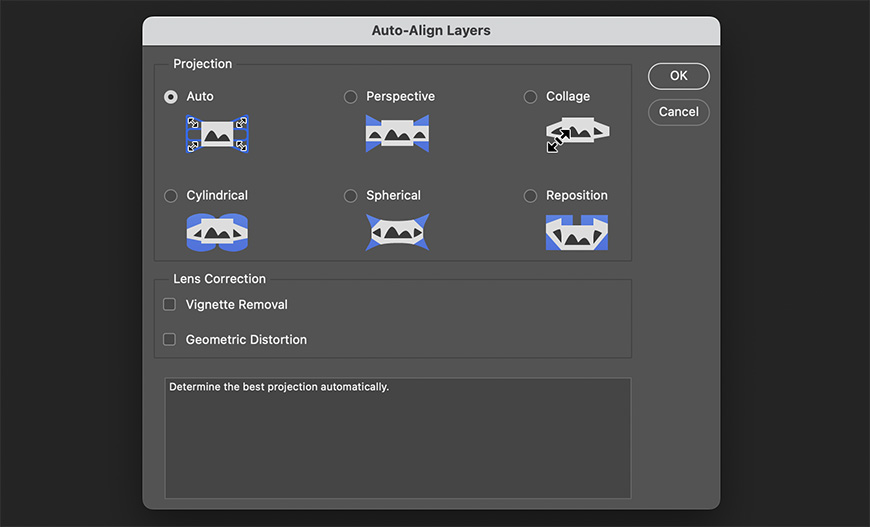
This is a key step to creating a perfect focus-stacked image. Even if you shoot with a tripod and you didn’t change the framing or your position, your images aren’t exactly the same.
As you change the focal plane, you’ll get something called focus breathing. This is an optical effect that changes the focal length as you change focal planes.
This is a common issue that happens with prime and zoom lenses. It’s usually not a problem, but when you’re doing focus stacking – you need to deal with it.
When you’re sending the focus stack images from Lightroom to Photoshop, this is what you need to do. Go to the Layers panel and select all your layers. Then, go to Edit > Auto-Align Layers.
If you are opening your layers directly in Photoshop using the Script ‘Load Files into Stack’, then you need to check the ‘Attempt to Automatically Align Source Images’ box when you select the files you want to stack.
Step 5: Make a copy (optional)
This step is completely optional, but I really recommend it. Sometimes, when Photoshop does its focus-blending magic, it can make mistakes when picking which areas to pick from each layer.
This may be difficult to correct – especially if you have many layers. So, it’s easier to have a copy of the perfectly aligned images before you apply focus stacking.
So, select all the layers and drag them to the New Layer icon at the bottom of the panel. This will create a duplicate.
Now, you can put each set in a different group. To do so, select one of the sets and click on the folder icon at the bottom of the panel. Alternatively, use the keyword shortcut Ctrl or Cmd + G.
Repeat the process with the other set. You can rename the sets to keep your panel organized.
Step 6: Apply Focus Stacking
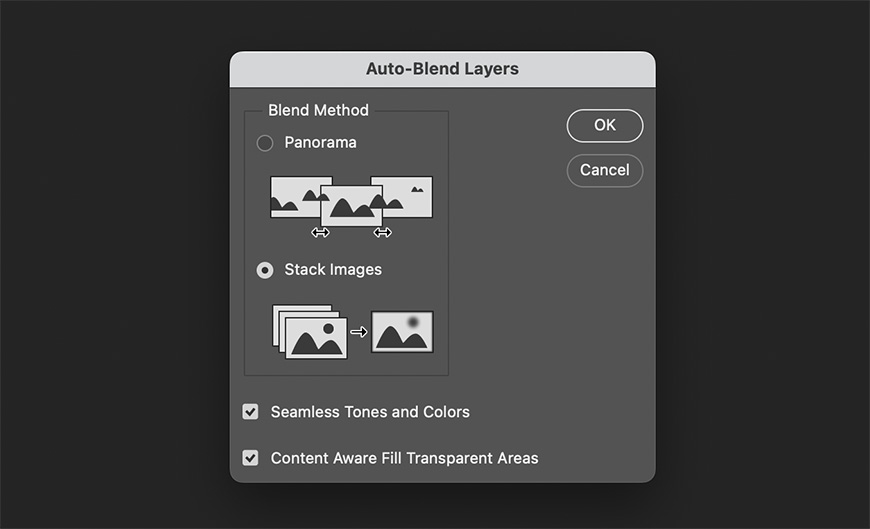
Open one of the folders you’ve created, and select the layers in it. Now, go to Edit and select Auto-Blend Layers.
Photoshop should recognize that you’re creating a stack and not a panorama. So, by default, this choice will be already selected. However, if it’s not, select Stack in the dialog box.
I usually leave the default settings as they are because it’s given me the best results. This means that the ‘Seamless Tones and Colors’, as well as the ‘Content Aware Fill Transparent Areas’ features are enabled.
You can try it this way and only if you’re having problems you can re-do the process and disable them. If you don’t use the Content-Aware Fill Transparent Areas, you can use the Crop tool to crop them out at the end.
However, this means that the final focus-stacked image will be slightly smaller.
Step 7: Retouch the focus stacked image
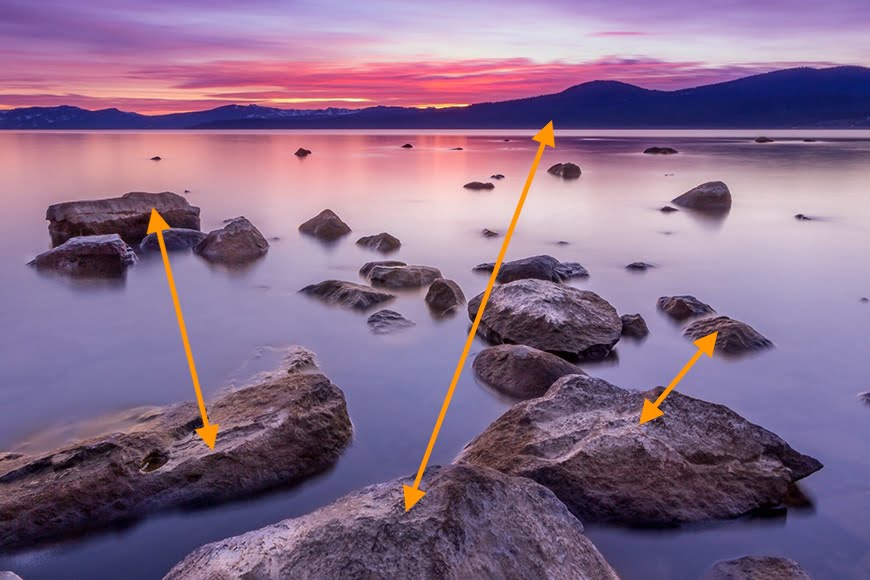
At this point, you should be seeing an image where the entire subject or scene is in focus. Make sure you analyse it closely because Photoshop can make mistakes.
Zoom into your photo and move around, it should be an entirely sharp image. If you find that something isn’t sharp, identify which layer has the correct focus point for that area.
Then, modify the layer masks to reveal the layer where the area is in focus. To modify the layer masks, you can use the brush tool and toggle between black and white.
Remember that everything in white will be visible. Instead, what’s black will be hidden. If you’re working with two or three images this should be an easy process.
However, if you’re working with many images you have to carefully look through all the layers that are on top of the one you need to reveal.
This step might be time-consuming. Sometimes it’s easier to give it another go. This is why it’s important having a copy of the images after you automatically align the images.
Step 8: Create a single image
Once everything looks in focus, you’re seeing a perfectly sharp image. However, you know that in reality, they are multiple images.
To save it as a single photo, there are a few options depending on whether or not you want to keep the layered document for further adjustments.
If you’re not interested in saving the separate layers, you can go to the menu Layer > Flatten Image. You should do this only if you’re sure you don’t want to access the focus stack images and their masks separately.
Once you do this, the file size will be much smaller, making it easier to handle or share. You’ll also be able to save it as a JPEG file or any other format you want.
However, if you want to keep the separate layers, save the document as a PDF file. Then, flatten the image and save it with a different name or a different file format.
Make sure you use the Save As command and not Save. Otherwise, you’ll overwrite the original with the flattened version.
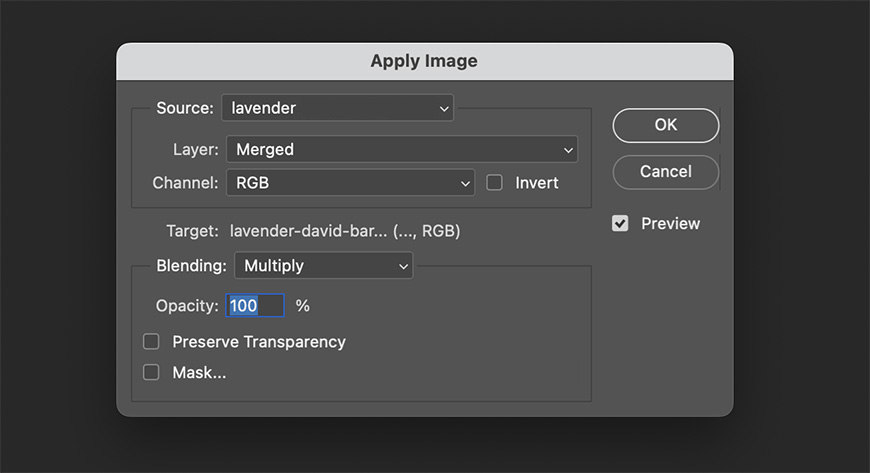
Alternatively, you can add a new layer on top. Then, go to the menu Image > Apply Image. On the pop-up dialog box, make sure that the Layer is set as Merged and the Blending mode is Multiply.
These should be the default settings, but they may be different if you used this feature before for a different edit.
Once they are correct, click OK. Now, the top layer will be a single sharp image that merged all the layers underneath.
Now you can copy and paste this layer anywhere you want.
Can you Focus Stack Without Photoshop?
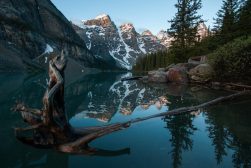
Focus Stacking allows objects in the foreground, middle-ground and background to remain in focus. Credit: Rodrigo Soares
There are two main ways to focus stack without Photoshop.
The first is to do it ‘in-camera’, by using a camera that has a built-in focus stacking feature. Not every camera offers this possibility. Some of them only have the focus bracketing feature, and others have none at all.
The second is to choose from one of the best focus stacking software apps available in 2023.
One of the most recent ones that do as good a job as Photoshop for focus stacking images is Luminar Neo and its Focus Stacking extension.
One final option is to manually focus the stack, like in the video below:
This is particularly helpful when there’s movement in your landscape photos, like flowing water or trees in the wind.
You need to edit and synchronize the images from the focus stack using Lightroom – just as explained in the first method.
Then send them to Photoshop using the Edit In command. So far nothing has changed from the previously explained technique.
Now that you have all the photos as layers in Photoshop, make sure the layer at the top is the one with the focal point in the background.
The image with the focus on the foreground should be at the bottom, and the layers in between should be organized in the order they were taken. This way, it will be easier for you to work with them.
Now, automatically align source images as explained before. Here’s where the technique is different because you won’t use the automatic focus stacking feature. Instead, you’ll do it manually.
Start with the background layer. Add a layer mask using the button on the bottom of the Layers panel. By default, the mask is white. This means that nothing has changed yet.
So, grab the Photoshop Brush tool and set the color to black – make sure the edges of the brush are very soft and change the brush size to suit. Now, start painting the foreground and middle ground to hide the parts of this layer that are out of focus.
Repeat this process on each of the other layers hiding the blurry areas and revealing the ones that are sharp. Remember that using layer masks, white reveals and black conceals.
Review the image and if you find something blurred, find the layer where it is sharp and fine-tune the masks to reveal the sharpness.
 Best Focus Stacking Software in 2023 for Ultra Sharp Images
 Focus Stacking: Technique, Examples & Best Settings
 Guide To Focus Stacking In Lightroom
 12 Best Adobe Lightroom Alternatives in 2023 [User Tested]
 How to Use the Clipping Mask in Photoshop (Complete Guide)
 How to Merge / Blend Two Images in Photoshop

Ana Mireles is a Mexican researcher that specializes in photography and communications for the arts and culture sector.

WELCOME TO SHOTKIT
Enter your email to be sent
today's Welcome Gift:
19 Photography Tools
🔥 Popular NOW:


Shotkit may earn a commission on affiliate links. Learn more.