


How to Color Grade Footage in DaVinci Resolve
Learning how to color grade and color correct your movie footage is essential for any level of film maker. Here's how to do it with DaVinci Resolve.
DaVinci Resolve | Software | By Andrew Dilks
If you’ve ever wondered how movies achieve that cinematic look, understanding color grading will give you the answer you’re looking for.
Learning how to colour in DaVinci Resolve will allow you to create visually arresting footage in your post-production workflow.
I’ve used DaVinci Resolve to correct and grade videos to give them a gorgeous color boost – here’s how you can do this yourself.
Table of Contents
How to color in DaVinci Resolve – everything you need to know
DaVinci Resolve began life first and foremost as a color correction and color grading tool, and it shows in the comprehensive features it delivers.
While color correction and grading can seem daunting, there are several basic steps you can follow that don’t require in-depth knowledge of advanced tools.
Let’s get started with the basic project settings and the steps you can follow to correct and grade your footage in DaVinci Resolve.
Check Colour Management in your Project Settings
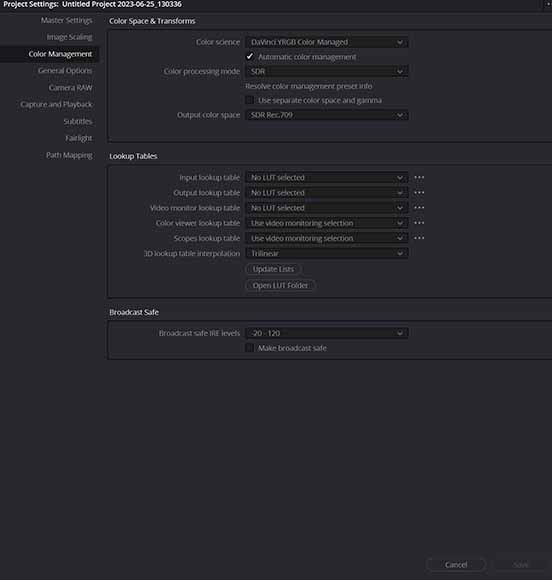
DaVinci Resolve offers a wealth of options to control how colours are managed and exported
Before you begin performing basic color correction to your project, you can make alterations to your project settings.
These settings allow you to alter a variety of settings that will affect how DaVinci Resolve processes your footage.
To check your settings before you edit:
- Click on the gear icon to bring up the Project Settings menu.
- Select Color Management to view the color setting menu.
- Choose the Color Science option you wish to apply to your project.
- Change the Color Processing Mode to the relevant option.
- Make any changes to the Output Color Space you want your project to export as.
If you’re new to DaVinci Resolve, it’s recommended that you leave each of these settings as their default.
Import your video clips and view them on the Color Page
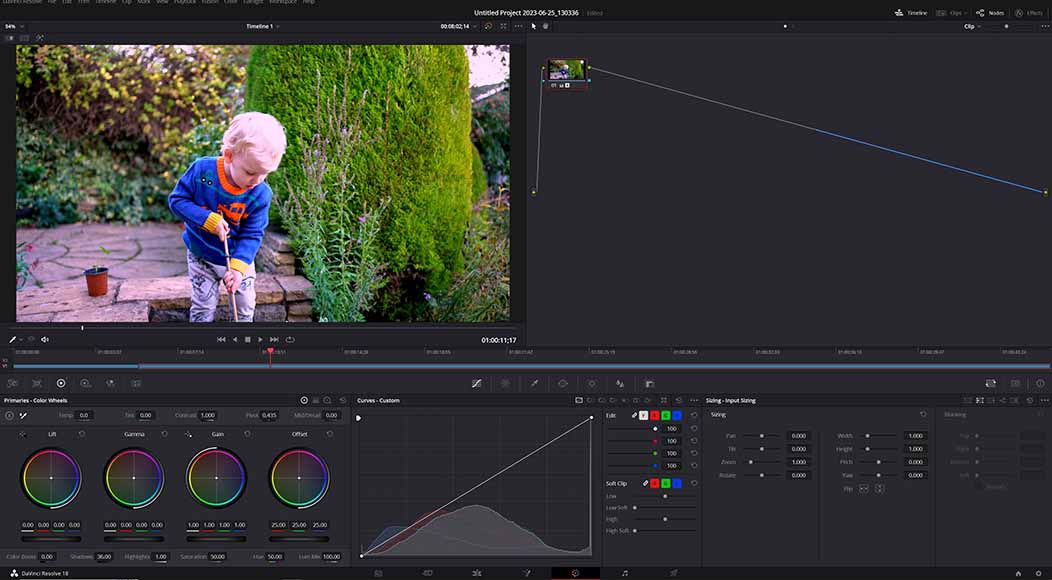
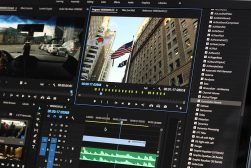
All colour correction and grading is performed on DaVinci Resolve’s Colour Page
With your settings adjusted to your liking, you can now import your raw file into DaVinci Resolve, ready for color correction and grading.
Import your clips into the software, then once you’ve made any necessary trims and edits, head over to the Color Page.
This is where you’ll perform all the correction and grading processes on your footage using the primary tools and other tools for altering color values.
You can check any changes you’ve made in the main Viewer display, which shows the video clip you’re working on.
The Viewer display functions in the same way as the Edit Page, so you can use this to scrub through your clips as you work on color correction and grading.
Make adjustments with the Primary Wheel
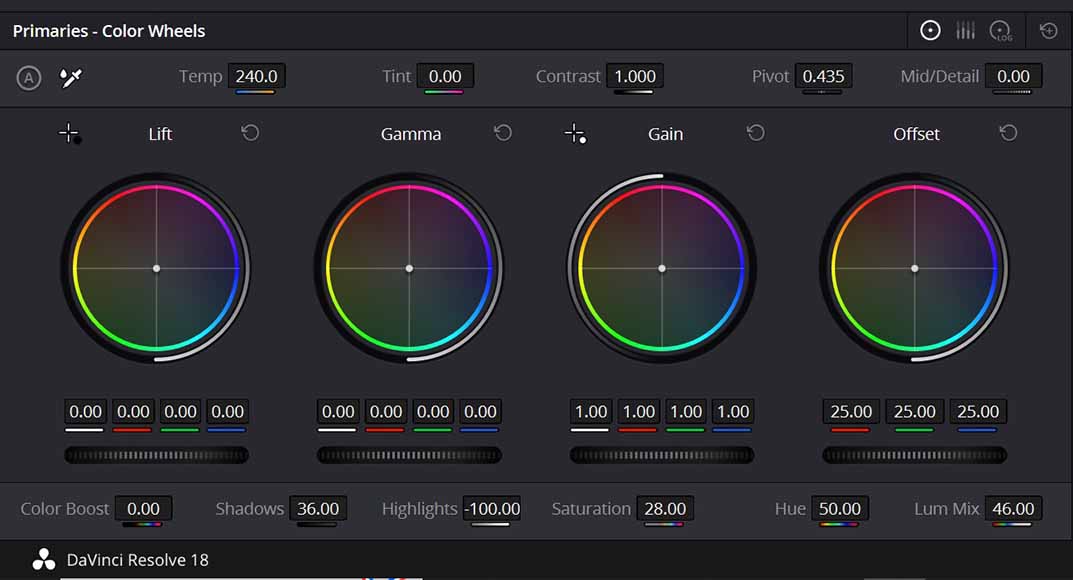
Basic colour correction adjustments are performed using the Primary Colour Wheel feature
Basic color correction and grading in DaVinci Resolve are accomplished using the Primary Wheel, which is located in the bottom left of the Color Page screen.
Here, you can make alterations to affect the entire image, adjusting brightness and color levels and tweaking the tonal range of your video.
These are broken down into the following categories:
- Lift. Use this to alter the intensity of your shadows.
- Gamma. This wheel changes your mid-tones.
- Gain. Use the Gain wheel to adjust the intensity of highlights.
Additional primary correction adjustment controls can be used to alter:
- Contrast. Enhance or diminish the light and dark areas of your image with contrast controls.
- Hue. Transform the colors in your footage using this tool.
- Shadows. Adjust the brightness and contrast of the dark portions of your video footage.
- Saturation. Use this to increase the vibrancy of your overall colors or remove saturation entirely to make your footage black and white.
- White balance. The white balance setting will help render whites accurately and remove any unwanted tints.
- Highlights. Use this to change the brightness and contrast of the bright areas of your footage.
- Color boost. This will compensate for low saturation and increase color for a more natural aesthetic.
Once you’ve made these basic color correction adjustments
Experiment with creative Look-Up Tables (LUTS)
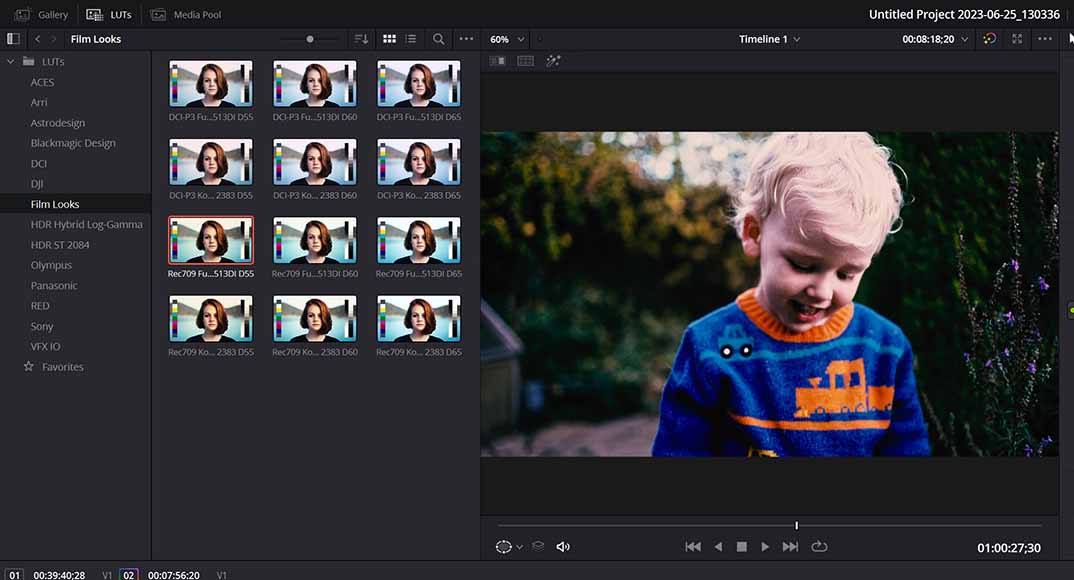
You can instantly give footage a cinematic look using the Look-Up Tables included in DaVinci Resolve
DaVinci Resolve also offers a selection of Look-Up Tables (LUTs), which you can apply to your footage to give it a specific visual style.
The LUTs Window can be viewed by clicking on LUTs in the top left-hand corner of the interface and will list a selection of LUTs for you to choose from.
There are lots of great presets available through DaVinci Resolve that can be applied to give your footage a cinematic feel.
These range from LUTs for specific camera models, such as Arri, Panasonic, and Red, to LUTs oriented around Film Looks.
To use one, simply double-click on a particular LUT, and the settings will be automatically applied to your footage.
There are also plenty of plugins for DaVinci Resolve you can download and integrate to expand the options you have when using LUTs.
Using the Node Editor for colour grading
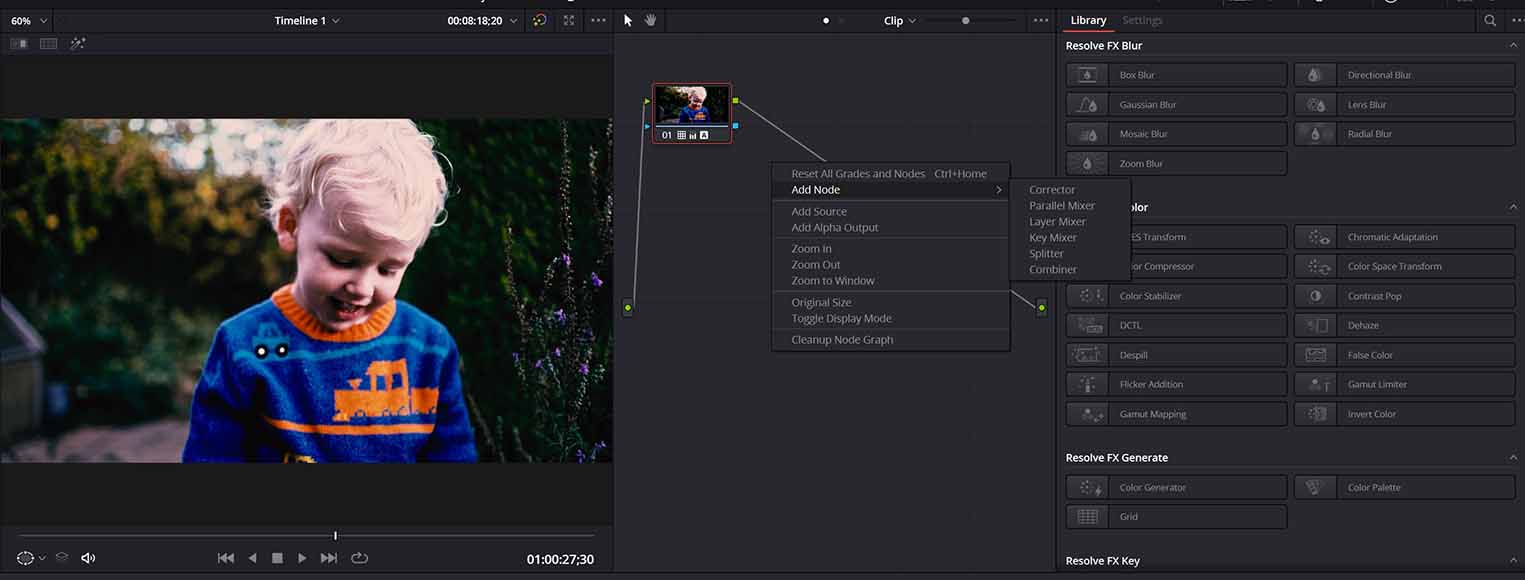
Adding new nodes in DaVinci Resolve allows you to layer grading throughout your footage
When color correcting and grading in DaVinci Resolve, you can add a new node to expand the range of alterations you make to your footage.
The Node Editor is available on the right-hand side of the Viewer, with each new node added by right-clicking and selecting Add Node.
When you add a new node, you can use it to isolate a specific element of your video footage, for example, to alter the sky or background elements.
You can also use parallel nodes to apply overlapping corrections, which combine the outputs of each parallel node into a single output.
Alternatively, a layer node will allow you to combine more corrections simultaneously while prioritizing the image with the lowest output.
Using nodes has a relatively steep learning curve, so if you’re new to the process, begin by making smaller alterations to get a feel for how they work.
Mastering this technique allows you to make changes to specific areas without accidentally applying them across multiple clips.
You can also use nodes to add effects to your footage, for example, blurring the subject or background elements.
Secondary color correction and grading using masks with Power Windows
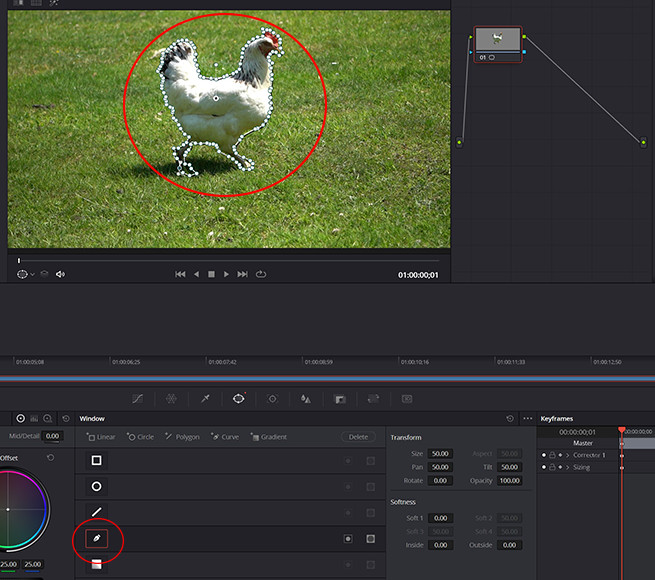
Using the various mask tools in Power Windows allows for grading of specific objects within the frame
Using DaVinci Resolve’s masking tools and Power Windows allows you to make specific grading alterations to objects within a scene.
The Power Window, located directly beneath the Viewer, includes a range of geometric shape tools you can use to select these objects.
These include:
- Linear
- Circle
- Polygon
- Curve
- Gradient
You can create a mask around a specific object in your footage by choosing the relevant mask tool and outlining the object in the Viewer window.
Within the Viewer, you can manually adjust the shape to rotate, pan, adjust the size, and soften the edges until it matches the object precisely.
Once this is done, changes in the color wheels and other correction and grading elements can be applied to the specific area.
You can also invert the masked area, for example, if you wish to grade only the area surrounding a given object.
Monitor changes in the Scopes panel
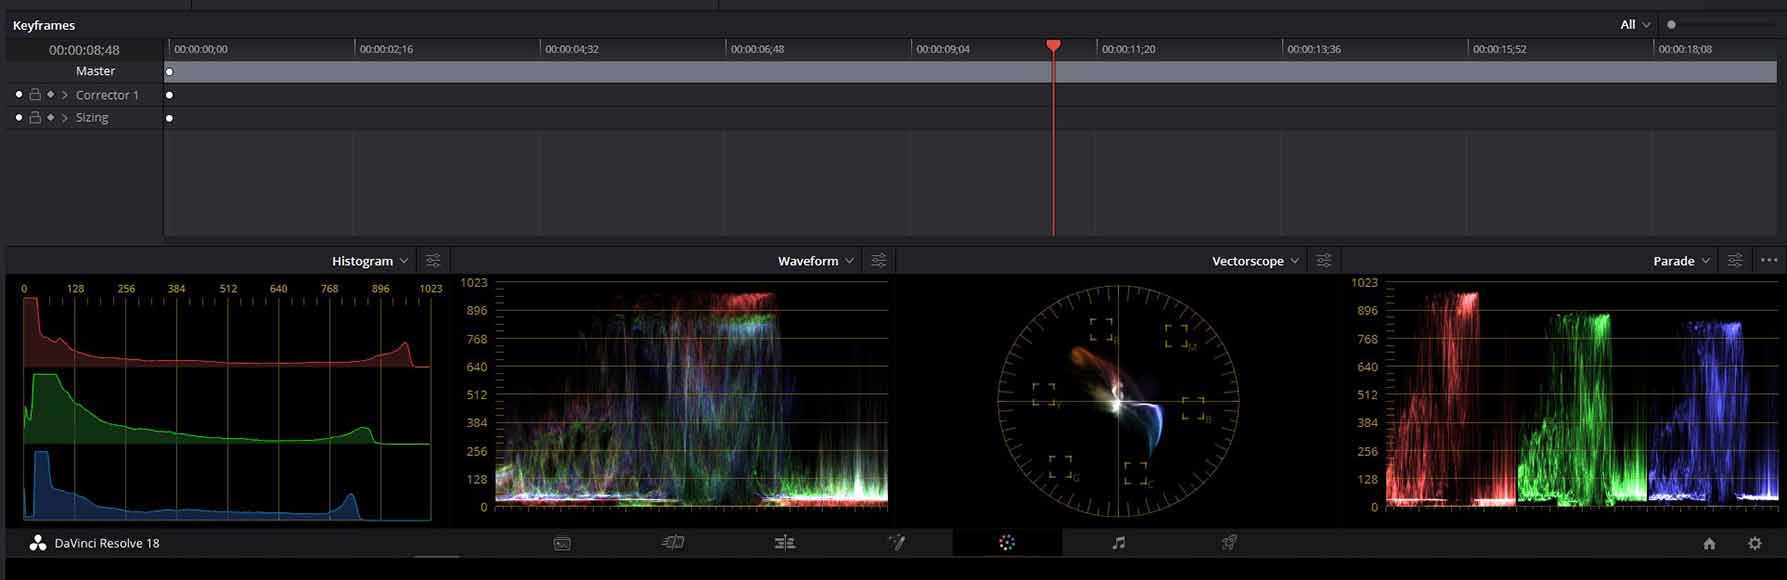
Use the Scopes panel to monitor various aspects of your footage such as brightness and exposure
The Scopes panel, which you can find on the lower right-hand side of DaVinci Resolve, displays information regarding a selection of image values.
This panel helps to guide your grading to ensure your image isn’t underexposed, as well as assessing brightness and other qualities.
Here’s a brief breakdown of what each display in the Scopes panel covers:
- Parade. Parade is the default scope and splits your image into the three RGB values and measures the saturation for each of these colors.
- Waveform. This scope assesses the brightness of your footage using an IRE scale from 0-100.
- Vectorscope. The vectorscope is used to measure the degree of saturation and hue in your footage and also includes lines that indicate where your skin tone should be.
- Histogram. This graph measures the frequency of tones in your video footage in a bar chart and can be used to see where highlights and shadows are clipped.
Pay attention to each display in the Scopes panel as you make alterations to your video footage to avoid any issues in quality.
How hard is it to learn color grading?
Learning the basics of color grading is relatively simple, although mastering the art form can take several years to match what professionals accomplish.
There are several fundamentals required to make your footage look as eye-popping as possible that combine technical and creative skills.
Understanding the basic theories around color and how to use color wheels is a great way to start grasping these basics to grade footage with an appealing aesthetic.
Whether you use DaVinci Resolve, Premiere Pro or any of the other video editing software available in 2023, it’s important to spend the time necessary to learn how to color grade.
FAQs about Color Grade Techniques in DaVinci Resolve
Can you color correct on DaVinci Resolve?
Yes, in addition to color grading, DaVinci Resolve includes everything you’ll need to fully correct your colors for a natural look.
This includes white balance, hue, and saturation controls, as well as fine-tuning highlights, shadows, and skin tones.
Color correction is the first step you need to take before moving on to adding a color grade, with most tools available in the free version.
Can you color correct with free DaVinci Resolve?
As mentioned, the color-correcting process can be performed in the free version of DaVinci Resolve to alter the entire image to your liking.
The only features lacking from the free version for color grading are high dynamic range and Dolby color, which are included in the full DaVinci Resolve Studio suite.
Most of the tools you’ll need for color correction are available on the Color Page of the free version, ready for you to use immediately.
Can you Colour grade with free DaVinci Resolve?
DaVinci Resolve color grading in the free version is, like the color correction features, fairly comprehensive, with lots of tools you can use.
Users of the free version of DaVinci Resolve can access a selection of LUTs, and use the various primary wheel settings and layer nodes for impressive results when color grading.
How do I start color grading in DaVinci?
All the color grading and correction tools you’ll need are located in the Color Page tab of DaVinci Resolve.
After setting the correct Color Science, Color Processing Mode, and Output Color Space in the Project Settings, you can adjust your video footage in the Color Page.
If you’re new to color grading, consider experimenting with the available Look-Up Tables (LUTs) to achieve a cinematic look you can edit from.
 How to Use DaVinci Resolve in 2023: Beginner’s Guide
 How to Edit in DaVinci Resolve (Tutorial for Beginners)
 DaVinci Resolve vs Premiere Pro (Key Differences to Know)
 What is Color Grading? Photography & Video Editing Techniques, Theory & Software
 How to Use Lookup Tables (LUTs) for Color Grading Video
 How to Render in DaVinci Resolve (+ Best Export Settings)

Andy Dilks is an experienced landscape photographer and former games industry veteran. When he isn’t taking photos or reviewing the latest tech gadgets, you can find him hiking and wild camping in the Peak District.

WELCOME TO SHOTKIT
Enter your email to be sent
today's Welcome Gift:
19 Photography Tools
🔥 Popular NOW:


Shotkit may earn a commission on affiliate links. Learn more.