


How to Underline Text in Photoshop (Plus Customized Options)
Master the art of emphasizing text! Dive into our step-by-step guide on how to seamlessly underline text in Photoshop and elevate your designs.
Photoshop | Software | By Judyth Satyn
Learn how to underline text in Photoshop and create stylized underlines to jazz up your documents.
Unlike other software programs underlining in Photoshop is not as straightforward as you would expect.

Download a free copy of Adobe Photoshop to follow along with this simple tutorial.
This guide will teach you everything you need to know to underline text in Photoshop and show you how to create customized text underlines.
So let’s dive in and get this text underlined.
Table of Contents
How to Underline Text in Photoshop
Underline Text in Photoshop
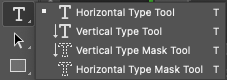
Open an image in Photoshop and activate the text tool by selecting it from the toolbar to the left of the workspace or for a keyboard shortcut hit the T key.

You will notice that a text layer will appear in the layers panel.
For the purpose of underlining the text it isn’t important what style, color, or size the font you have chosen is.
Write the text in the canvas workspace and then head to Window > Character.
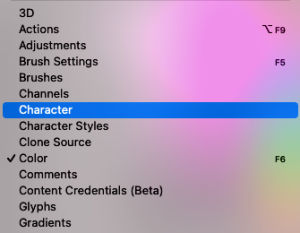
The Character Panel will appear on the right-hand side of your workspace.
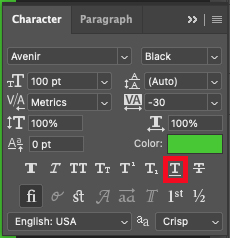
Locate the underlined text icon in the Character Panel, it is the underlined T icon.
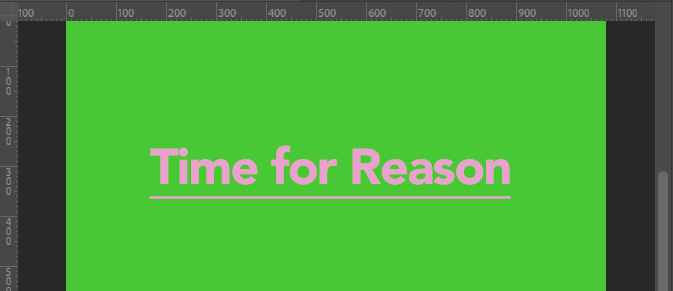
Click the icon and a line will be added underneath your text.
Well, that was easy you now have a perfect line with the same color as the text.
So what if you want the line dotted, dashed colored? Only on sections of text?
How to Underline Text in Photoshop – As You Write
If you want to the text to be underlined as you write, follow these instructions.
From the Character Panel click the underlined T icon.
Now, select the text tool from the menu bar or hit T for the keyboard shortcut.
When the text tool is active start writing in the workspace.
When you start writing a Text Layer will appear in the Layers Panel.
All new text you write will be underlined as you write.
If you wish to write more text with no underline head to the Characters Panel and uncheck the underlined T icon.
How to Underline Text in Photoshop – Existing Text
There are a couple of options to underline existing text.
Select the text by double-clicking it, or press Control plus A (for Windows) or Command plus A (for Macs).
Navigate to the top menu bar and select Window > Character.
The Text Character Panel will appear, now activate the underlined text icon, the underlined T.

The active selection of text in the workspace will now be underlined.
Create Customized Dotted or Dashed Underlines in Photoshops
When creating an underline for text in Photoshop you will find that the properties of the underline are restricted.
You won’t be able to change the color, position, thickness, or length of the line, nor will you be able to create a dotted or dashed line.
However, Photoshop is a powerful tool and there is always more than one way to complete a task.
Using the different tools to create the exact underline you require for your work will allow you versatility in your design options.
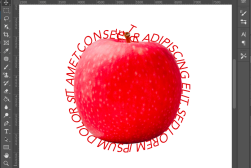
You can create any type of underline you need from a thick pink dashed underline to a dotted orange underline.
Write Text in the canvas space by activating the Text tool, or hit T for the keyboard shortcut.
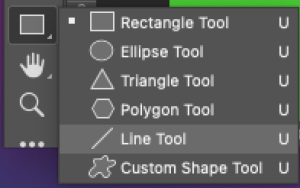
Now select the Line tool from the toolbar to the left of the workspace.
You will find the line tool in the Shape tool drop-down menu.
Navigate to the Shape tool’s option bar above the workspace, if the Mode is set to Pixel or Path change it to Shape.
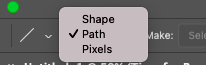
When Shape is active you will be presented with new options in the bar, Fill, Stoke, and more.
Set Fill to Transparent and select your color of choice, chose the same color as the text or one that contrasts it.
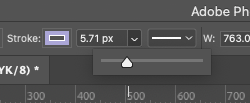
Now enter a value for the Stroke, this will determine the width of the stroke line, and the size of your canvas space, and the resolution will affect the resulting stroke size.
You can use the stroke size slider and a visual will be generated as you slide to the left and right.
When you have set the size value for the stroke, open the Stroke Options.
From the drop-down menu, you can select dotted lines or stoked lines.
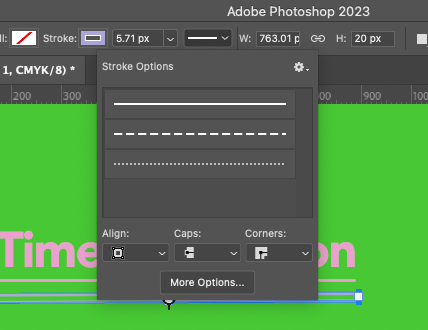
Select your preference and the Stoke in the workspace will be adjusted accordingly.
Click More Options at the bottom of the Stroke Options panel to perfect the line.
Customize the length of the Dash, and the length of the Gap as you wish.
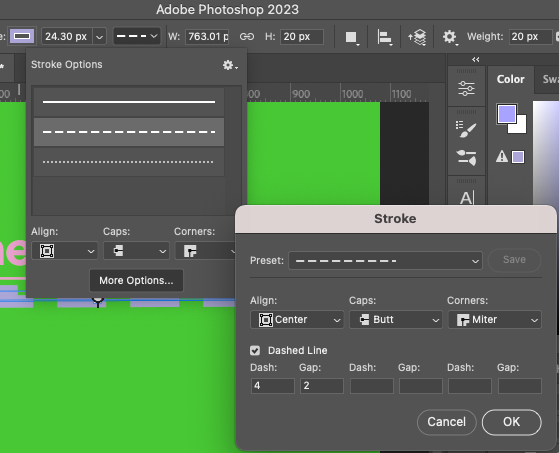
Select Inside under Align to achieve one line of dashed lines, outside will create a loop of dashed lines going around the line shape.

The above example is when Align is set to Outside and the example below is when Align is set to Inside.

Now you have optimized the properties of your new text underline.
Adjust the length and position of the line to suit your text by dragging the outer boundary of the text.
Use Photoshop Guide, Grid & Splice tool if you want to align the line to complete perfection Photoshop > Preferences > Guides, Grid & Slices
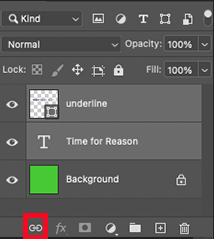
When you have created and positioned the customized text underline it is a good idea to link the text and the underline together.
This means if you have to move the text in the future you won’t have to take time to reposition and readjust the underline.
To do this, activate the underline layer and the text layer in the layers panel.
Hold the shift key and click both layers to activate both at the same time, then click the link icon at the bottom of the layers panel.
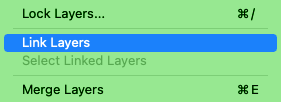
Alternatively, you can link the layers by heading to the top menu bar and selecting Layers > Link Layers.
If you are really committed to the underline you have created, you can choose to merge the layers together.
Check in the layers panel to see if the two layers are linked, this will be indicated by link icons on the side of the layer.
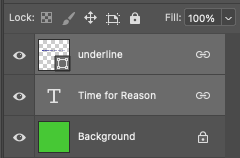
Also, try moving the underline or text to see if they move together.
When you have finished press Control plus Z (for Windows) or Command plus Z (for Macs) to snap the text back to its original position.
Now you will be able to move the text anywhere you wish in Photoshop and the underline will remain perfectly glued underneath the text.
Have fun creating some wild and wonderful underlines for your text.
FAQ’s
How do you Underline Part of a Text in Photoshop?
To underline only a section of text in Photoshop, select and highlight the text you wish to underline and open the text Character panel.
Click the underlined T icon in the character panel and only your selected text will be underlined, the rest of the text will not be underlined.
Why does my Text not Underline in Photoshop?
Check to see if your text layer is locked, if it is this will prevent you from underlining the text.
Unlock the layer and attempt again to underline the text.
Another reason why you are not able to underline text is that the properties of the font you have chosen will not permit underlined text.
How do you Underline and Bold Text in Photoshop?
To underline and bold text at the same time in Photoshop head to the text character panel by selecting Windows > Character.
The text Character panel will open, click the underlined T icon to underline the text and click the bold T icon to bold the text.
 How To Make Dotted & Dashed Lines In Photoshop (3 Ways)
 How to Wrap Text in Photoshop (Three Different Ways)
 How to Use the Clipping Mask in Photoshop (Complete Guide)
 67 Best Photography Books of 2023 for All Levels
 How to Merge / Blend Two Images in Photoshop

Judyth is an experienced studio photographer and glass artist. When she isn’t Photoshopping comedians into the bellies of sharks, you can find her cooking delicious treats for her guests.

WELCOME TO SHOTKIT
Enter your email to be sent
today's Welcome Gift:
19 Photography Tools
🔥 Popular NOW:


Shotkit may earn a commission on affiliate links. Learn more.