


How To Make Dotted & Dashed Lines In Photoshop (3 Ways)
Unlock the techniques to craft dotted and dashed lines in Photoshop with our step-by-step guide covering three simple methods.
Photoshop | Software | By Judyth Satyn
Learn how to make dotted and dashed lines in Photoshop with three simple techniques.

Download a free copy of Adobe Photoshop to follow along with this simple tutorial.
Dotted and dashed lines can add a decorative aspect to a document or break up a design.
Here are three methods for you to use to create a dotted or dashed line in Photoshop. Let’s dive in.
Table of Contents
How To Make Dotted & Dashed Lines In Photoshop in 3 Methods
Dotted and dashed lines add a unique touch and emphasize a point in documents and designs.
Traditionally they were used to indicate where a line needs to be cut or to demonstrate incomplete content.
So many uses! They can even be used to build a pattern.
Photoshop is an image-focused software program, not text-focused.
Making dotted and dashed lines in Photoshop can be accomplished in different ways. Although some are cumbersome and time-consuming.
I have spent too long engrossed with grids and rulers trying to make perfectly positioned dashed and dotted lines.
I manually moved each individual dot until I stumbled upon these three great methods.
Let’s get ready to connect the dots and dashes.
Make dotted or dashed lines using the Line Tool
Open an empty canvas by selecting File > New from the top menu bar. Then enter the characteristics of your new document.
Alternatively, choose the document you wish to add dotted lines to File > Open and locate the document.
Activate the Line tool from the toolbar or by clicking U for the keyboard shortcut.

If you can’t find the Line tool it is under the Rectangle tool in the Shape tool drop-down menu.
Click on your canvas and drag the cursor to create a line. Release the cursor when you have achieved the correct length.
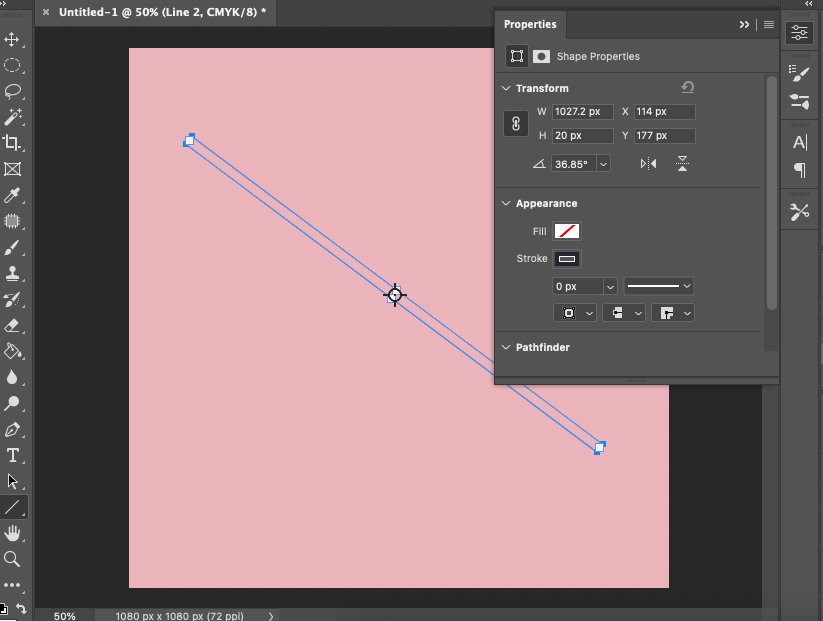
The shape Properties panel will appear when you begin using the tool.
Set Fill to transparent.
Choose a color for the stroke by clicking on the box beside Stroke. When clicked it will open the color options.
Set the size value for the dot in the box below Stoke.
From the drop-down menu for Stoke Options select the dotted or dashed line, depending on which you wish to use.
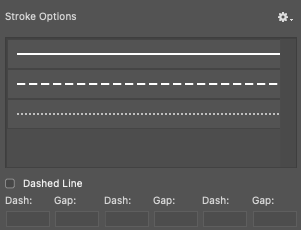
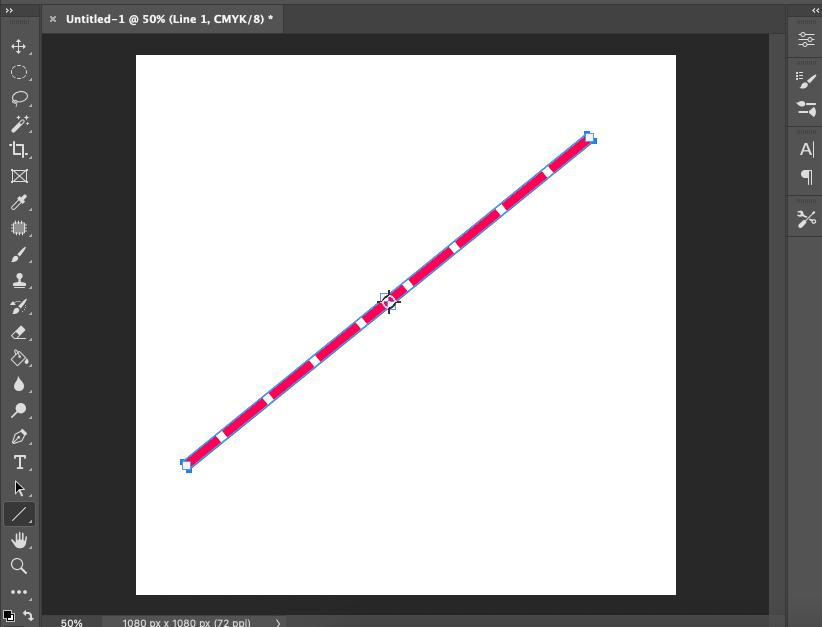
Below is the line created by using the dashed line in Stroke Options.
And here below is the line when the dot option is selected.

Here is a tutorial for when you need to draw a straight line in Photoshop.
Make Dotted Lines using the Brush tool
This one is my personal favorite to use whenever I need dotted lines.
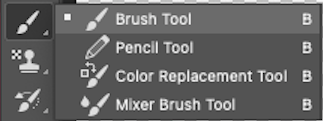
From the toolbar select the Brush tool or click B for the keyboard shortcut.
To create dotted lines with the Brush tool you will first have to alter the Brush tool settings.
To do this head to Window in the top menu bar and select Brush Settings from the drop-down menu.
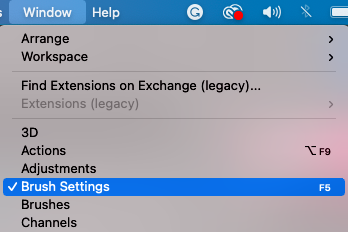
This will automatically open the Brush Settings panel.
There are more options to refine the settings of the Brush tool in the Brush Settings panel than in the Brush tool’s options bar.
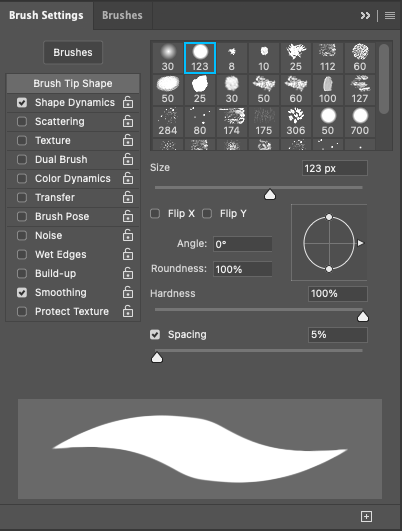
In the Brush setting panel, you will have a live preview of how the brush stroke will look on your document.`
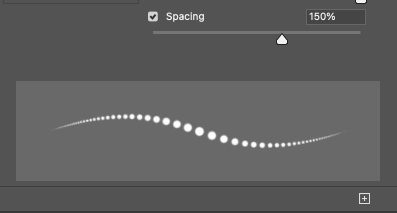
First, set the size of the Brush tool by sliding the Size slider.
Roundness should be set to 100%. Unless you want oblong dots.
Set the hardness of the Brush tool by sliding the Hardness slider to 100%. Unless you want fuzzy soft dots.
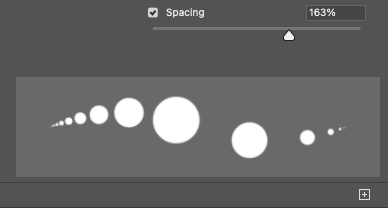
And this is when the dotty magic happens, by using the Spacing slider.
Slide the Spacing slider. Once the value of the spacing is over 100% dots will be formed.
A live preview will demonstrate how wide apart the dots will be from each other when you draw on your canvas.
Select a color for your dots from the Color palette.

You can alter the size of theBrush tool at any time by hitting either the [ or ] keys.
You can also change the color of the Brush tool at any time by clicking on the Color panel.
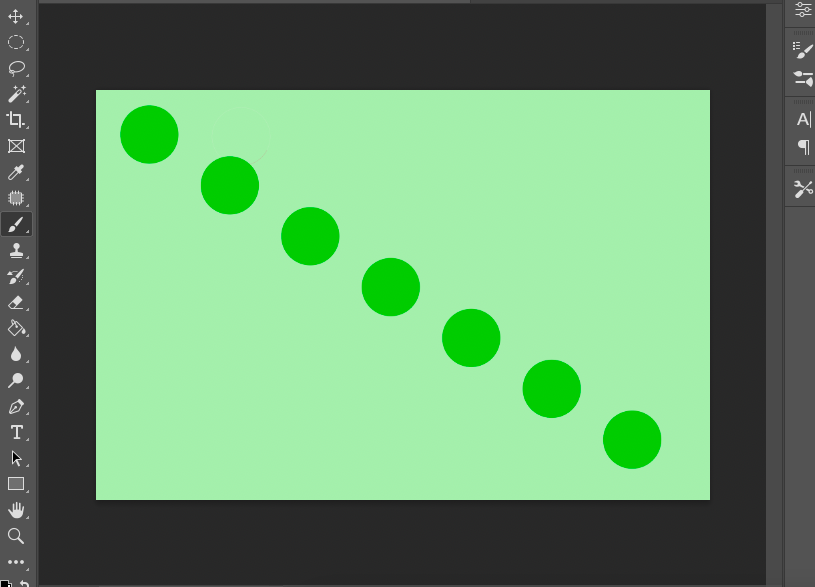
If you want to draw a straight line hold the Shift key down as you drag the Brush tool across the canvas.
If you want to create dotted lines in a specific pattern you can create a path using the Pen tool.
We will show you how in the next method.
Now go wild and dotty. Make lots of dot tracks on your canvas.
Troubleshooting – If the Brush Settings open but won’t let you alter the settings. Check that the Brush tool is active, if it is not active you will not be able to alter its settings.
And remember you will not be able to alter the size of brush spacing by using the Brush tools option bar, only by using the Brush tool’s settings.
Save the Dot Brush Setting as a Preset
If you plan to use the Brush tool for creating dots regularly you can save this Brush tool setting as a Adobe Photoshop Preset.
This will save you from hopping in and out of the Brush Setting panel every time you want a dotted line.
To save as a Preset hit the Create New Brush icon, a square with a plus inside, at the bottom of the Brush Settings panel.
The New Brush dialog box will appear. Tick the box beside Include Tool Settings.

Give the new brush preset a name to locate it easily in Photoshop’s Brush tool preset library. I named mine Dotty.
When complete hit OK.
Now check in the Brush tool options bar to see if the new brush has been saved as a Preset.
The new ‘Dotty’ brush should appear at the bottom of the Brush tool preset drop-down menu.
Now you will never be stuck for a dotted line when you need one.
Another great editing trick you might want to know is how to draw curved arrows in Photoshop.
Create dotted lines using the Pen tool
This is a great trick to use when making circular dotted lines or another custom dotted line shape.
First, activate the Brush tool by selecting it from the toolbar or hit B for the keyboard shortcut.
Then head to Windows > Brush Settings to open the Brush Setting panel.
Set the settings for your Brush tool. This will define the shape, color, size, and hardness of the dot you want for your dotted line.
Slide the Spacing slider until the value is over 100%. This is when you will begin to achieve the dotted line look.
Photoshop will give you a preview below the Sliding space so you can make sure the final brush stroke will appear dotted.
When complete close the Brush Settings panel.
Now select the Pen tool from the toolbar or hit P for the keyboard shortcut.
Use the Pen Tool to make a Straight Dotted Line
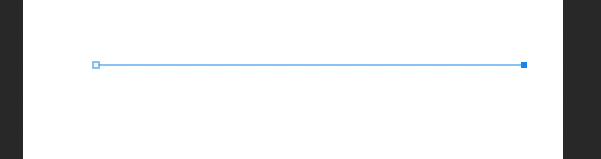
Click on the canvas using your Pen tool to create the first anchor point. This will be the starting point of your dotted line.
Release your cursor and click again on the canvas in the spot where you want the end of the dotted line to be.
Do not release the cursor if you want to make a line that runs parallel to the frame of the canvas.
Hold the Shift key down and click on the canvas with the Pen tool where you want the end of the dotted line to be.
Now we will create an active path using this line.
Head to the Paths panel and click the Stroke Path with Brush icon at the bottom of the panel, the circle.
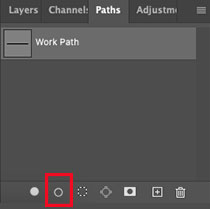
When you click this icon a dotted brush stroke will be applied to the line path in your canvas workspace.
Perfect! As you can see, the line is perfectly straight and the dots are beautifully spaced.

How to use the Pen Tool to make a Custom Shaped Dotted Line
One day you will want to make a random shape, and you will want to make it out of dots.
So here’s how.
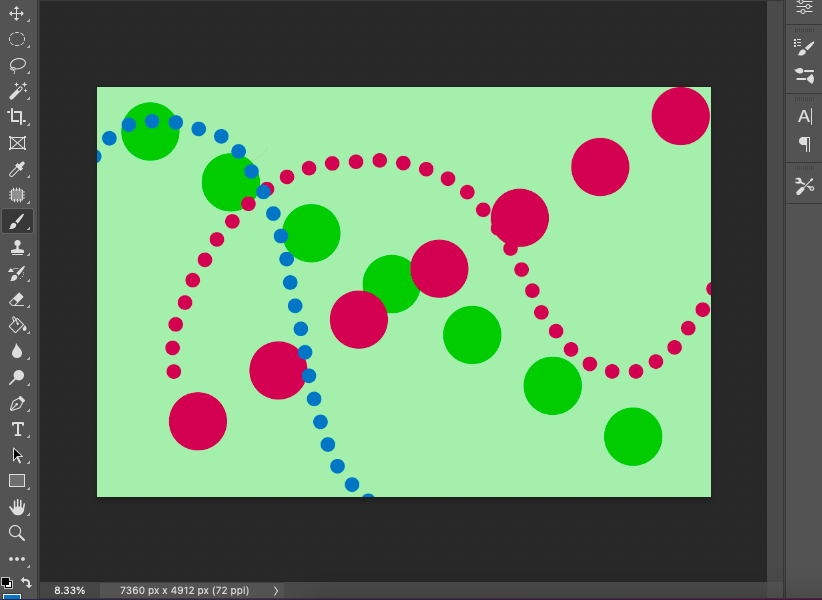
Using the Pen tool create your funky shape.
Click on the canvas to make each consecutive anchor point.
For this tutorial, we will make a simple start shape.
If you are a Pen tool editing wizz you will be able to make any shape using the Pen tool.
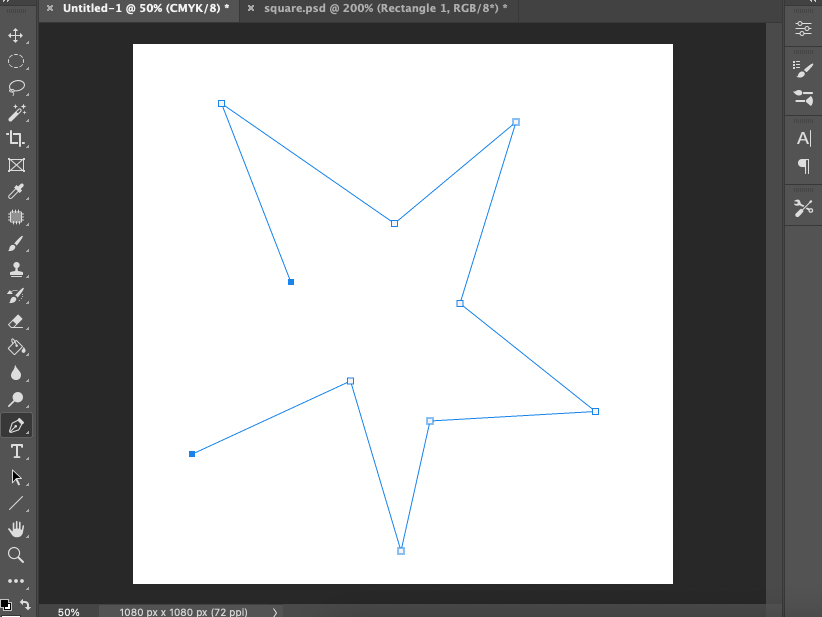
Click the last anchor point onto the exact position of the first anchor point to complete the work path.
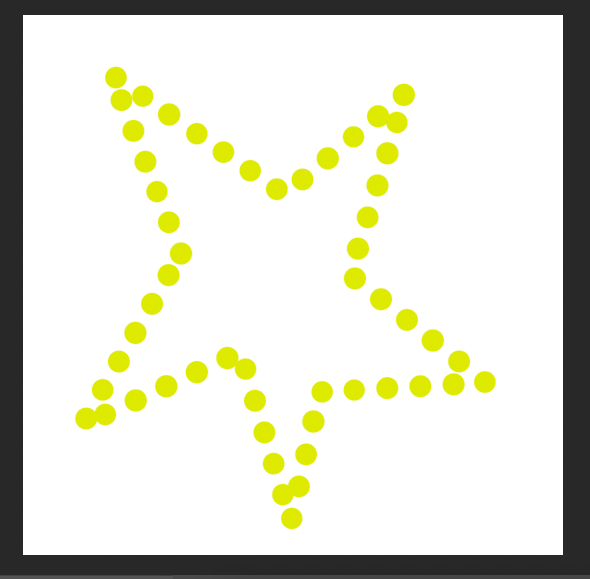
Alter the shape and color of your Brush tool if you wish to before the next step.
Head to the Path panel and click on the Create Stroke Path with Brush icon, the circle at the bottom of the panel.
![]()
Once the icon is clicked the star-shaped work path will become a dotted star-shaped line.

You can delete the Pen path by dragging the Work Path layer into the trash at the bottom of the Paths panel.
Now you are equipped with great techniques for making dashed or dotted lines in Photoshop.
If you are keen to learn more editing tricks in Adobe Photoshop try this tutorial – How to wrap text in Photoshop.
As always it’s a pleasure to get to know Photoshop more intimately and realize all the amazing editing tricks it is capable of.
FAQs on Drawing Dotted and Dashed Lines in Photoshop
How to make dotted lines in Photoshop with brushes?
The fastest and most foolproof way to make a dotted line in Photoshop is to use the Brush tool.
To do this, you need to adjust the spacing of the Brush tool in the Brush Settings panel.
Go to Windows > Brush Settings. Once selected the Brush Settings panel will open.
Set the brush to round and slide the Spacing slider to over 100%. Now, you can draw using the Brush tool to create dotted lines.
How do you make a dotted line?
In Adobe Photoshop, you can make dotted lines using the Brush tool, Line tool, or Pen tool.
How do I draw a dotted line in a circle in Photoshop?
To draw a dotted line in a circle using Photoshop set the Sliding value of the Brush tool to over 100%.
Then using the Pen tool create a circle shape in your canvas workspace.
When the Circle is complete hit the Create Stroke from Brush icon at the bottom of the Paths layer.
Viola, you will now have a dotted circle.
 33 Most Famous Architecture Photographers in 2023
 How to Underline Text in Photoshop (Plus Customized Options)
 33 Most Famous Film Photographers in 2023
 26 Famous Car Photographers to Follow in 2023
 How to Type on a Path in Photoshop (Make Text Follow Shapes)

Judyth is an experienced studio photographer and glass artist. When she isn’t Photoshopping comedians into the bellies of sharks, you can find her cooking delicious treats for her guests.

WELCOME TO SHOTKIT
Enter your email to be sent
today's Welcome Gift:
19 Photography Tools
🔥 Popular NOW:


Shotkit may earn a commission on affiliate links. Learn more.