


How to change GIF Speed in Photoshop (Fast or Slow)
Master the art of adjusting GIF animation speed using Photoshop with our comprehensive step-by-step guide to enhancing your visuals.
Photoshop | Software | By Judyth Satyn
This guide will show you how to change GIF speed in Photoshop by ramping the movement up or slowing it down.

Download a free copy of Adobe Photoshop to follow along with this simple tutorial.
GIFs are popular animations with an immense range of diverse uses.
Learn how to modify a GIF using Photoshop in seconds to match music, smooth jitters or suit creative vision. It’s easy!
Table of Contents
How to Change GIF Speed in Photoshop in 5 Steps
What is a GIF?
A GIF (Graphics Interchange Format) is a file format for animations and static images.
Because a GIF can support numerous frames in the same file, it can be used for creating animations.
A GIF animation is a compilation of frames played in a sequence repeated in a loop.
GIFs are created in a software program. All the frames are placed in sequence and looped.
GIF mechanics is very similar to the concept of a flipbook. Doodles in the flipbook appear to move when the booklet’s pages are flipped.
GIFs’ small file size makes them easy to use on the web and social media.
And if you think all GIFs are short, think again. The longest GIF takes 1,000 years to complete one loop.
Known as AS Long As Possible (ALAP), it was created by a Finish Artist, Juha Van Ingen.
I have to admit I am in love with GIFs; they are ingenious in their simplicity.
The sky is only limited by your imagination when it comes to GIF animation.

Why Change the Speed of a GIF?
Changing the time each GIF frame is played will alter the length of the animation.
You don’t have to change the speed of the entire GIF; you can alter the rate of one section.
Freezing one GIF frame is a technique used for dramatic effect or to emphasise a point.
You might need to lengthen or shorten the play time of a GIF to suit your design purposes.
A GIF can look jittery and staggered; speeding up the length of each frame can smooth out creases.
When setting a GIF to music you might have to adapt the speed to match the song.
Another reason to change the time of a GIF is to suit the requirements of a website.
Below is a GIF I made for a pasta restaurant.
As you can see, the timing of the GIF is too fast, making it hard to watch.

How to Change the Speed
You’ll be pleased to know that changing the speed of a GIF in Photoshop is easy.
It only takes a few seconds when you know how.
So, let’s get stuck in and open your GIF in Photoshop.
Step 1. Open GIF
You can open a GIF just like you open any other image.
Head to the top menu bar and select File> Open now. Then locate your GIF.
Alternatively, you can drag the GIF from your desktop into Photoshop’s workspace.
When the GIF is open, all its layers will be displayed in the Layers Panel.
You can edit any GIF layer by clicking on the layer to select it.
Step 2. Open Timeline
To view the GIF’s frame sequence, we will need to open Photoshop’s Timeline.
Head to the top menu bar and select Window > Timeline.

When clicked, a tick will appear beside Timeline. Then the Timeline panel will open at the bottom of the workspace.
Each GIF layer will be displayed in the Timeline panel as a numbered frame.
The GIF’s Timeline will show you the speed and sequence of each frame.
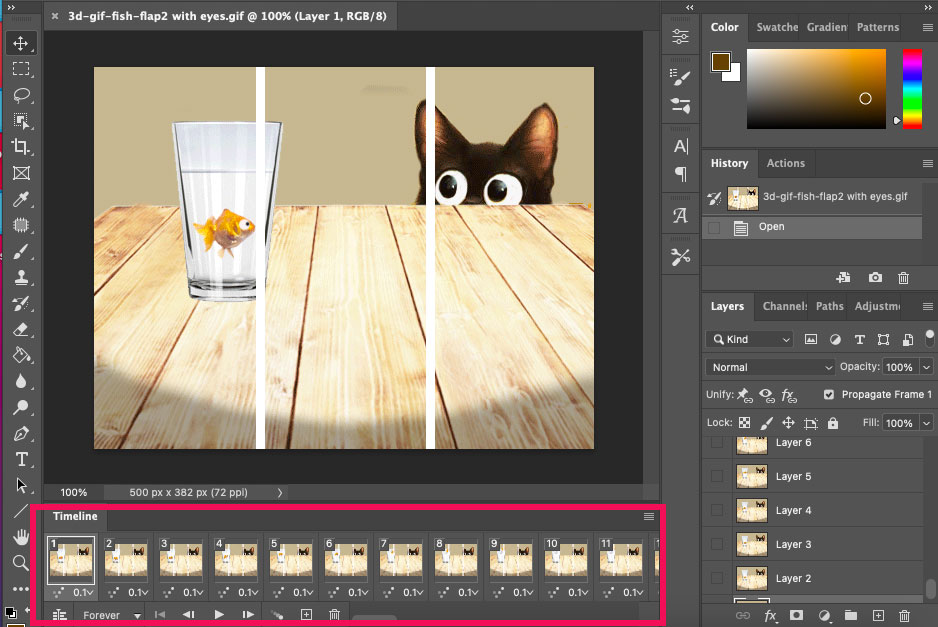
Here, you can alter the speed of the GIF, change the sequence of the frames and delete or add frames.
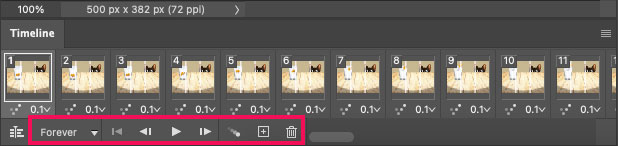
To test the speed of the GIF, click the play button in the Timeline controls.
The GIF will play through in the workspace.
Using the Timeline panel controls, you can pause the GIF, and skip forwards or backwards.
You can change the time delay of one frame, a few or all.
Increasing or decreasing the time of one or more frames will affect the speed of the entire GIF.
When one or more frame’s time delay is slowed down, the GIF will be played for longer.
If a frame’s delay time is increased, the GIF will be played faster.
Step 3 a. Adjust the Speed of Individual Frames.
Each frame can be identified in the Timeline by its number, in the top left corner of its icon.
To change the speed of one individual frame, activate it in the Timeline by clicking on it.
Once selected, click the downward time arrow in the frame’s bottom right-hand corner.
This will open a drop-down menu of playback speed choices from No delay to 10 seconds.
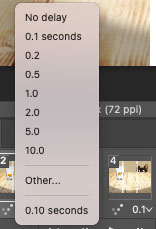
Select the “Other” option to enter a specific time delay for the frame.
To speed up the GIF, choose a faster delay time; to slow down, choose a slower delay time.
The drop-down menu will close when you have changed the frame’s time.
Now, you should see the frame’s new adjusted time displayed.
The rest of the frames will be unaltered with the original time delay displayed.
Now press the Play button to see what the new speed of the GIF looks like.
Extending the speed of one frame is helpful when you want to highlight it from the other frames.
Step 3 b. Adjust the Speed of Frames in a Row
You can adjust the speed of a few select frames without affecting the rest.
Use this technique to select frames positioned beside each other in the Timeline.
Select the first frame by clicking on it. Then, on the keyboard hold down the Shift key and click the last frame.

This will activate all the frames in between. So you will have a line of selected frames in a row.
Click the downward arrow on any of the selected frames to change the time delay of all of the frames.
Once the arrow is clicked, a drop-down menu will appear. Select the time delay and close the drop-down menu.
All the selected frames will now have the same time delay.
Step 3 c. Adjust the Speed of Separate Frames
Use this technique to change the time of a few frames positioned separately on the timeline.
Click on the first frame, then hold down the Command key (on Macs) or the Ctrl key (on Windows). Now, select other frames by clicking on them.
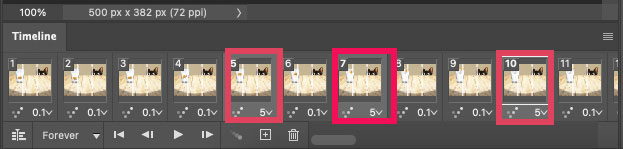
You can now adjust the speed of all selected frames at the same time.
Click the downward arrow in one of the frames, then from the drop-down menu, select a new time.
All the selected frames will now have the new time. While the unselected frames will remain unaffected.
This technique is helpful if you need to change the time of many individual frames in a large GIF.
Step 3 d. Adjust the Speed of All the Frames
Changing the speed of all frames to the same length will give the GIF a consistent look.
To change the speed of all the frames head to the top right corner of the Timeline panel.
Here you will find an icon made of three lines. Click it.
From the drop-down menu that opens, click Select All Frames.
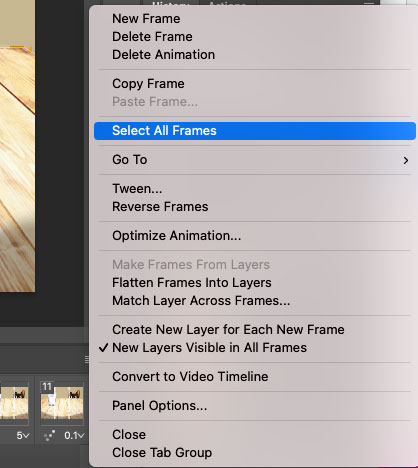
This will activate and select all the GIF frames.
Click on the downward time arrow in one of the frames.
The drop-down menu will open, displaying the time interval options.
Select the time preference for all the frames.
Now, all the frames will have the new time displayed.
Step 4. How to Loop the GIF
After adjusting the speed of the GIF, we can adjust the GIF loop count.
The GIF can be looped Once, Three Times, Forever, or a custom loop can be set.
Setting the loop to Forever will not take up any extra room on the file, and the GIF will run continuously.
Having a GIF looped forever might be distracting if it is for a demonstration or tutorial.
In this case, set the Loop count to One or Three. The GIF will pause after it has played through the number of Loops set.
To set the loop count, click the Loop button in the bottom left-hand corner of the Timeline panel.
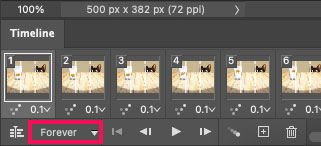
Once clicked, a drop-down menu will appear.
Select the number of times you wish your GIF to loop.

Click other if you want to set a custom number of loops.
When Other is clicked, the Set Loop Count dialogue box will open.
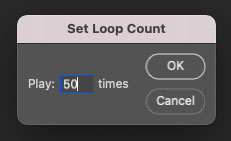
Enter the times you wish the GIF to loop in the box beside Play.
Then click OK. Your loop count has been set.
Step 5. Save the GIF
This is an important step. If a GIF is saved as anything other than a GIF, it won’t play as an animation.
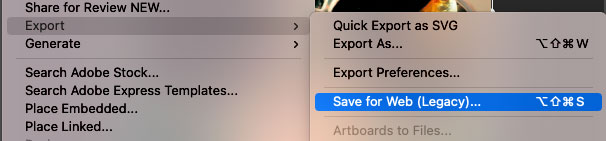
Head to File > Export > Save for Web (Legacy) to save your GIF as an animation.
The Save for Web window will open.
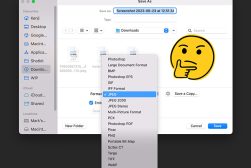
You will find the GIF file formats in the drop-down menu beside Preset.
There are different options for colour ranges combined with Dithered or No Dither.
As you can see in the image below.

The number choices indicate the color palette that will be used for the GIF.
The lower the number, the fewer colors included and the smaller the file size.
A higher number will ensure the GIF is vibrant but will increase the file size.
The Dither option will improve the quality of the image but increase the file size.
If you need a small file size for easy use on digital platforms, choose a low number combined with No Dither.
Choose a high number combined with DIther for high-quality GIFs with unadulterated colours.
When you have chosen the GIF setting, hit Save at the bottom of the Window.
Then select the location to save your GIF.
Now, you can go and open the GIF to check it is playing at the speed you want.
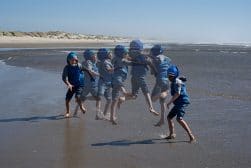
I made the GIF below to play with timing and test perspectives.
Congratulations, now you know how to change the speed of GIFs using Photoshops Timeline.
It’s simple when you know how!
FAQs About Changing GIF Speed in Photoshop
How do you slow down a GIF in Photoshop?
To slow the speed of a GIF in Photoshop, first open the GIF in Photoshop.
Then head to the top menu bar and select Window> Timeline. The Timeline will open, displaying each of the GIF’s frames.
Select all the GIF’s frames and increase the time the frames are played for. This will slow down the GIF.
Can you change the speed of GIFs?
Yes, you can change the speed of a GIF.
You can increase or decrease the speed of the GIF using Photoshop.
How do I control the speed of an animated GIF?
To control the speed of an animated GIF, change the time each frame is played.
You can change the speed of one frame, a few or all the frames.
How do I change the frame rate of a GIF?
To change the frame rate of a GIF, first open it in Photoshop.
Head to the top menu bar and select Window> Timeline.
When the Timeline panel is open, click on a frame to change the time it is played for.
 How to Make a GIF in Photoshop (+ 8 FREE Methods)
 How To Make a Video or GIF Into a Live Photo on iPhone
 16 Common Image Formats (+ When to Use Them)
 Best Free Photoshop Actions for Photographers
 How to Change Color of Logo in Photoshop (Three Ways)
 How to Use DaVinci Resolve in 2023: Beginner’s Guide

Judyth is an experienced studio photographer and glass artist. When she isn’t Photoshopping comedians into the bellies of sharks, you can find her cooking delicious treats for her guests.

WELCOME TO SHOTKIT
Enter your email to be sent
today's Welcome Gift:
19 Photography Tools
🔥 Popular NOW:


Shotkit may earn a commission on affiliate links. Learn more.