


How to Edit Pictures on Mac (for Free in Photos)
Discover a comprehensive guide on editing pictures seamlessly on your Mac using the free Photos application for stunning results.
Software | By Ashley Darrow
In this guide, you’ll learn how to edit photos on Mac without having to buy any extra photo editing software.
The free Photos app has everything you need—and I’m going to show you how it’s done!
When you first start to edit photos, it can be intimidating to look at the price tags of photo editors and the steep learning curves behind pro photo editing tools.
Thankfully, the built-in Photos program is the best free photo editor for Mac, and it’s powerful enough to handle most of your essential photography edits.
Sure, I’m a big fan of Lightroom and Adobe Photoshop, but I find myself using this native Mac app more and more.
Here’s a quick crash course for editing pictures using nothing but Photos!
Table of Contents
How to Edit Pictures on Mac for Free (without Photoshop)
Tips for editing photographs for free on Mac are going to be perfect for new photographers as well as Mac users looking to make the most of the software they already own.
Today, I’m going to edit one of my photographs alongside you.
Consider this a proof of concept to demonstrate that you can actually get some quality editing out of Photos.
1. Search for ‘Photos’ photo editing software on your Mac
Your first step is going to be to open up the Photos for MacOS app.
This might seem a little obvious. However, I didn’t use the Photos app for the longest time until I got more serious about mobile photography.
If you’re using Apple hardware, you can find Photos with the rest of your applications. This is a free app that’s included with your Mac.
If you happen to have uninstalled Photos, you can always redownload it for free from the Mac app store.
2. Pick an Image to Edit
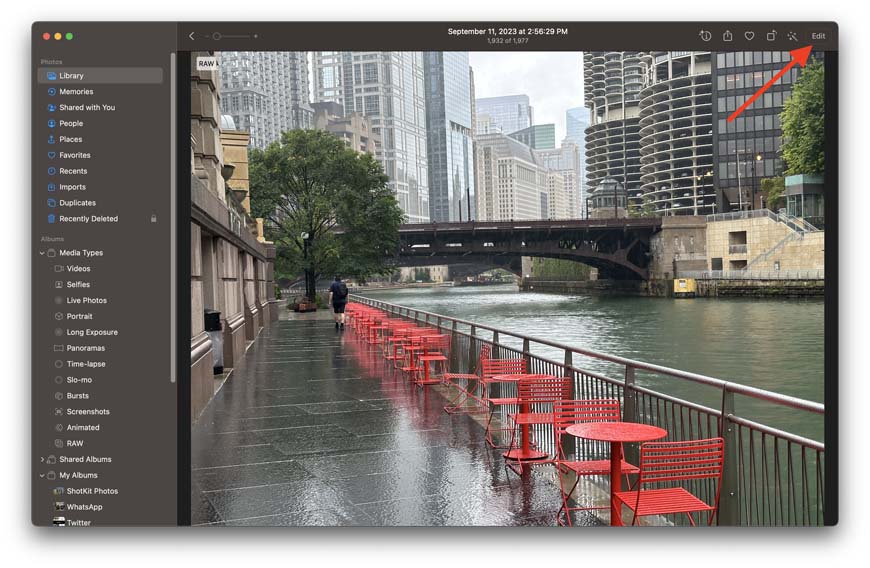
Once you’ve got Photos open, you want to pick the image that you’ll be editing.
Double-clicking an image, or pressing Command while clicking, will open the image into a full window view.
You can enter the editing window by clicking the edit button in the upper right-hand corner of the application.
3. Get to Know Your Editing Options
You should get familiar with the editing interface before you start sliding curves around.
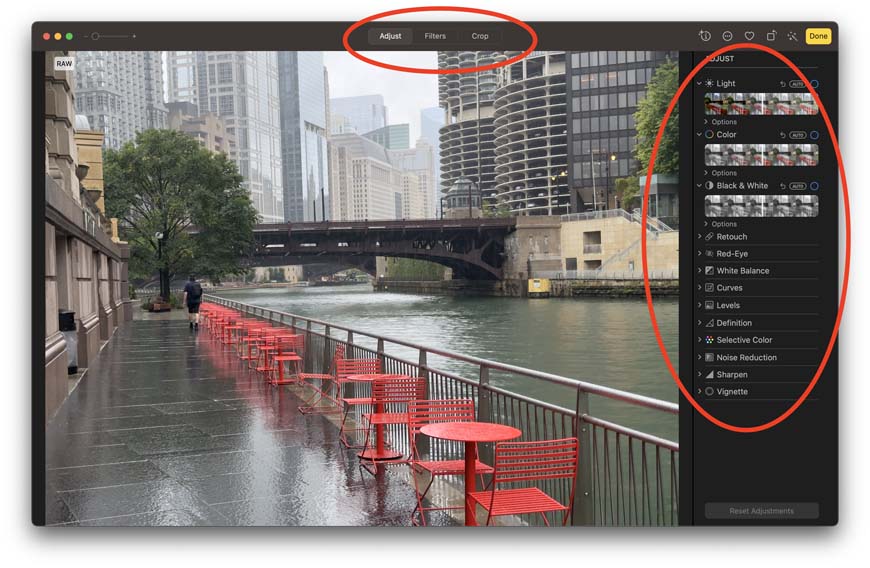
On the top of the application, you’ll see three options for adjust, filters, and crop.
Adjust expands the full menu of editing options. Filters allow you to choose one of the nine included filters that come with Photos. Crop allows you to make geometric adjustments to your image.
4. Use the Crop Tool to Edit Photos First
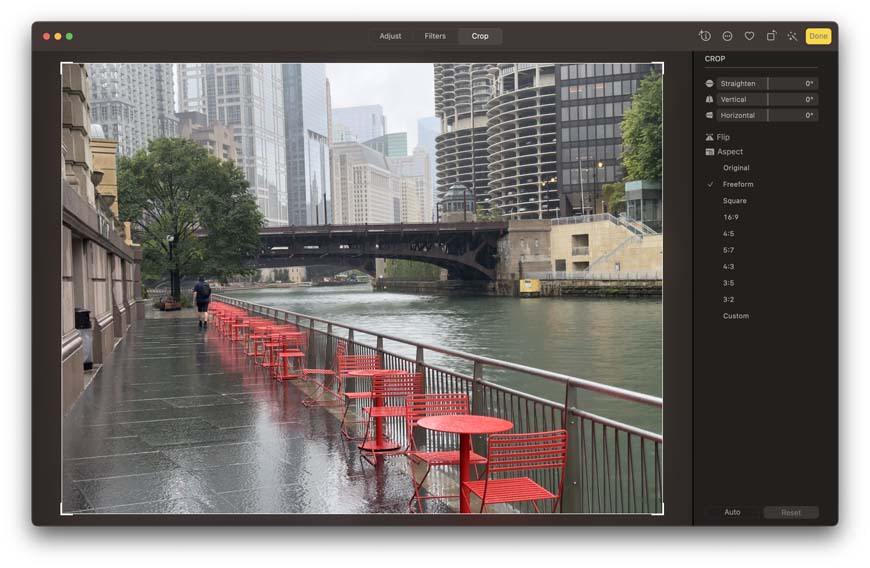
I always start my editing by working with the crop tool.
Cropping in Photos is really easy. you can click inside of the straighten, horizontal, or vertical buttons to automatically set those corrections. You can also manually adjust them.
You then got more cropping options than most photographers will ever use. You can set a wide range of aspect ratios perfect for printing photographs or uploading them to a wide range of social media sites.
5. Take a Look at the Preset Filters
There’s no shame in using a filter if it makes your image look great. In fact, you can consider filters as the first layer of basic tools in this Mac image editor.
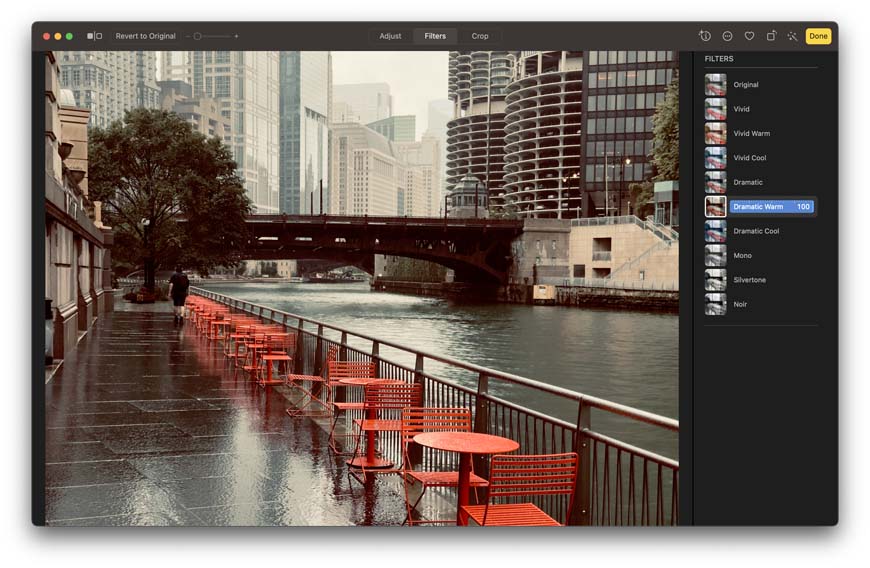
You can click on the filters tab to check out any of the nine preset filters that come with Photos.
I got some interesting results out of the dramatic warm filter, but I’m going to dial in my own edits rather than using one of the presets.
In my opinion, there are only two real downsides to these preset filters. The first is that you can rely on them too much which means you lose valuable chances to learn how to edit photos and filters do tend to make a lot of photographs look too similar.
6. The Powerful Photos Adjustments Menu
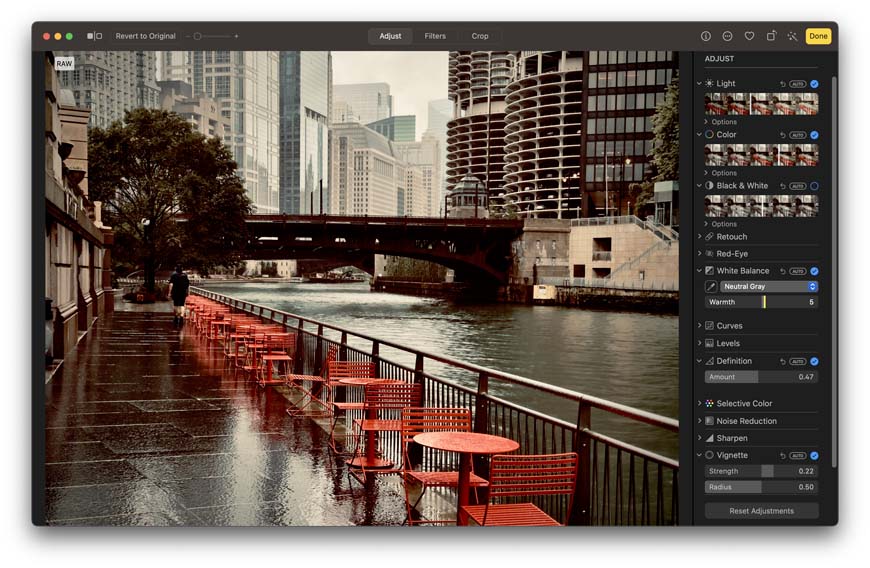
The adjustments menu offers more advanced tools for editing with Photos.
I went hard with some of the sliders well barely touching others. I wanted to emphasize the red color of the chairs will bring out the drab, gloomy environment of the riverwalk on a rainy afternoon.
Here’s a detailed walkthrough that lets you know what each of these sliders handles and how you can use them to improve your photographs.
- Light—Light allows you to adjust the exposure of your image. In my experience, smartphones tend to overexpose so I’m typically bringing the exposure down a little bit in my edits
- Color—The color slider allows you to adjust the hues and saturation in the image to emphasize, or de-emphasize, certain color values
- Black and White—Black and white is another slider that lets you adjust the look of your image if you happen to go for the black and white look
- Retouch—Retouch is a surprisingly advanced feature that lets you remove small blemishes from your image with a retouching brush that you can adjust the size of
- Red-Eye—Red eye is a classic feature that allows you to remove red eye from your flash photography
- White Balance—White balance allows you to adjust the temperature of white light in the image by making things warmer, or cooler, or using one of Apple’s presets
- Curves—Curves is a powerful tool that allows you to control the high, mid, and low tones and color values. This powerful Photos editing tool is freely available on Mac as well as iPhone and iPad
- Levels—Levels allows you to view the histogram for your image and make edits by selectively adjusting the brightness of certain aspects of your picture
- Definition—Definition allows you to improve the clarity of your photo by reducing haze. It might be tempting to crank this one up, but go light with edits like definition and sharpen or you might risk actually increasing the blurry qualities in your image
- Selective Color—Use selective color if you want to edit a single color independently of everything else that’s going on in your picture
- Noise Reduction—Noise reduction is especially useful if you’re shooting on mobile in low-light environments where ISO levels are high and you’re getting a lot more digital noise than you would in a bright environment
- Sharpen—Sharpen increases the overall focus of an image
- Vignette—Vignetting adds a classic effect that either darkens or brightens, the corners of your photograph
7. Copying Editing Pics and Undoing Edits

I can’t tell you how many times I’ve reached a point in editing an image where I’ve been really dissatisfied with my work, but I’ve also taken so many steps that I can’t quite figure out where I went wrong.
Thankfully, Photos gives you plenty of options for undoing your edits so you can walk things back and start again with a clean slate.
In the lower right-hand corner of the adjustments menu, you’ll see an option that allows you to reset all of the adjustments that you’ve been making.
In the upper left corner of the app, you’ll see two buttons. The button that looks like two squares with a line through the middle allow you to see what your image looked like before you started editing.
The button that says “revert to original” resets your photo entirely to how it was the moment you shot it.
FAQs about Photos App for Mac and its Photo Editing Tools
How do I crop a photo in the Photos app on Mac?
You can crop a photo by selecting the photo, clicking on the “Edit” button at the top right corner, and then clicking the “Crop” button. From there, you can adjust the size and angle of the crop box.
Can I adjust the color of my photo in the Photos app?
Yes, you can adjust the color of your photo in the Photos app. To do this, select your photo, click “Edit,” and then click the “Adjust” tab. Here you will find options for saturation, contrast, and color balance among others.
How do I use filters in the Photos app on Mac?
To use filters, select the photo you want to edit, then click “Edit” at the top right, and select the “Filters” tab. Here, you can choose from a variety of preset filters to apply to your photo.
Can I remove red-eye using the Photos app?
Yes, the Photos app has a red-eye removal tool. After clicking “Edit” on the photo, select the “Retouch” option, then the “Red-eye” tool. Click on the red eyes in the photo to apply the correction.
Can I revert to the original photo after making edits in the Photos app?
Yes, you can revert to the original photo after making edits. Just select the photo, click on “Edit,” and then choose “Revert to Original.”
How do I add a description to my photos in the Photos app?
You can add descriptions to your photos in the “Info” panel. Select the photo, click on “Window” in the menu bar, and then “Info.” A panel will appear where you can add a description.
Can I create albums in the Photos app on Mac?
Yes, you can create albums in the Photos app. Click on “File” in the menu bar, then “New Album.” You can then drag and drop photos into this album.
How can I share photos directly from the Photos app?
The Photos app allows you to share photos directly through email, messages, AirDrop, or social media. Simply select the photo(s) you want to share, then click on the “Share” button on the top right and choose your preferred method.
Wrapping Up this Free Photo Editor for Mac
This Mac photo editor offers an intuitive user interface and powerful editing tools that can help you clean up your images when you need an alternative to Adobe software.
I’ve become a big fan of editing in Photos over the years. Unless I’m trying to do something that’s just outside the scope of the software, I might even use the editing tools in photos over what’s available in premium software.
Let me know what you think about editing your photographs using the Photos app in the comments below.
 Best Photo Editing Software for Macs in 2023 (Free & Paid)
 12 Best Adobe Lightroom Alternatives in 2023 [User Tested]
 11 Best Video Editing Software Programs for Mac
 Luminar Neo Review (My Latest Test Results)
 Best Video Editing Software Tools for Movie Making
 Best Photo Editing Software in 2023 (User Tested)

Ashley is a photographer, writer, and film critic. When Ashley’s not writing essays on photography, cinema, and theory, he’s out taking pictures with retro film cameras.

WELCOME TO SHOTKIT
Enter your email to be sent
today's Welcome Gift:
19 Photography Tools
🔥 Popular NOW:


Shotkit may earn a commission on affiliate links. Learn more.