


Do You Need to Render Before Exporting in Premiere Pro?
Uncover the intricacies of rendering in Premiere Pro and determine whether it's essential before exporting for optimal video quality and efficiency.
Premiere Pro | Software | By Jeff Collier
One of the most common questions beginner and expert video editors alike ask is do you need to render before exporting in Premiere Pro.
You can render your project while working on it or export without rendering.
However, rendering before you export the video will make a huge difference in the export speed.
In this article, you’ll learn everything about the two processes and understand when you should render your project.
Let’s dive in!
Table of Contents
What’s the Difference Between Rendering and Exporting in Premiere Pro?
Many people use rendering and exporting interchangeably. That’s because exporting a file includes rendering, encoding, and saving.
Yet, rendering and exporting have different purposes. For this reason, many video editors prefer to separate the two processes by rendering their video before exporting it.
To simplify, here’s an explanation of each process and what it does to the final video:
Rendering
The rendering process transforms your spliced videos, sound effects, and frames into a viewable file inside Adobe Premiere Pro. However, the preview file won’t be available on your hard disk.
The process is a crucial part of video editing, as it allows for smoother playback of your project while letting you make further edits.
Keep in mind that after rendering a project, you can’t alter your previously made edits. Instead, you can only edit the rendered file.
That’s why many people confuse rendering with exporting. After all, they both create a final, viewable version of your project.
Yet, rendering is reversible, as you can undo it by right-clicking the rendered clip on the timeline and selecting Reconfigure, or Delete Render Files.
Adobe Premiere Pro can automatically render your project as you’re editing it for a faster export. Still, you can turn off this feature, so you’ll have total control of your timeline.
Exporting
As the name suggests, exporting is transporting your project onto your hard disk as a video file.
Then, the finalized video will be on your hard drive forever, regardless if you accidentally close the video editing software.
You can either export your video after rendering it or export the file as it is.
There are numerous export settings available in Adobe Premiere Pro to help you control the quality and file size of your finished project.
The settings in the export process include:
- Video format
- Video performance
- Aspect ratio
- Frame rate
- Frame size
- Bitrate encoding
- Target bitrate
- Time interpolation
Do You Need to Render Before Exporting in Premiere Pro?
While there’s a strong emphasis on rendering in the video editing community, you don’t have to render before exporting in Premiere Pro.
When you’re finalizing and saving your project, the video editing software will automatically render it during export.
Having said that, there are numerous reasons why rendering is an indispensable part of video editing, particularly in Adobe Premiere Pro.
Benefits of Rendering Before Exporting
Though you can export without rendering, here are all the different ways this method might simplify your workflow:
Smooth Playback
Finalizing and saving a project without playing it back multiple times is unheard of.
If you’re a meticulous editor, you might check the final product hundreds of times before exporting.
Well, if there are stacks of special effects, transitions, spliced videos, and audio clips in Premiere Pro, playback would be insufferable. Luckily, that’s where rendering comes in handy.
Instead of saving the file, viewing it, and then going back to make the necessary edits, rendering makes it all possible within the editing software.
Extra Control
It’s only natural that rendering gives you total control over the finalized project. That’s because you can preview the video and make edits in real time.
If you dislike an effect or an editing choice, there’s no need to worry. You can reconfigure the video clip to make the necessary alterations.
That’s not all. You can also render specific parts of the timeline or adjust the settings in Adobe Premiere Pro to automatically render the project while you’re editing.
Accordingly, rendering is exceptionally helpful when you’re editing a longer video, as you can precisely control each section of the project.
Faster Export
Watching the export bar move at an excruciatingly slow rate is every video editor’s nightmare.
The reason for this is simply rendering. While exporting saves the final video to the hard drive, rendering transforms the project into a viewable video.
So, if you have a longer video or have used many complex effects and layers in Premiere Pro, rendering while exporting can take hours.
In contrast, rendering your project while editing will bypass this problem. The export process will only consist of encoding and saving, which will take minutes at most.
How to Render Before Exporting in Adobe Premiere Pro
There are multiple ways to render before exporting in Adobe Premiere Pro. This depends on the type of project you’re working on and why you want to render your project.
Here are all the different ways to render before exporting:
1. Render the Whole Project
If you have a smaller project or prefer to keep rendering as a final step, you’ll need to render the whole project at once.
To render the entire timeline, you can utilize the In and Out points. The rendering effects will appear in the Sequence menu, or you can click Enter, and Adobe Premiere Pro will do the work for you.
2. Render a Section Within the Timeline
So, you want to still have control over the timeline, but you need to preview a specific section? Fortunately, you don’t have to render the whole project.
Adobe Premiere Pro allows you to select a certain part of the timeline and render it. The video, special effects, and audio of this area will merge, becoming one video clip within the timeline.
You can do this by:
- Drag the work area bar over the clip you want to preview, making sure you drag it from the center of the bar.
- Specify the work area by positioning the playhead and pressing Option + [ to set the beginning of the work area, and Option + ] to set the end.
- In the Sequence menu, you should find options for rendering the effects within the work area, rendering the entire work area, or deleting render files in the work area.
3. Background Rendering
Background rendering ensures that Premiere Pro automatically renders while you’re editing.
This can save plenty of time and effort, as you won’t have to go back and render specific clips or wait for the file to render while exporting.
To enable background rendering, you should do the following:
- Select Edit > Preferences > Media.
- In the Media window, check the box labeled Enable Background Rendering.
- Lastly, you can customize the background rendering settings in the preferences window below the checkbox.
4. Render Audio

Whether you’re rendering a sequence in the work area or rendering your entire project, by default, Adobe Premiere Pro doesn’t render audio.
This can cause problems during playback due to the different flow between the video and audio.
Accordingly, you need to render the audio by doing the following:
- Select Edit > Preferences > General.
- Check or uncheck the Render Audio While Rendering Video box.
- Click OK.
Tips for Rendering in Premiere Pro
Rendering is a pretty straightforward process. Yet, many beginners go through with the export process without rendering, as they find rendering useless.
That said, there are a couple of pro tips that’ll help you make the most out of Adobe Premiere Pro’s rendering process. These include:
Pay Attention to the Rendering Colors
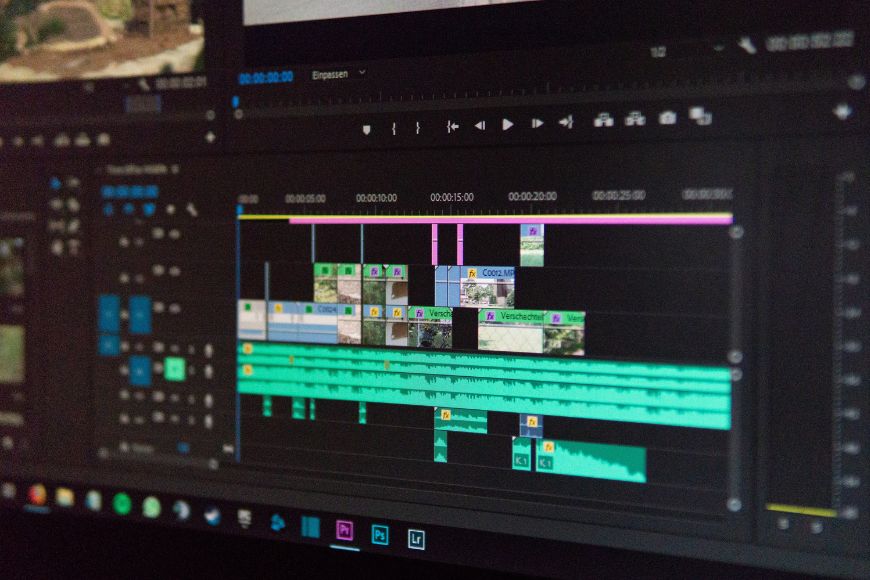
Adobe Premiere Pro has a color bar on top of the timeline to help you assess if the project needs rendering. This way, you’ll know what you’re in for when previewing the project.
Here’s what each color on the bar means:
- Green: The green color above our work area signifies rendered clips. If you’ve enabled background rendering or manually rendered the videos, the bar should be green.
- Yellow: If you’ve added effects to a clip but have yet to render it, the yellow implies that the area requires rendering. However, Premiere Pro will automatically render each frame individually as you’re previewing the clip.
- Red: A red rendered bar indicates the absence of render files associated with the clip. If there are lots of effects, Premiere Pro might not playback the clips smoothly, which means you’ll need to render these parts.
- No render color: If there’s no color bar on top of the timeline, this means the clips haven’t been rendered yet. However, these clips are simple enough, and the playback will be smooth without rendering.
Save a Copy of the Project Before Rendering
Going back to alter the edits you made before rendering isn’t possible. You’ll have to undo the rendering, which means losing all the edits you made after rendering, as well as your time.
That’s why saving a copy of your project before rendering is crucial. Simply save your project by clicking File > Save As, then choosing the destination and file name.
Optimize the Export Settings
If you’re rendering your project while exporting, this can take plenty of time. Yet, you can fasten the rendering process by reducing output file size.
That doesn’t mean you should compromise the video quality, though. Instead, make sure of the following:
- Match the frame rate of the output file to that of your project.
- Select a video codec that balances file size and quality, such as H.264.
- Scale down the resolution.
 Final Cut Pro vs Adobe Premiere in 2023: Which Video Editor?
 How to Render in After Effects (Fastest Way)
 Best Video Editing Software Tools for Movie Making
 10 Best Video Editing Software Programs for Youtube
 How to Export in After Effects (2 Best Ways)
 How to Render in DaVinci Resolve (+ Best Export Settings)

Jeff Collier is an experienced film photographer who enjoys experimenting with modern digital photography equipment, software and apps. He’s also an ex-world champion triathlete and avid cyclist, clocking hundreds of km each week in the beautiful Tweed Valley of northern NSW, Australia.

WELCOME TO SHOTKIT
Enter your email to be sent
today's Welcome Gift:
19 Photography Tools
🔥 Popular NOW:


Shotkit may earn a commission on affiliate links. Learn more.