


How to Use Capcut to Edit Videos for Free
Learn how to use Capcut for editing videos for TikTok and social media, enhancing your content with this user-friendly free editing app for iOS and Android.
Mobile Apps | Software | By Jane Howard
This guide to CapCut will help you unlock the ability to create captivating videos.
In the age of TikTok, YouTube, and Instagram, the art of video editing has become an invaluable skill.
CapCut is a free video editing app and a new, ever-growing tool that can help you achieve your video editing desires.
Whether you’re a beginner or an experienced editor, I’m here to delve deeper into the world of CapCut, so you can edit and create incredible videos.
With over two years of experience in using CapCut under my belt, I’ve evolved from a novice to a proficient video editor.
Through countless projects, I’ve learned to use CapCut to transform ordinary footage into attention-grabbing videos.
In this article, I will tell you what CapCut has to offer so you can decide if it’s still the best mobile video editing app.
Table of Contents
What is Capcut?
- Free to use
- Music and sound integration
- Templates
- Auto-Saves your project
- iOS and Android only
- Struggles with larger videos
- Ads and Watermarks
CapCut is a popular mobile video editing software app that allows users to create, edit, and enhance videos all from their mobile devices.
It offers a wide range of features, which makes it suitable for anyone who wants to broaden their video editing skills.
With practice and creativity, you can use CapCut to produce impressive videos for various purposes, from personal vlogs to professional content.
Capcut is an especially useful video editing app for TikTokers who need to make quick edits on the go.
Who made the Capcut app?
CapCut was created by a Chinese tech company called ByteDance, the same company that developed the popular social media platform TikTok.
What is Capcut used for?
CapCut is a flexible video editing app that caters to a wide range of video editing purposes, both professional and unprofessional. Common uses of CapCut include:
- Content Creation:
CapCut is commonly used by content creators on platforms such as TikTok, YouTube, and Instagram to edit and enhance their videos.
Users can use CapCut to create engaging content by editing impressive videos for their posts, stories, and reels, making it a popular tool for TikTok clips and YouTube shorts.
- Enhancing Personal Videos:
CapCut allows users to edit clips, transitions, audio, and effects to improve the overall impressiveness of their video.
It’s frequently used as a basic video editing tool to enhance personal videos.
- Educational Content:
CapCut can be used to edit and create educational videos and tutorials, enhancing the learning experience for their students and providing a more interactive visual learning platform.
- Short Films:
Some users have used CapCut to produce short films, using its cinematic effects to put together creative shorts.
How to Get Started with the Capcut Editing App
I understand that the prospect of video editing can be intimidating, especially for newcomers.
That’s why this comprehensive guide is here to simplify the process and provide you with the knowledge and skills to master CapCut.
To get started on CapCut, follow these steps:
1. Download and Install CapCut:
Visit your device’s app store, search for CapCut, download, and then install.
There’s also the option to use the online CapCut video editor or even download a version for Mac – get more info on both these options here.
2. Create an account:
This is optional – you can use CapCut without an account, but creating one allows you to save your projects and access your videos from multiple accounts.
Just sign up using your email, phone number, or a third-party account like Google or Facebook.
How to Use Capcut to Edit Videos for Free
Now that you’ve successfully got onto the application, I’ll provide you with the knowledge needed to make the most out of CapCut.
From the basics of importing clips to the intricacies of adding text, applying filters, and adjusting speed, after you’ve read this guide, you’ll be equipped with the tools and techniques necessary to bring your vision to life.
Start a New Project and Import Footage
After signing in, you’ll be greeted with the main screen; click on “New Project”.
First things first, tap the “+” button to import video clips and photos from your gallery. You can select multiple files at once.
Arrange Clips
These imported clips will appear at the bottom of the screen. Arrange the clips in your desired order by holding and dragging.
Basic Editing
To edit individual clips, select the clip by simply tapping it.
Once highlighted, you can use the different tools to trim, change the speed, or split the clip.
You can also add animation if you wish; once you tap “Animation”, you will be presented with multiple animation tools to use.
An “In” animation will put the animation at the beginning of the clip, and an “Out” animation, at the end.
Examples of this include; “Fade in & out”, “Screen Flash”, and “Ripple Effect”.
You may also wish to choose the “Combo” animation tool, which will overlay the animation over the start and end of the clip.
To add transitions in between clips, highlight the desired clip, select the transition icon, and choose from the variety of effects.
Filters can make your videos look more visually appealing, and by applying one, it can adjust colours, brightness, and contrast to create a more polished appearance.
To do so, highlight your clip and apply a filter using the “Filters” tool.
CapCut provides different filters used for different subjects, such as “Scenery” and “Food”.
Common Editing Techniques on Capcut
There are lots of ways you can edit your videos with Capcut, but here are some of the most common questions about techniques.
How to use the green screen on Capcut
Using the green screen tool can be a creative way of making your video more innovative and entertaining.
Once you have downloaded a green screen video onto your device, import your media into your project so that it appears on the timeline.
Using the “Add Overley” feature, import your green screen video as an overlay on your background video.
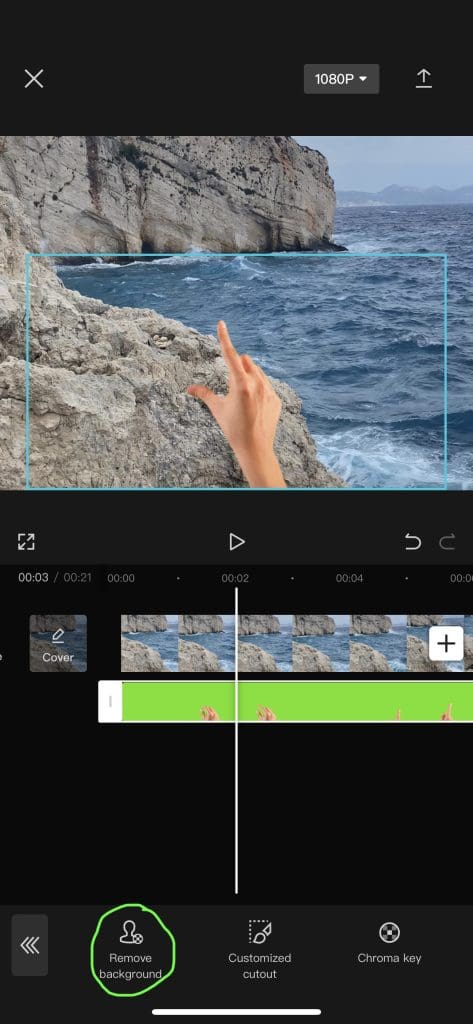
Along the menu at the bottom of your screen, you should find the “Remove Background” button.
When you click this, it will automatically remove the green screen for you.
Furthermore, you can use the “Chroma Key” to select the colour you want to remove. Simply use the colour picker to remove the green screen.
Continue to edit your video with your green screen effect.
How to blur on Capcut
Blurring a part of your video is a handy tool for protecting privacy in a clip, or it can be used for artistic purposes.
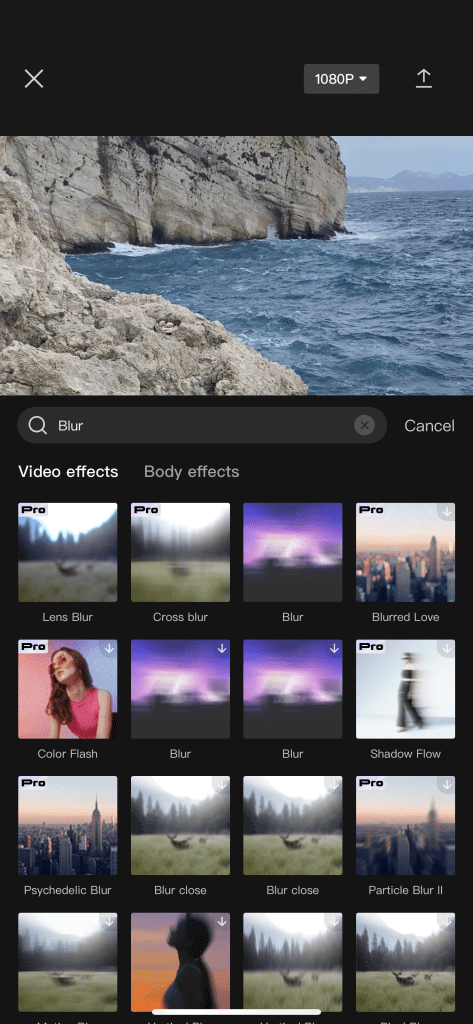
Under the “Effects” feature in CapCut, there is a search bar tool that allows you to find any effect.
Simply type ‘blur’ in, and it will provide you with a variety of different blurs ranging from “mosaic” to “lens blur”.
The mosaic blur pixelates the image, which may be ideal for hiding content for privacy reasons
How to reverse on Capcut
Reversing a video can add a unique storytelling element to your videos. It can be an artistic tool to create abstract or experimental content.
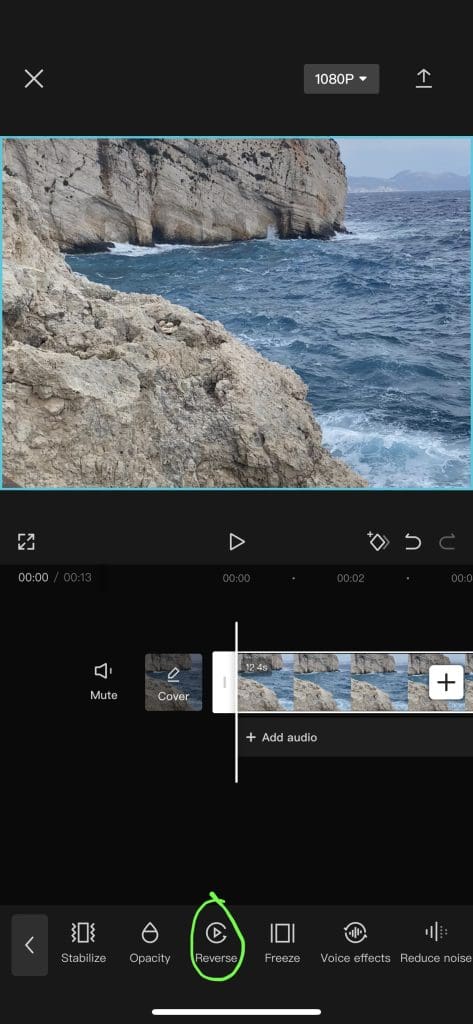
To reverse a clip in CapCut, start by highlighting the clip by tapping on it.
Along the bottom, there is a list of editing tools; scroll along until you come to the “Reverse” feature (it looks like a play button inside an anti-clockwise arrow).
If you tap this, it will automatically reverse your video.
It can take up to a few seconds, depending on the length of the clip.
How to remove CapCut watermark

At the end of the timeline, there will be an automated clip with the CapCut logo.
If necessary, you may select this ending by tapping on it and delete it by clicking on the delete icon on the bottom.
The CapCut watermark may also appear on your videos once exported.
If you wanted to get rid of this, you would need to upgrade your app to CapCut Pro.
Alternatively, you can upload your video to your socials, and CapCut will remove the watermark.
How to add text on Capcut
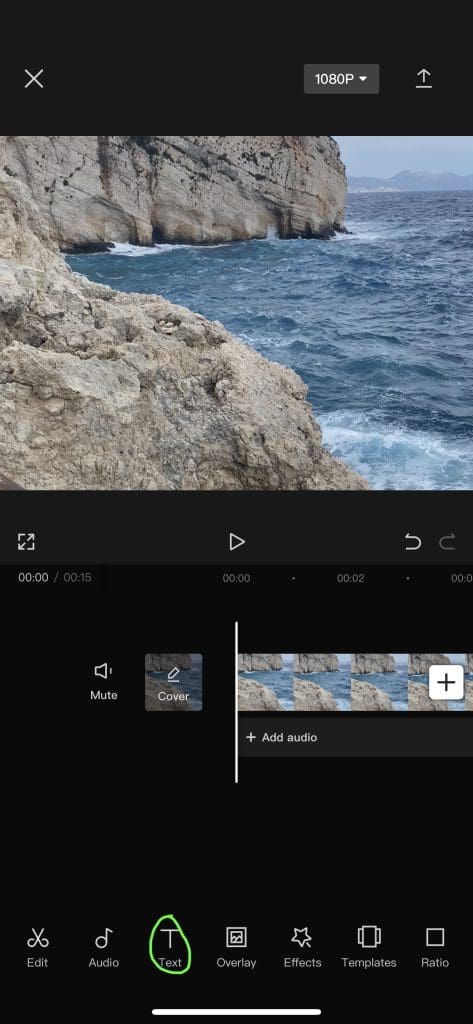
You can add text easily on CapCut to add titles, captions, subtitles, and other textual elements to enhance your video content.
At the bottom of the screen, underneath the timeline, there is the “Text” icon (the capital letter T), which will then open a variety of options.
If using this tool for the use of subtitles, CapCut has an “Auto Captions” feature which will detect the sound of your videos and automatically create a subtitle overlay.
Alternatively, you can add text by clicking on the “Add Text” tool, which will then open your keypad, and you can start typing away…
Text editing is easy with CapCut. There are options to change the font, style, effects, and animation of the text.
Once you are happy with your text, you can resize and move it to go where ever you desire.
Beneath the clip timeline, the text will appear as an overlay.
You can now trim it, as you would a clip, and determine how long you would like it to appear on the screen.
How to add music to Capcut
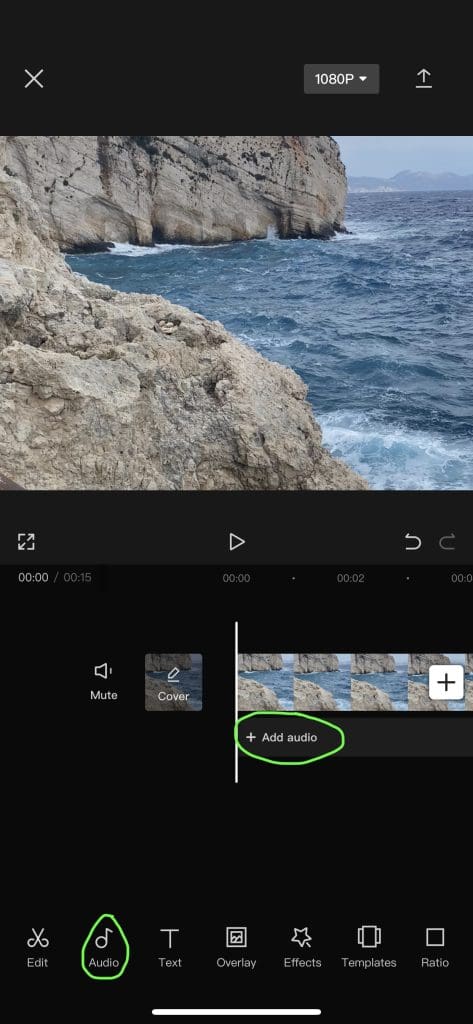
Music can enhance the mood and atmosphere of your video, making it more engaging and appealing to your audience.
Users can easily add music and sound to their clips, as well as adjust the volume level and trim audio tracks.
Beneath the clips in the edit timeline, click on “Add Audio” to browse CapCut’s extensive list of exclusive copyrighted songs.
You can choose the mood and category of the audio, ranging from “R&B” to “Travel”.
You can also find popular sounds from social media here.
Alternatively, you may use music saved on your mobile device’s music library by selecting the file button, or you can also use sound extracted from previous videos.
How to do slow-mo on Capcut
Making a clip slow-motion (slo-mo), allows you to create dramatic and visually appealing moments within your video.
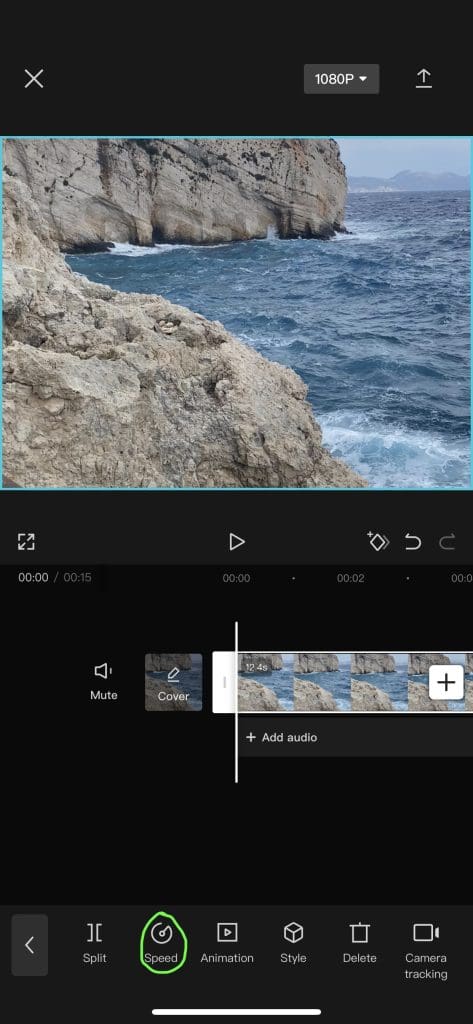
Transforming a clip into slo-mo in CapCut is very straightforward.
Once you tap on the clip that you want to edit, In the toolbar at the bottom of the screen, you will find a speed adjustment tool labelled “Speed”.
By tapping on that, it will take you to a “Normal” or “Curve” graph.
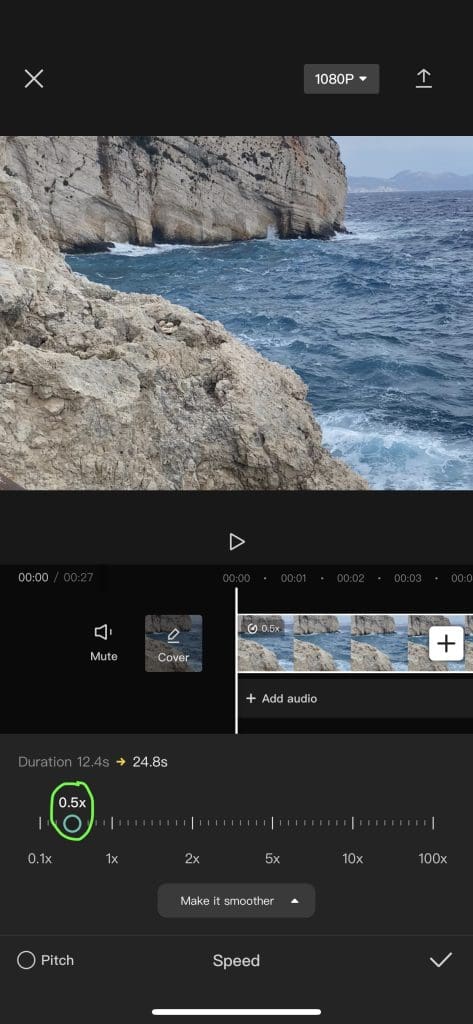
Select “Normal”, and you will see a slider that allows you to adjust the speed of the clip.
To create a slow-motion effect, move the slider to the left, reducing the speed as much as you wish.
For example, if you want to make the clip play at half speed, move the slider to 0.5x.
You may adjust the speed to any value you prefer, but 0.5x is commonly used for smooth slow-motion effects.
On the other hand, you can drag the slider to the right to speed your video up.
How to zoom in on Capcut
If you want to emphasize or draw attention to a specific area of your video or even create a dynamic visual within your project, zooming in is the perfect feature.
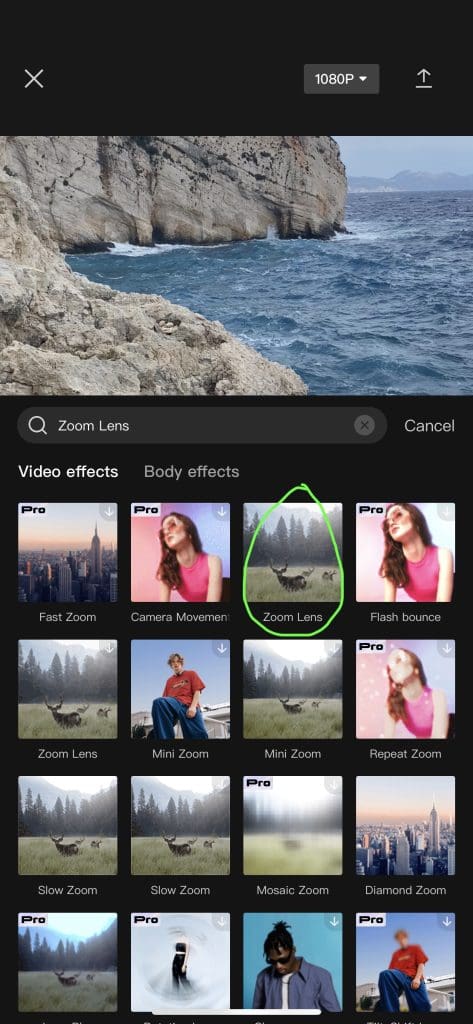
Starting off, tap on the “Effects” icon under your video timeline.
You can browse the features or search directly for ‘Zoom Lens’.
Once selected, apply this zoom feature to your clip.
This effect will appear as an overlay in the timeline in purple.
You can extend or trim the effect in the timeline by stretching it.
Furthermore, you can adjust it manually by clicking on the adjustment tool when the effect is selected.
Here, you can change the speed and range of the zoom.
How to use Capcut templates
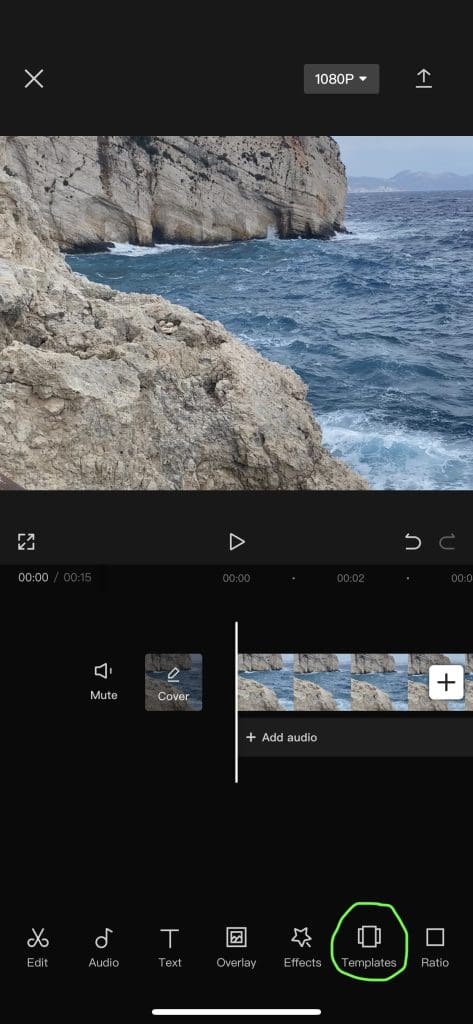
Templates can save you time and help you achieve professional-looking results with minimal effort.
CapCut offers its users templates that can enable you to create impressive videos quickly and easily.
Once your media is imported and on the timeline, look for the “Templates” icon at the bottom of the screen and tap on it.
Browse through the extensive available templates. CapCut provides different styles, themes, and effects.
You can also search by “CapCut” trends to find a template for trending videos.
Once you select one, a preview of the template will come up, and you can see how it will look with your content.
Select the template that best suits your project by clicking it. The template will then be applied to your timeline clips.
Advanced Video Editing Techniques in Capcut
Using Effects and Transitions
Using video effects and transitions can transform a normal video into an impressive one by enhancing the visual appeal.
CapCut offers an extensive amount of effects and transition options, most of which are free to use (the more advanced ones can be used with a pro subscription).
Simply browse the options on the “Effects” and “Transitions” from the menu and select the one that best suits your video.
Colour Correction and Grading for Film
Colour correction and grading are integral to creating a professional and captivating visual experience for your audience.
In CapCut, the process of colour correction and grading is somewhat simplified compared to dedicated colour grading software, but you can still achieve effective results.
Once your clip is highlighted by selecting it, along the tool section at the bottom of your screen, you will find the “Adjust” icon.
Using the sliders, you can adjust the brightness, contrast, and saturation. Use these to balance exposure and colour.
Sound Design in Capcut
Sound design is an important aspect of video editing, and while CapCut may not offer the depth of sound design capabilities found in dedicated audio software, you can still enhance your video’s audio in different ways.
You can control the volume of your audio clips by selecting the individual clip and adjusting the volume slider.
Make sure that your audio is balanced with your video’s sound.
Layering multiple audio tracks can create a more dynamic sound.
For example, adding background music to layer alongside narration or sound effects.
Fading your audio in and out can make a huge difference to the overall video experience.
To do so, simply click on the audio, and the option to “Fade” will appear.
You can then use the sliders to determine the fade in and out duration.
Enhance your video with sound effects. CapCut may offer a library of different sound effects, but you can also import your own.
If you want your video to include voiceovers or narration.
I’d recommend recording these within the CapCut app using the “Voiceover” feature.
You can then edit your recording more easily and synchronize it with your video.
Exporting for Different Platforms
CapCut offers different export options so that your video meets the specifications of different platforms.
You can choose various resolution options ranging from standard definition (SD) to ultra-high definition (4K).
Higher resolution is more suitable for YouTube and lower for TikTok.
CapCut also offers different frame rate options.
A higher frame rate means a smoother video quality. However, different platforms require different frame rates, so bear that in mind.
Finally, you can choose multiple video formats, such as MP4, MOV, and AVI. MP4 is suitable for most platforms but may not be accepted for all.
Tips and Tricks for Efficient Editing in Capcut
Download CapCut on your laptop or PC
Editing your videos on CapCut has been made easier by making a desktop version.
Editing on the app is great for quick clips, but I find having the footage on a bigger screen and, ultimately, a bigger timeline makes it much easier to edit individual clips.
Keyboard Shortcuts for Video Editing
A great feature for desktop use that CapCut has is keyboard shortcuts.
Using the shortcuts can make your editing easier and quicker, plus they’re simple to use.
‘cmd’ + ‘Z’ is undo
‘I’ and ‘O’ are input and outputs
‘cmd’ + ‘C’ is copy
‘cmd’ + ‘V’ is paste
Get Rid of CapCut’s automatic ending
Go to settings on the home page and select “Discard Ending”, and it will apply this to all future edits.
As mentioned earlier, if you want to get rid of the watermark, you may have to purchase the Pro subscription or upload your project to your preferred social media platform.
Capcut Price: How Much is Capcut Pro?
The great thing about CapCut is that it’s free to use, and this includes the majority of its available features.
However, you may wish to upgrade and purchase a subscription to CapCut Pro, which is a monthly subscription of $15.29.
By purchasing, you get unlimited use of all their Pro features and the ability to remove the watermark.
They offer a 7-day free trial if you wish to try before you buy.
Capcut Video Editing Software | Final Words
Finding a suitable video editing software is crucial for editors.
Whether you’re an aspiring videographer or simply someone who wants to enhance their personal videos, CapCut may just be the free video editing tool you need to unleash your creativity.
Just use the tips and tricks you’ve learned today and download the app to create, edit, and enhance impressive high-quality videos for any purpose.
 How to Remove Audio from Video (Windows, Mac & Mobile)
 How to Edit in DaVinci Resolve (Tutorial for Beginners)
 How to Use DaVinci Resolve in 2023: Beginner’s Guide
 Best Video Editing Software Tools for Movie Making
 How to Edit in Filmora (A Guide for the Absolute Beginner)
 10 Best Video Editing Software Programs for Youtube

WELCOME TO SHOTKIT
Enter your email to be sent
today's Welcome Gift:
19 Photography Tools
🔥 Popular NOW:


Shotkit may earn a commission on affiliate links. Learn more.