


How To Photograph Birds In Flight
Learn how to photograph birds in flight. We cover tips, techniques and which camera settings to use for incredible bird photos!
Learn | Photography Guides | By Greg Cromie
As photographers, a unique challenge exists in mastering how to photograph birds in flight.
Witnessing birds in flight has inspired human adventure and invention for centuries. There’s something truly majestic about the fluid motion of a bird taking wing from a lake or soaring among mountain tops.
Capturing these moments in crisp, precise images is a skill unto itself – but it’s not an impossible one to perfect.
With a little patience, a lot of practice and a read of our tips for photographing birds in flight, you can capture amazing images.
Along the way, we’re going to give you practical advice for choosing a location, understanding bird flight, and essential camera settings.
Let’s take a closer look at nailing the necessary skills to photograph birds in flight.
Table of Contents
7 Tips for Photographing Birds in Flight
1. Location, Location, Location
Before you pack your telephoto lenses into a camera bag, it’s critical to do some preliminary research online. While you could just head out to your local park or nature reserve, you want to make the most of the outing.
I would highly recommend searching on local government or parks services sites. They will often have a section dedicated to local wildlife and birdlife. Further research will give you a greater insight into what bird species exist, what their seasonal patterns and behaviour are and the best places to spot them.
In general terms, birds spend a considerable part of their day searching for food. Setting up near a food source such as a lake or river makes a lot of sense. Or, if you’re after smaller species that feed on insects, then be on the lookout for flowering bushes and trees.
Again a little bit of time online will help you know how to find the bird you’re after.
You may need to travel a little bit to reach your destination – not many people have a lake or mountain range in their backyard. (See: how do you photography mountains?)
Also, you may need to hike for some time to reach an ideal vantage point, and use binoculars or a spotting scope.
Make sure that you have a suitable backpack for your gear and include a couple of snacks and water bottles. Above all else, let someone else know where you’re heading.
Always be on the lookout for birds and try to travel quietly so as not to spook them or disrupt their habitats and behaviour.
2. Use Optimal Lighting
Having good lighting when photographing birds in flight is essential. While we’ll cover settings in more detail later, having ample light will ensure you can optimise your camera settings.
As birds fly across the sky, you want to ensure that you’re not shooting directly into the sun. You should position yourself so that the sun, or strongest glare on a cloudy day, is behind you. That way you’re not having to deal with intense glare causing an over-exposed image.
Also, having the sun behind you will ensure that the subject you’re photographing is in full light.
Photographing first thing in the morning when the sun has risen can produce outstanding bird-flight images with a golden glow.
Equally, capturing such images before sunset can add significant drama to your image with interesting skies and scudding clouds.
But I cannot stress enough how critical it is to shoot when there’s as much light as possible.
3. Be The Ninja

As with shooting any wildlife, there are very good reasons why you need to become as silent and invisible as possible.
Also, as you’re usually shooting birds in a natural environment, it’s critical to not disrupt the eco-system or habitat of any animals – on the ground or in the sky.
Birds that soar high in the sky may be a long way away, and you may think you cannot disturb them. But soaring birds are usually on the hunt for small ground animals. These birds have amazing long-distance sight and can spot prey from a vast distance.
If you disturb their potential prey, they will likely fly out of range to a new location. However, if you’re quiet, still, and even hidden, you increase your chances to capture that bird diving from a great height to snatch up its lunch.
If you’re serious about this genre, you could invest in camouflage clothing and even lens wraps. Plus, you can purchase small camouflage tents with viewing slots. These are often used by birders and hunters, so check out your local camping store.
Finally, a true ninja will sit quietly and study their target without taking any action. The same applies when photographing birds in flight as you want to take the time to study them.
Observe their behaviour, paths of flight, how often they dive for prey and where they take off and land from. This knowledge can help you find a suitable location and better anticipate their behaviour to capture a stunning shot.
4. Pack The Right Gear
To successfully photograph birds in flight, there are some essential pieces of gear that you’re going to need to pack.
First and foremost, you want to have a suitable camera bag or backpack. You may need to get up from one location and quickly relocate to another to get the best vantage point. Having your gear stored safely and securely is key.
Your camera for birding should ideally have good low light performance, especially when shooting at fast shutter speeds. A camera that can have shutter speeds from 1/2000 up to 1/800 is going to deliver the best outcomes.
Birds move surprisingly fast, and being able to capture them in crisp detail is going to require your camera to be faster.
Attached to your camera, you’re going to need a good zoom lens or telephoto prime. Even birds that fly low to the ground will disappear if you get too close. Having a telephoto lens for bird photography allows you to say well away from your subject and capture their natural behaviour.
Ideally, you want a lens with a minimal zoom range of 200mm – anything above this is a bonus. Some lenses are specifically designed for wildlife photography that has up to a 600mm range.
A zoom gives you more flexibility, but a prime lens will be just as effective.
Finally, in some situations, using a tripod can make a huge difference to your success. Especially when you have a long and heavy zoom lens attached to your camera – handholding it all day is going to hurt.
Placing your camera on a sturdy tripod with a good-quality ball-head allows you to swivel the camera while panning and tracking a bird in flight.
5. Master Your Settings for Photographing Birds in Flight

Let’s recap: you’ve done your research on the local birdlife, picked the best time of day for optimal lighting, done your basic ninja training and packed your kit.
Next, we’re going to take a look at how to best manage the settings on your camera to ensure success with photographing birds in flight.
- Shutter Speed
When it comes to photographing birds in flight, there are a couple of options for how you use shutter speed to control the outcomes of your image. And by that, we mean how sharp your subject is and how you capture its movement.
In some cases, capturing a bird in perfect sharpness can deliver a dramatic outcome.
Not only can you appreciate the gorgeous detail and beauty of the animal, but you can freeze its motion. Freezing a Bald Eagle an instant before its talons strike the water and its unsuspecting submerged prey is visually awe-inspiring.
On the flip side, capturing a little bit of motion in the fluttering wings of a Hummingbird can be appealing too. (Best of luck with this one as some Hummingbirds can beat their wings up to 80 times per second!)
Practice and experimentation will teach you what works best in each scenario – you can also check our guide on how to photograph dragonflies for more related tips.
To achieve super-sharp images, you’re going to need to shoot with fast shutter speed. The best shutter speed setting is going to be determined by the pace at which the bird is moving. Plus, the speed of its wings and the lighting conditions will also be factors.
As you speed up the shutter speed, the time that the sensor is exposed to the light diminishes. Less light hitting the sensor means darker images.
A simple rule of thumb is to start with a 1/1000 shutter speed, practice some shots and then check the outcomes. If the images are not sharp enough, then try 1/2000 and so on. A big part of the joy of photography is the trial and error to reach the final image.
- Aperture

Close-up of harris hawk, parabuteo unicinctus, in flight facing camera in autumn. Wild bird of prey approaching in air with intense look into camera. Animal wildlife in nature.
Regardless of being a zoom or a prime, all lenses have an aperture. Essentially, the aperture is the size of the opening that the lens creates to allow light through to the sensor.
A wide aperture has a wide opening and is represented by a smaller number on the aperture control. For example, an aperture of f/1.4 or f/2.8 is considered to be a wide aperture. A narrow aperture has a narrower opening and is also represented by a number. The larger the number, such as f/11 or f/16, the narrower the aperture.
Aperture has a direct impact on the depth of field in an image and what elements are in focus. A narrow aperture such as f/11 will result in a depth of field where everything in the image is in focus – this is often used in landscape compositions.
A wide aperture such as f/2 will result in your foreground subject being in crisp focus, but the background will be soft and blurry. This would be perfect for portrait photography.
When it comes to photographing birds in flight, a good starting place for aperture is between f/5.6 and f/8. This way, you’re sure to have your bird in sharp focus with any background elements being a little soft.
This results in an appealing image where the bird is more interesting than its surroundings.
- Autofocus
Of course, all the camera settings in the world are pretty much useless if you cannot get your bird in sharp focus.
Fortunately, most cameras have comprehensive focusing systems that offer various modes for capturing a moving subject. Some focusing systems will provide options like single point autofocus and zone focusing.
Some photographers prefer one over the other, but I highly recommend you play with both to find what suits you best. Either way, it’s always best to have your autofocus set to the continuous focusing mode or equivalent.
Cameras generally have some form of tracking mode with the better-known brands excelling in this technology. With tracking autofocus, you can select the subject to track, or the camera can select it for you. Once selected, the camera will hold focus on that subject as it moves and as you move.
Some systems will lock on, and even if that bird flies out of sight for a second, the camera will lock focus on it again when it’s visible.
Tracking can apply within a 3D space – the bird flying across the frame, up the frame or even directed towards you.
Some cameras have taken the human eye and face tracking a step further to include animal-eye tracking. The camera sensor and processor will recognise an animal’s eye (including a bird’s) and hold focus to that eye.
Our best tip is to take the time to understand how your camera’s focusing system works well before you go looking for birds. Read its manual, watch some YouTube tutorials and play with it a lot. Test it out in your backyard, tracking your dog or kids as they run around.
- ISO

The final camera setting that you need to deal with is the ISO. In modern cameras, ISO controls the sensitivity of light as it hits the sensor.
You will no doubt have seen images taken in the dark where there’s a lot of noise or grain in the image. This generally happens when the ISO is too high.
In bird photography, you want to keep your ISO as low as possible to prevent a similar distortion from appearing in your images. Keep in mind that you want a fast shutter speed, and that will reduce the amount of light hitting the sensor.
You also want a mid-range aperture, and that too will limit the light hitting the sensor. So managing your ISO can be a little tricky as the instinct is to bump ISO up, so more light is allowed to hit the sensor.
Again, this is a balancing act and one that you will perfect with time and practice.
6. Play With Composition
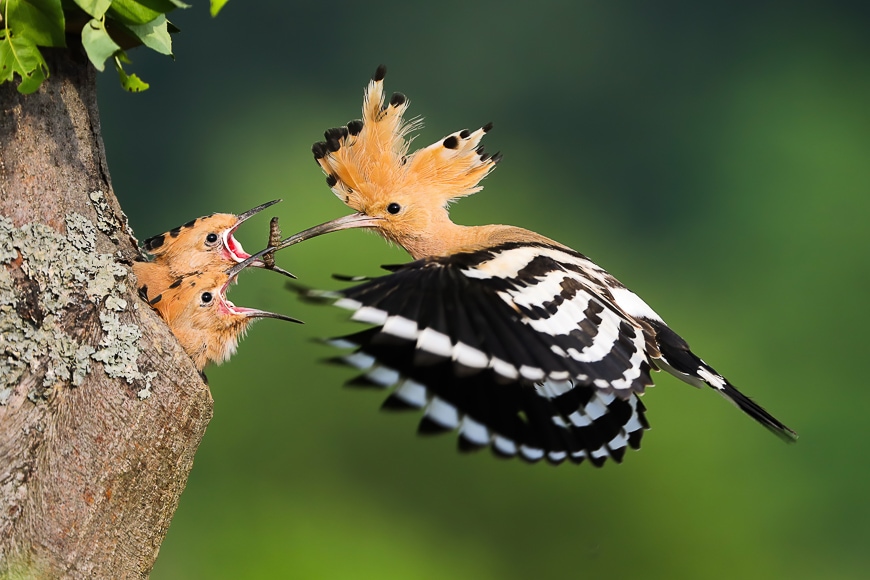
Family of eurasian hoopoe, upupa epops, breeding in nesting season in summer nature at sunrise. Adult bird with open crest and striped wings in flight hovering in air and feeding young chicks.
The composition is all about setting up the shot so that you have a great structure and balance within your image. When tracking a high-speed bird in flight, you’re often too focused on the bird to notice the background.
To overcome this, take a few minutes to scan the setting that you’re likely to capture an image within. Know where the elements are that you don’t want to capture – other people, buildings, etc. While you cannot control nor always guess where a bird will fly, at least by having checked out the scene, you have some idea of what to expect.
Always look for elements of interest such as background landscape, clouds, trees and bodies of water.
Also, shoot with your camera set to high continuous burst, where multiple frames per second are captured. This way, you’ll have many photos to work with, and you can reject the ones where the composition failed.
As for your start subject, try to focus on the bird’s eye being in the centre of the composition and don’t zoom in too close. You can always slightly crop the image later if the bird is not sitting properly within the frame.
7. Use This Tracking Technique

Birds in flight images
As mentioned earlier, the use of a tripod can help support your camera gear, especially when you’re using big, heavy telephoto lenses and trying photograph a bird flying towards the camera.
The other benefit of using a tripod is that you can employ it when tracking a bird’s flight across a scene.
By having a tripod with an adjustable ball head, you can comfortably pivot and pan the camera to follow the flight-path. Just make sure that the tripod is not too loose as it will result in your gear flopping around.
By first practising a panning motion horizontally and then diagonally across a scene, you have a far better chance of smoothly tracking a bird.
With your autofocus set to a tracking mode, when you lock on the bird, you can pan and stay on it at the same pace as the movement. And, with continuous high or burst shooting, you’ll grab multiple shots with the likelihood that more of them are in the frame and focused.
This way, you won’t have the bird slipping in and out of frame as you move the lens. It’s quite a challenging skill to master, but with practice, you will nail it.
As long as you don’t zoom in too close and work to keep the bird in the frame, you will be sure to capture some amazing shots. If you zoom too close, it makes it harder to track erratic movement.
Birds in Flight Photography FAQs
How do you photograph a flying bird?
Make sure you have your camera set to continuous focusing mode (or equivalent) and a fast shutter speed. You may wish to employ a tripod for smoother tracking, especially if you have a heavy lens. Then, work on mastering your settings and compositional techniques (more tips on these above).
What shutter speed should I use for birds in flight?
To crisply capture birds in flight, you need a fast shutter speed to freeze the movement. A simple rule of thumb is to start with around 1/1000 and adjust from there.
Which mode is best for bird photography?
Because you need a fast shutter to capture birds flying, it can be useful to use shutter priority mode. You can also use manual mode if you’re comfortable adjusting all your settings manually. Auto mode is best avoided.
Final Words
Bird photography is certainly not as easy as some photographers make it look. But the beautiful thing about challenging projects is that they’re extremely rewarding.
With birds on the wing moving at rapid speeds, you’ll have some work ahead of you nailing the right camera settings and photography techniques. But hopefully these tips have given you an excellent starting point.
Have you tried photographing birds in flight before? How did you go and what gear did you use? Let us know!


I am a Melbourne based street photographer and blogger. I love to travel and make a regular trip to Japan to photograph and document its dynamic culture.

WELCOME TO SHOTKIT
Enter your email to be sent
today's Welcome Gift:
19 Photography Tools
🔥 Popular NOW:


Shotkit may earn a commission on affiliate links. Learn more.