


How to Format a Memory Card (On Camera, Computer & Phone)
Formatting a memory card is an important step for performance, error correction, file system compatibility and data management. Here's how to do it properly.
Learn | By Ana Mireles
You’re about to learn how to format a memory card using whatever camera, laptop or phone you own.
I recommend that you format your memory card before using it for the first time on any new device.
Then, when you’ve finished exporting your photos and videos somewhere safe, you should format the memory card again.
(If you’ve accidentally formatted the card without backing up its contents, don’t worry – I’ve included some tips to help you recover everything below.)
So when you need to format an SD card, keep reading to find the simple solution.
Table of Contents
How To Format a Memory Card Using a Laptop or Computer
Mac
To format an SD card on Mac, follow the instructions below:
- Insert the memory card into the corresponding port. If your Mac doesn’t have one, you’ll need to use a memory card reader.
- Next, go to Finder > Applications > Utilities > Disk Utilities and select the memory card you want to format from the list of devices.
- Click Erase on the top menu bar.
- Now, choose a name for the card and the system type you want to use. If you plan to use the memory card on your camera, the best choices are ExFat or MS-DOS (Fat).
- Wait until the formatting is done and click Finish.
- Now you can Eject the card and safely remove it.
PC
To format a memory card on PC, follow the instructions below:
- Insert the memory card into the reader – it doesn’t matter if you use the one from your computer or an external one.
- Open Windows Explorer and select the memory card you’re formatting.
- Click Format.
- On the Format screen, you can select the system type, whether you want a Quick Format or a regular one, amongst other things.
- Choose the settings you want and click Start.
- You’ll get a warning pop-up sign letting you know that formatting will erase all data. If you have already backed up everything important, click OK. Otherwise, close the window, back up your files and start the process again.
- If you chose a Quick Format, the card will be formatted in a couple of minutes -tops. If you didn’t enable this choice, the process might take around 20 minutes for an 8GB card.
- When you get the Format Complete notice, click OK.
Windows 10
To format a memory card on Windows 10, follow the instructions below:
- Insert the memory card or connect the memory card reader.
- Open the File Explorer which you can do with its icon on the taskbar. Alternatively, press Windows + E on the keyboard.
- On the left-side panel, click This PC.
- Then, right-click on the memory card you want and select Format from the menu.
- Next, choose the file system of your choice and click Start.
Chromebook
To format a memory card on Chromebook, follow the instructions below:
- Once your memory card is connected to the Chromebook, navigate to Apps > Settings > Files.
- Right-click on the memory card and select Format Device on the pop-up menu.
- You’ll receive a warning that this process deletes all your data. If you backed up your files, you can proceed by clicking OK. Otherwise, save your files elsewhere before formatting.
- A notification will show in the bottom right corner once the formatting is complete.
How To Format a Memory Card Using a Phone
Here’s how you can format the SD or micro SD cards from a mobile device. Sometimes, you can even use a smartphone to format an external memory card, as long as you have a memory card reader.
Android
To format a memory card on Android, follow the instructions below:
- With the card inserted into your phone, open the Settings app on your phone.
- Tap About Phone.
- Tap on Storage.
- Tap Format SD card and accept.
iPhone
You cannot format an external memory card on iPhone. You can only access and copy the files, photos and videos by using the Files app. Here’s how to do it.
- Connect the Lightning USB Camera Adapter to your iPhone via the charging port. You can try connecting the card reader directly to the iPhone – however, this often gives an error.
- Connect the power cable to the adaptor.
- Then, connect the card reader with the card inserted.
- Open the Files app and go to Browse.
- Tap on the SD card. You’ll find it in the Locations section.
Samsung Galaxy
To format a memory card on Samsung Galaxy, follow the instructions below:
- Open the Settings app.
- Tap on Battery and Device Care.
- Tap Storage.
- Swipe left to switch to the SD card screen.
- Tap the three-dots menu on the top left corner and select Advanced.
- Tap SD card.
- Tap Format.
- Confirm by pressing Format SD card.
How to Format a Memory Card On a Camera
Here are the instructions on how to format a memory card using some of the most popular cameras, organised by brand.
Sony Cameras
- Turn on the camera while the memory card is inside.
- Open the menu by pressing the menu button on the back of the camera.
- Move over to Tab 5 – the one with the yellow toolbox icon.
- Go to Setup 5 and scroll down to Format.
- Choose which memory card you want to format and press enter.
- Repeat the process for the other card if you want to format both of them.
Sony a7iv / Sony a7siii
- When the camera is turned on and the memory card is inserted, you can access the format menu by pressing the Menu and the Trash buttons simultaneously. You can also follow the path Menu > Shooting > Media > Format.
- Now, choose the slot that holds the memory card you want to format.
- Press Enter if you want to perform a Quick Format. This is the one recommended most of the time.
- If you want to perform a Full Format, press the Trash button. Then, press enter. This is the type of format you would do if you have a new card or if you want to make sure none of the data can be recovered.
- Do the same process again if you want to format the card in the other slot as well.
Sony a7ii
- Turn on your Sony a7ii camera and make sure your memory camera is inserted.
- Menu > Setup > 5 > Format.
- Press Enter.
Sony ZV1
- Turn on your camera and press the menu button.
- Using the control dial go to the fifth tab with the yellow toolbox.
- Then, move down and to the right until you reach Setup 4.
- Select Format > Enter.
Sony a6000 / Sony a6100 / Sony a6300
- Keep the card you want to format inside the camera and turn it on. Make sure it has more than 1% battery – otherwise, you won’t be able to format the memory card.
- Next, press the menu button.
- Move to the tab with a toolbox icon which is the number five.
- Select Format from the menu and press Enter. The process may take a few minutes, don’t turn off the camera while it’s formatting the card.
- Related: How many pictures can 256GB hold?
Canon Cameras
Canon Rebel t7
- Turn on the camera with the card inside it.
- Open the menu and move to the fifth tab – the first one with a wrench icon.
- Scroll down and select the Format Card option from the menu.
- Press Ok, then the Set button to start formatting.
- Once the formatting is over, the menu will reappear. At this point, you can press the trash can button if you want to perform a low-level format.
Canon Rebel t1i
- Make sure the card is inside and move the power to ON.
- Press the menu button.
- Using the right arrow button, move to the first Setup tab – the wrench icon one.
- Using the down arrow go to Format and press the button Set.
- Press OK, then Set again.
- This will do regular formatting on your card. If you want to proceed with a low-level format press the trash can button, then OK.
Canon EOS 450d / Canon Rebel XSI
- Turn on your camera and press the menu button.
- Go to the first Setup tab using the arrow buttons. Then down to Format.
- Press the set button.
- Choose OK and press Set again to start formatting.
- You can choose the low-level format by pressing the trash can button, then press Set.
Canon 5d Mark III / Canon 5d Mark IV
- Insert the card into the camera and turn it on.
- Press the menu button.
- Move to the Setup tab and access the first page.
- Select Format Card.
- Choose which one of the two cards you want to format.
- Select OK, then press Set.
- If you select memory card 2, you can perform low-level formatting by pressing the trash can button.
- Turn on the camera making sure that the card is inserted.
- Press the menu button.
- Move to the Function Settings and select the Setup 1 page.
- Select Format Card from the menu.
- Press the Info button if you want to perform a low-level format. Otherwise, leave this option disabled.
- Use the right arrow button to select OK.
- Press the Set button.
Canon G7X Mark II / Canon G5X / Canon EOS R
- When the card is inside, press the power button to turn on your camera.
- Press the menu button and use the Zoom dial to reach the Function settings.
- Then, move to Setup 1 and scroll down the menu to select Format. Press the Set button.
- Press Info if you want to do a low-level format. Otherwise, simply choose OK and press the Set button.
Canon 90D
- With the memory card inserted, turn on the camera.
- Press the menu button.
- Tap on the Function Settings > Setup 1 menu.
- Tap on Format Card.
- Check the box for low-level formatting if you want to enable this function.
- Tap OK.
Nikon Cameras
Nikon D5600 / Nikon Z6 / Nikon D3200 / Nikon D3000 / Nikon D3300 / Nikon D90
- Turn on your camera.
- Press the menu button.
- Go to the Setup Menu.
- Select Format memory card.
- Press OK.
- You’ll get a warning message telling you that all your images will be deleted. Select Yes if you have already backed up your data and you want to proceed.
- Press OK.
Nikon ‘Two Button Card Format’ technique
All the cameras mentioned above have the Format memory card feature inside the menu. However, most Nikon cameras also have a two-button shortcut that does the same thing.
Locate the ISO and the Trash can buttons on the camera. They should have a red Format sign underneath. Simply press and hold both of them at the same time. Once the word ‘For’ is blinking on the screen, you can let go.
Press the buttons again to start the formatting. If the camera has two memory cards, you can toggle from one to the other using the rear command dial.
Nikon Coolpix p900
- Insert the memory card into the camera and turn it on.
- Then press the menu button and go to Setup > Format card.
- Press OK.
- Related: How Many Pictures Can 16GB Hold?
Fujifilm Cameras
- Insert the memory card.
- Turn on the camera.
- Press and hold the trash can button.
- After three seconds, push the scroll wheel while you’re still pressing the other button.
- This will open the Format menu on the screen. Here, choose which memory card you want to format.
- Confirm the operation by choosing OK with the arrow buttons, then press the Menu/OK button.
Fujifilm X-T20
- Turn on the camera with the memory card on it.
- Press the Menu/OK button.
- Navigate the menus to Setup > User Settings > Format.
- When prompted, confirm by highlighting OK. Then, press the Menu/OK button.
- Alternatively, you can use the shortcut version described in the Fujifilm X-T4. The only difference is that you won’t have to choose which memory card as this camera can only hold one.
How to Format a Memory Card on a GoPro
- Make sure your GoPro is turned off, then insert the memory card.
- Power on your GoPro.
- Press the Mode button (usually at the front or side of the camera) to cycle through the modes until you reach the “Preferences” or “Settings” mode.
- Select “Preferences” or “Settings” (usually by pressing the top shutter button).
- Scroll down using the Mode button or touchscreen (if your model has one) until you find the “Reset” option. Select it.
- Under “Reset,” look for an option that says “Format SD Card,” “Delete All/Format,” or something similar. Select it.
- You’ll be asked to confirm that you want to format the card, as this will delete all data on it. Confirm your choice.
- The GoPro will then format the memory card, which can take a few seconds to a few minutes depending on the card’s size.
- Related: Best SD Cards for GoPros
How to Format a Memory Card without Losing Data
Formatting a memory card means that you’re deleting all the data in it.
It works as a factory reset – so, you’ll lose all the data from the memory card.
However, this doesn’t mean that you have to lose your data forever.
If there are files you want to save, make sure you copy them on your computer, an external hard drive, another card, or a cloud storage system.
Once you know that all your data is safe, you can proceed with the formatting.
Now, you can copy the data back to the memory card if you want. Otherwise, just keep it in the new location.
How to Format a Memory Card That is Write Protected
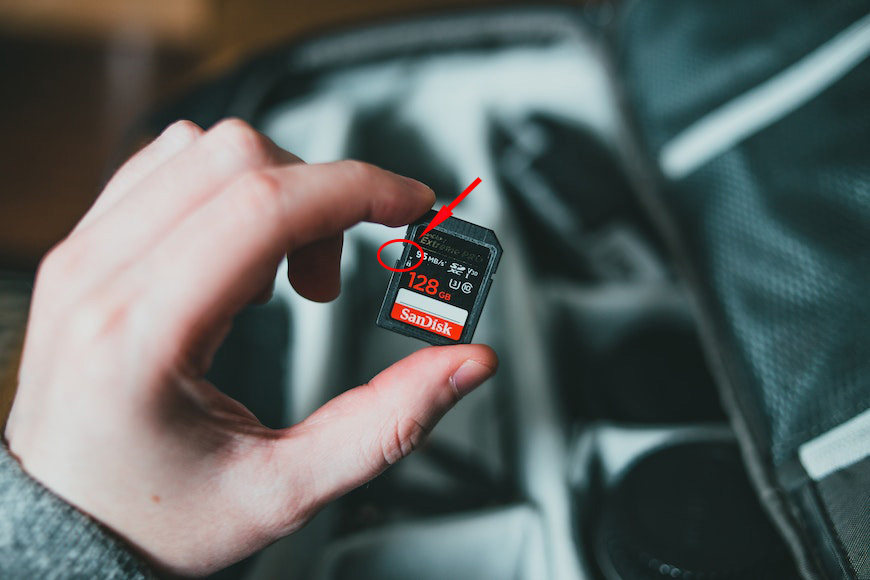
Credit: Erik McLean
If you’re trying to format a memory card and you get a prompt saying that it’s write-protected, you won’t be able to format it until you remove the protection.
Many memory cards have a physical switch that you can use to block and unblock. So, the first thing you should do is check your card to see if there’s a switch and flick it.
If the card doesn’t have a switch, plug it in again. Sometimes just unplugging and putting it back in solves the issue. If you have more than one port, use a different one.
Another thing you can try is to use a memory card reader. Otherwise, try inserting the card into another computer and see if you can format it there.
If none of these easy solutions has helped, try using antivirus software. Norton, McAfee, Avira, Avast, and others are known to help.
If an antivirus wasn’t enough, try using a write protection removal tool. One of the most popular is EaseUS.
How to Format a Memory Card To Fat32
Usually, you can decide what type of file system you want if you’re formatting the memory card on your computer.
Digital cameras, for example, format the card to whatever system they prefer and don’t work well if you formatted it on a different one.
So, if you’re using a PC, right-click on the card and select Format. Then, select Fat32 and apply the changes.
If you’re using a Mac, open the Disk Utility. Then, select the card and click Erase. Type a name to identify the card and choose MS-DOS (FAT) / FAT32. Click Erase.
How to Format a Memory Card Using CMD
CMD is a Windows built-in tool that allows you to perform different functions by typing a command prompt.
To format a memory card using CMD, start by typing CMD on the Window’s Search Bar. This will open a Command Prompt Window.
Select Run as Administrator.
- Type ‘diskpart’ and press Enter.
- Type ‘list disk’ and press Enter.
- Type ‘select disk’ and the disk number of your card and press Enter.
- Type ‘clean’ and press Enter.
- Type ‘create partition primary’ and press Enter.
- Type ‘ format fs=fat32’ or ‘format fs=exFAT’ depending on what system type you want and press Enter.
How to Recover Files from a Memory Card That’s Been Formatted
Formatting a memory card deletes everything you had stored in it.
This is why all devices have a warning that tells you this before you format the card.
Most of them require an extra step for confirmation, hoping to prevent accidental loss of data.
However, you may need to recover files after you formatted your memory card for any number of reasons.
At this point, you’ll need special software. You may not be able to recover everything but don’t lose hope.
One of the best data recovery software for Windows and Mac is Disk Drill. There is a free limited version and a PRO one. It’s also very easy to use.
When you launch the program, you’ll have the available disks and devices in the left column. Once you select which one you want, you’ll see its content in the middle column.
It looks like any browser window on your computer – so, it’s very intuitive.
On the right side, you’ll have the option to access data analysis or the recovery feature. You can do a Quick Scan, a Deep Scan and other recovery methods to maximise the possibilities of retrieving your precious files.
To learn more about Disk Drill, you can check out our Disk Drill review. Of course, some other photo recovery programs and apps can be useful too. This is just the one that the Shotkit team likes best.
How Long Does it Take to Format a Memory Card?
A regular format usually takes a few seconds – depending on the card’s capacity.
However, if you’re doing a complete format it can take anything from 2 to 20 minutes. This depends on the device, the type of card, and the card’s capacity.
The names of each type of formatting vary. For example, on a PC you have Quick Format and Format, on Canon cameras you have Format and Low-Level Format.
Notice that simply calling it ‘Format’ has the opposite meaning in the examples I just gave. On a PC, Format is the deeper cleaning while on a Canon is the fast one.
To be sure, check the user manual on your device. Also, as a general rule, the default setting will be the fast one regardless of the name. This is because deeper formatting is usually not necessary.


Ana Mireles is a Mexican researcher that specializes in photography and communications for the arts and culture sector.

WELCOME TO SHOTKIT
Enter your email to be sent
today's Welcome Gift:
19 Photography Tools
🔥 Popular NOW:


Shotkit may earn a commission on affiliate links. Learn more.