


Focus Stacking: Technique, Examples & Best Settings
Creating an image which is pin sharp from front to back requires a technique known as focus stacking. Here's how to get the best results using software.
Learn | By Ana Mireles
In this article, I’ll explain everything you need to know about focus stacking in photography.
I’ll also give you some examples of how and when to use focus stacking.
Follow along with this simple tutorial to focus stack your first images using Luminar Neo.
Use code shotkit10neo to save $10
You’ll also find a list of cameras that support focus stacking so you can do this technique without having to do any post-processing with dedicated focus stacking software.
If you’re into macro or landscape photography, you’ll definitely want to learn how to focus stack images to achieve an ‘impossible’ depth of field.
So, let’s get started!
Best Focus Stacking Settings for Camera & Lens
- Aperture: Mid-range (e.g., f/8 to f/11)
- ISO: Low (e.g., 100 or 200)
- Shutter Speed: Depends on lighting; use a tripod
- Focus Mode: Manual
- White Balance: Consistent (e.g., Daylight)
- Drive Mode: Single shot
- Stabilization: Off (if using a tripod)
- Lens: Prime or macro for close-ups
- Interval: Small focus shifts between shots
Table of Contents
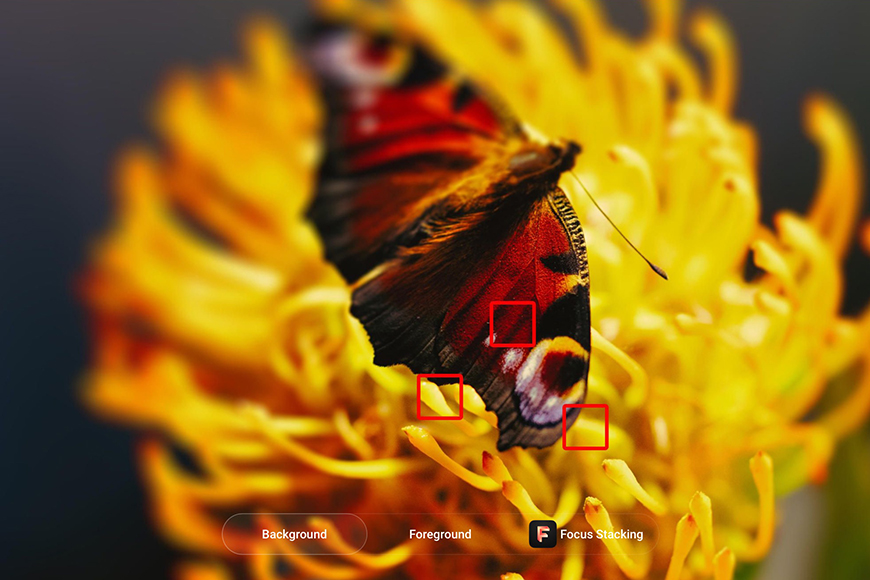
What is Focus Stacking?
Credit: David Bartus
- Extends the depth of field.
- Both the foreground and background can be in focus.
- Tack sharp images.
- Not easy to do with moving subjects.
- Time-consuming.
- Requires specific gear or software.
You’ve probably noticed that closing the aperture to its narrower setting gets you a deeper depth of field, but it doesn’t really offer a very sharp image.
Maybe, you’ve encountered situations when even the narrowest aperture doesn’t give you enough depth of field. Perhaps, you can’t even use a narrow aperture because of the light conditions.
You can solve any of these problems by using focus stacking. In short, if you can’t get everything in focus in one image, then you take more images. Let’s explain this in more detail.
Focus stacking in photography refers to a post-processing method that allows you to achieve sharp focus throughout the scene by blending images.
This very useful technique lets you create images where the most distant background element is as sharp as the nearest foreground element.
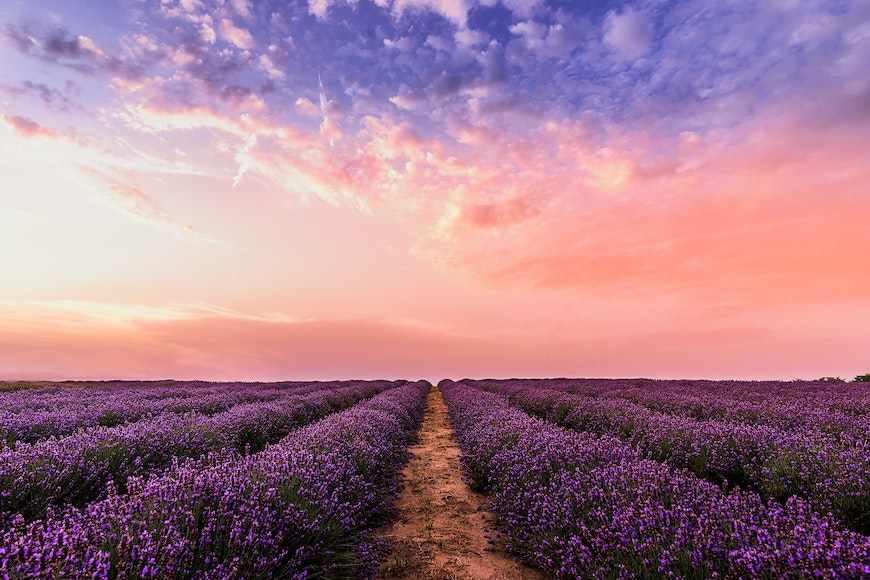
Most landscape scenes use focus stacking to achieve a sharp image. However, it’s also popular in macro photography because it has a very shallow depth of field.
In this case, it’s not about having multiple elements in focus – it’s necessary just to have the main subject fully sharp.
Whichever the case, focus stacking in photography allows you to have a sharp image regardless of the depth of field you are able to achieve in-camera.
Simply take multiple images with different focus planes. Then, load them into post-processing software, and the final stacked image will be fully sharp.
That’s what focus stacking is. I’ll explain the process in more detail further on.
What is an example of focus stacking?

Credit: Jewelry Dima Valkov
Focus stacking is very common in macro photography – for example, photographing a water drop on a leaf. Since the close distance to the subject offers a narrow depth of field even when you use the narrowest aperture of your lens.
It’s also common to use focus stacking in product photography – especially if the product is small like jewelry. This is because you need to have the subject tack sharp so that potential clients can see every detail.
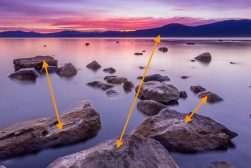
On the opposite side of the photographic spectrum, focus stacking is used in landscape photography. Despite the fact you’re capturing a big subject, sometimes it’s also impossible to get it completely in focus.
This happens when in landscape photography the closest focal point is very far from the one in the further back. Let’s say when you include the pebbles on the beach shore a few feet away from you and you want the mountains in the background to be sharp as well. Despite the aperture, it’s impossible to have enough depth of field.
What’s the difference between focus bracketing and focus stacking?
Focus bracketing is taking multiple photos with different focus points. Some cameras have a feature to do it automatically, but you can also do it manually.
Focus stacking is a post-processing technique that refers to blending the aforementioned images with special software. The focus-stacked image has a sharp foreground and background.
What is the difference between focus stacking and tilt shift?
Credit: Tom Pumford
The term focus stacking refers to a post-processing technique you can do in Adobe Photoshop or other focus-stacking software.
To do it, you need source images with various focal planes. Then, you blend them to create a single image that’s fully sharp.
Instead, tilt-shift is a type of lens that allows you to adjust the direction of the focus plane in relation to the camera sensor. This way, you can have a fully sharp scene in a single shot.
It’s also possible to do this with camera movements using a large format camera.
Does focus stacking increase resolution?
A focus-stacked photograph will have the same resolution as the individual images you use for focus blending. However, you’ll have much more detail – as a result, the image quality will be better.
How to Focus Stack: Technique for Beginners
I’m about to explain how to focus stack using your camera to take the pictures, then computer software to stack them into one final image.
Although there are cameras with built-in focus stacking (see below), it’s best to learn the proper focus stacking technique so you can use any camera (and even your smartphone!)
You can focus stack in Lightroom and Photoshop, or you can focus stack in Photoshop only. There are other focus-stacking software you can use if you don’t have an Adobe membership.
The steps listed below will be similar no matter what app you use.
I’ve chosen to use the Luminar Neo Focus Stacking extension since it’s easy to use and delivers great results.
You can download it here (either buy the extension separately or subscribe to the Pro Plan to get it free.)
Step 1: Shoot the images you need for focus stacking
To achieve focus-stacked images, you need to first shoot all the images you’re going to need. To do this, you need to set up your camera on a tripod. This is necessary because you’ll need all images to have the same scene.
Next, you’ll need to set the camera to manual mode. Each of the images needs to have the same settings, that’s why an automatic or semiautomatic mode won’t work.
Now, take a test shot to make sure you have the correct exposure. Once this is settled, you can start taking the pictures needed for your focus stack.
Set the focus to manual mode and start by having the lens focused on the closest element. Then, move the focus further away and take the next picture. Keep doing this until you cover the entire scene. Some cameras do this automatically, but we’ll talk more about that further in the article.
There isn’t a rule that tells you how many shots you need. As a general rule, landscape photography needs fewer images than macro photography. However, it depends on the scene, the lens, and the aperture you’re using.
Once you’ve shot all the images, you need to blend them using any software that has a focus stacking feature. Some of the most common is Adobe Photoshop, but there’s also Luminar, Helicon Focus, ON1 Photo Raw, etc.
As I mentioned before, I’ll be showing you the steps to do it in Luminar Neo with the Focus Stacking extension.
Step 2: Gather the tools you need for focus stacking
The first thing you need to do is to download and install Luminar Neo. Then, you download and install the Focus Stacking extension.
These are two separate processes – you won’t be able to do focus stacking only with Luminar Neo without the extension.
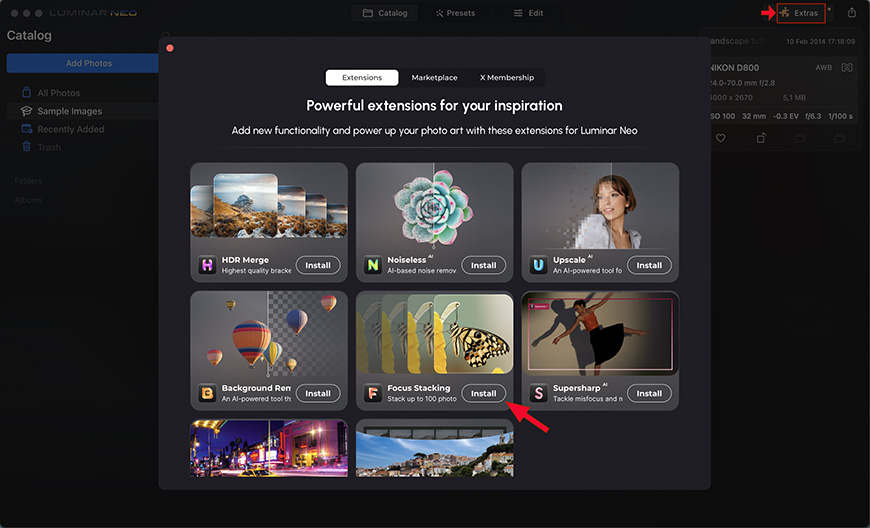
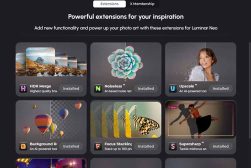
The Focus Stacking extension is very easy to install. Simply open the extensions window by clicking on the puzzle piece icon called Extras on the right corner of the screen. Here, navigate to the fifth extension called Focus Stacking and click on the button Install.
Once it’s done, the word Install will be replaced by Installed. Now, you can close the window and continue the process.
Next, you need to upload the focus stacking images into the Luminar Neo catalog. It doesn’t matter if they are JPEGs or RAW files – Luminar Neo supports both formats.
If you’re wondering how many images you can focus stack, the extension requires a minimum of two and a maximum of one hundred.
Step 3: Dial in the best settings for focus stacking
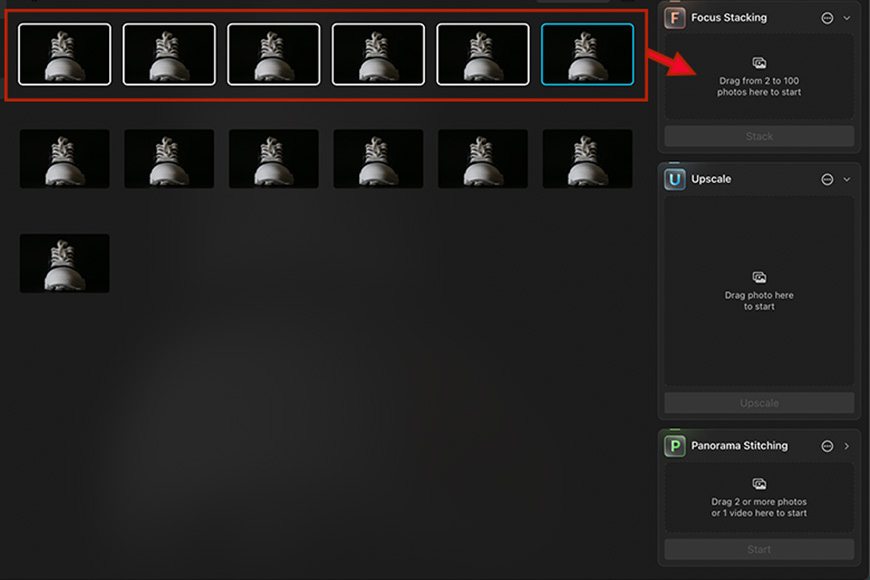
On the Catalog module of Luminar Neo, you’ll find the Focus Stacking panel on the right side of the screen together with any other extensions you might have.
So, select the photos you want to use for the process and drag them into the Focus Stacking panel on the right. Now you’ll see all your focus stack images as thumbnails inside the panel.
Also, on the top right of the panel, you’ll find a three-dot icon that opens the Settings panel. Click on it to adjust the settings of the focus stacking.

Enable the Auto Alignment feature by clicking on the square next to it. If it has a checkmark, it means that it’s already enabled.
This is similar to the Auto-Align Layers feature when you do a focus stack in Photoshop. The difference is that Luminar Neo allows you to choose a single image as a reference for the alignment. You can open the drop-down menu to choose which one you want. Usually, using the middle photo gives good results.
You can also enable the Remove Chromatic Aberration feature. This is always a good idea unless you’ve already corrected the individual images.
Step 4: Focus Stack
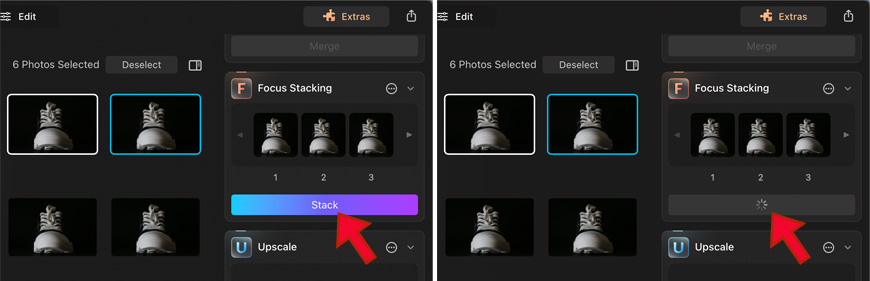
Once you have the settings adjusted, close the menu. Next, click on the button Stack underneath the thumbnails at the bottom of the panel.
While the focus stacking works, the button Stack is replaced by a rotating icon to show you that it’s processing. The time it takes Luminar Neo to process a focus stack depends on the size of the files and the number of images you’re using.
The more images you have, the longer it will take. Of course, the capacity of your computer plays a part. Generally speaking, it shouldn’t take more than a few minutes. To do the image I’m showing as an example it only took a few seconds.
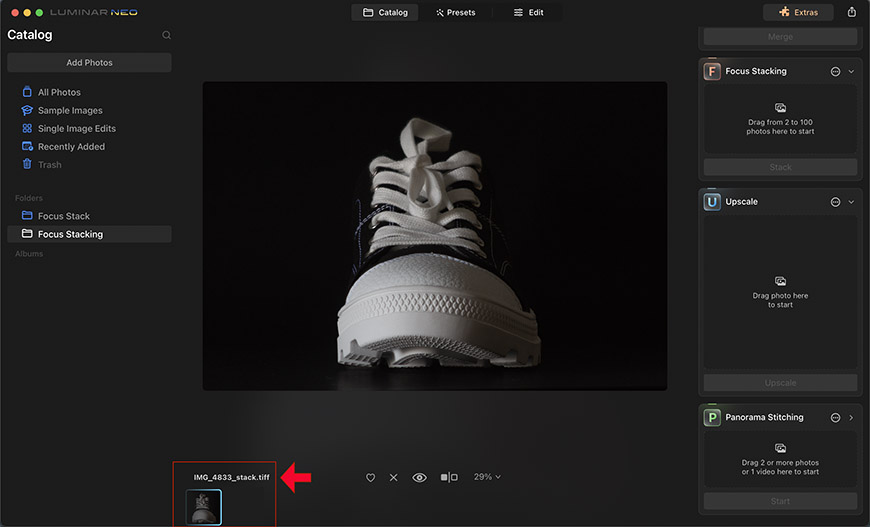
When it’s ready, it will show you the final focus stacked image which is a TIFF file. In the stacked image, you’ll have a deeper depth of field that should cover the entire image if the photos were taken correctly.
What Cameras Support Focus Stacking?
Some digital cameras can focus stack images automatically, with no photo editing software required.
Here are some popular cameras with built-in focus stacking.
They also have high-resolution sensors and lens systems that offer excellent optical quality.
| Camera Model | Sensor Size | Megapixels | Lens Mount |
|---|---|---|---|
| Olympus OM-D E-M1 Mark II | Micro Four Thirds | 20.4 | Micro Four Thirds |
| Nikon D850 | Full Frame | 45.7 | Nikon F |
| Canon EOS R5 | Full Frame | 45 | Canon RF |
| Panasonic Lumix DC-G9 | Micro Four Thirds | 20.3 | Micro Four Thirds |
| FujiFilm GFX 100 | Medium Format | 102 | Fujifilm G |
| Olympus OM-D E-M1 Mark III | Micro Four Thirds | 20.4 | Micro Four Thirds |
| Olympus OM-D E-M5 Mark III | Micro Four Thirds | 20.4 | Micro Four Thirds |
| Olympus OM-D E-M1X | Micro Four Thirds | 20.4 | Micro Four Thirds |
| Panasonic Lumix G95 | Micro Four Thirds | 20.3 | Micro Four Thirds |
| Panasonic Lumix GX9 | Micro Four Thirds | 20.3 | Micro Four Thirds |
| Panasonic Lumix G9 | Micro Four Thirds | 20.3 | Micro Four Thirds |
| Fujifilm X-Pro3 | APS-C | 26.1 | Fujifilm X |
| Panasonic Lumix S5 | Full Frame | 24.2 | L-Mount |
| Panasonic Lumix GH6 | Micro Four Thirds | 25.2 | Micro Four Thirds |
| Nikon Z6 II | Full Frame | 24.5 | Nikon Z |
What Are Some General Tips for Focus Stacking?

- Use a Tripod: To ensure consistent alignment of the images, it’s important to use a sturdy tripod. Even slight shifts between images can make stacking more difficult. For the same reason, you can also use a remote trigger. This way, you won’t risk moving the camera accidentally when pressing the shutter button.
- Manual Focus: Use manual focus and adjust it slightly for each shot. Autofocus can sometimes make inconsistent decisions, which can make it difficult to stack the images later. If you have a camera with a focus bracketing feature, you can use it for better results.
- Avoid Motion: Since focus stacking involves taking multiple images over a period of time, it’s best to avoid subjects that are moving or might move, like flowers in the wind or insects.
- Large Aperture: Start with a large aperture to create a shallow depth of field. This will allow you to more clearly see the effect of the focus stacking as the focus shifts through different parts of the scene.
- Capture Overlapping Focus Points: When changing the focus for each shot, make sure the in-focus areas overlap between each shot. This will ensure all parts of the image are sharp in at least one of the shots, which is necessary for successful stacking.
- Use Continuous Lighting For Indoor Shots: If you’re shooting indoors and need extra light, use continuous lighting rather than flash. The continuous light will be more consistent across all the shots.
- Use Focus Bracketing If Your Camera Has It: Some cameras have a feature called focus bracketing, which automatically takes a series of images with the focus point adjusted slightly in each one. This can make focus stacking much easier.
- Try different Post-Processing Software: Software like Photoshop, Zerene Stacker, or Helicon Focus can help with the stacking process. They align and blend the images, keeping the sharpest parts of each one. You might get different results with different software, so feel free to try more than one to see which one does a better job.
- Be Patient and Practice: Focus stacking can be tricky and time-consuming, especially when you’re just starting out. But with practice, you’ll get a better sense of how to take the initial images and how to best stack them for a great final result.


Ana Mireles is a Mexican researcher that specializes in photography and communications for the arts and culture sector.

WELCOME TO SHOTKIT
Enter your email to be sent
today's Welcome Gift:
19 Photography Tools
🔥 Popular NOW:


Shotkit may earn a commission on affiliate links. Learn more.