


How Lens Compression Affects Your Photography
Discover how lens compression influences your images, shaping perception and depth in ways that can transform your photography approach.
Learn | By Jeff Collier
This article will help you understand what lens compression is, and the factors that affect it.
We’ll also look at how you can achieve lens compression, and what kind of equipment you might need to create it.
Lens compression is something that often even photographers don’t understand, or don’t know how to use.
Although the ideas behind compression can appear complex, both in theory and practice it can actually be quite simple.
Hopefully, by the end of the article, it will have become that way, simple, for you.
Table of Contents
Lens Compression Photography Definition
Lens compression is the idea that when you use a zoom lens, elements of the background will appear to be larger, as they’ve been compressed closer to the foreground.
Zoom in, and you bring the background closer.
By changing the distance between you and your subject, by moving away from it and zooming back in, your subject will appear to be larger in the frame.
It’s a form of distortion, which presses the background elements up against the foreground and makes them look as if they are much closer and larger than they really are.
Using lens compression is a great way to isolate a subject in a scene, even when using small aperture sizes.
Lens Compression Myth
So, lens compression basically states that it’s the lens you use that is compressing the image and that you therefore can only use a telephoto lens to ‘compress’ images and bring the background closer to the foreground.
Technically speaking, it’s not the lens that compresses the image, but the interplay of perspective, angle of view, and depth of field.
In a way, none of these have anything to do with the lens you’re using. It’s a myth.
Of course, the lens you use can help you achieve compression more easily, depending on what you’re shooting.
But, from a purely technical standpoint (if you ignore current technological limitations), there’s no reason you can’t get the same image from a 16mm wide-angle lens that you could get from a 600mm lens if you make sure the perspective, angle of view, and depth of field are the same.
This is not a simple thing to understand, or explain, but to try to put it simply:
Perspective is the distance of your camera position from the scene.
If you use two lenses, each with a different focal length, like 50mm and 200mm, shooting from exactly the same position, both images will offer the same perspective.
If you fix the aperture on both lenses to an equal diameter, they will have the same depth of field.
You should note here that I said the same diameter, not the same aperture or f/stop number. The lenses need the same physical size of iris opening.
Different focal lengths of lenses require different diameters of iris opening to get the same apertures as each other.
Maths is how you work out this diameter. Maths that we are not going to get into here.
Next, you need to take care of the angle of view, that is, what is shown in the frame.
A 50mm lens will naturally show more of a view than a 200mm lens would.
If you crop that 50mm image down to the same angle of view as the 200mm lens, and then scale them to match, both images, from an optical standpoint, will effectively be identical.
So, in this example, we’ve used two very different focal lengths but made sure to place them at identical distances from the scene or subject, used the same depth of field, and given them the same angle of view.
The two resulting images would, apart from the lower resolution of the 50mm image (due to cropping), be visual twins.
They would be compressed. The background would have moved closer to the foreground and would appear larger in the frame. And it wouldn’t be the lens that would have produced the compression.
You see?
Factors Influencing Telephoto Lens Compression

Credit: Michael Korol
Having covered the lens compression myth up there, we’re now just going to kind of ignore it.
It’s more of an intellectual and technical exercise to demonstrate that you can achieve compression in photography regardless of the lens you use.
Having said that, using particular lenses is generally how we photographers produce compression, which is why we call it lens compression.
And, avoiding using a wide-angle lens, and instead using a zoom lens or telephoto lens is normally how we do it.
Let’s now look at some of the factors involved.
Focal Length vs. Distance to Background
The fundamental principle of lens compression can be reduced to the fact that to double or halve the size of an object in your frame, you will need to double or halve the distance of your camera to that object.
However, as you make these movements to or from what you want your image’s focal point to be, not everything in the frame will be the same distance away from the camera.
So, you get changes in perspective.
If you shoot the same scene twice, each time with a different focal length, and are standing the same distance from it, your images will look very different.
The depth of field, which decides how much of your image is in focus, is controlled by three elements – focal length and distance to the background, and aperture size.
When it comes to compression, your aperture is not the most important factor. focal length and the distance between the elements you’re shooting are what matter.
Using a lens with a shorter focal length won’t compress your photos as much, but, if you change the distance between your camera, your subject and your background, it’s easy to create compression.
When you create a bigger gap between your subject and the background, this gives you a better chance of creating a ‘bokeh’ background.
There are two ways to do this.
Credit: Zac Ong
If your subject can move, you can move your subject closer to the camera.
So, if you’re taking a portrait of someone, you can ask them to come closer. When you focus on them, the background will automatically become more out of focus.
If your subject can’t move, you can move the camera closer to the subject.
For example, if you are shooting a building against a mountain landscape, you can move closer to the building to make the mountains appear both bigger and closer in the frame, and more blurry.
Shrinking the gap between your camera and its subject increases the relative distance between your subject and its background.
This increase in distance also increases the likelihood that your background will be out of focus.
Equipment Considerations
For efficient lens compression, both to make the background appear closer and for it to be blurred out, some lenses are better than others.
Obviously, as we saw in the discussion of the lens compression myth above, you could technically use any lens to get the effect you desire.
But, in reality, a longer focal length is going to help you get that compression more quickly and easily than a shorter focal length will.
Generally, when you’re using a focal length of 100mm and upwards, you’ll clearly see the effect of compression.
And it doesn’t matter if that lens is a zoom lens or a prime telephoto lens. The only thing that matters is the focal length it gives you.
The only differences between the two types of lenses are in the ease of use and the optical quality.
With zoom lenses, you have more range of movement within the lens, which means that you won’t have to move around so much to get the effect you want.
The lens will adjust the distances between you and the elements of your photograph, while you remain in the same place.
Prime lenses, though, while they make you move around more, effectively zooming in and out with your feet, generally have better quality glass.
Your overall image quality will be better, and you’ll have smoother background blur.
Practical Applications in Photography
Credit: Chris Jones
So now we’ve covered the technical aspects and the theory behind lens compression.
But how is it actually used in photography?
There are many instances when understanding lens compression and understanding how to use it will elevate your craft.
Landscape Photography
- Capturing distant objects like moon rises and sunsets
- Making distant objects appear closer and more prominent

Credit: John Ko
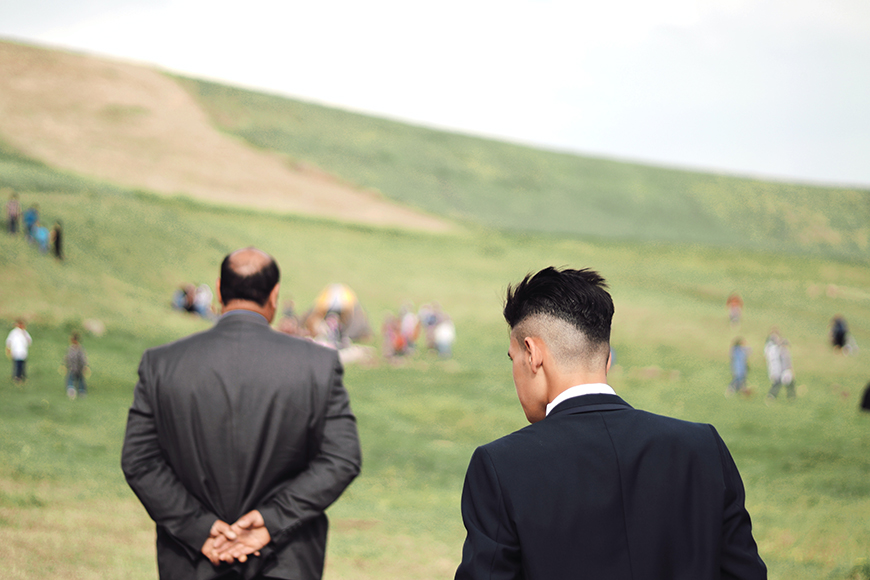
Portrait Photography
- Isolating subjects from busy backgrounds
- Enhancing the subject’s story by manipulating background elements
- Eliminating distortion of a subject’s facial features

Credit: Hiki App
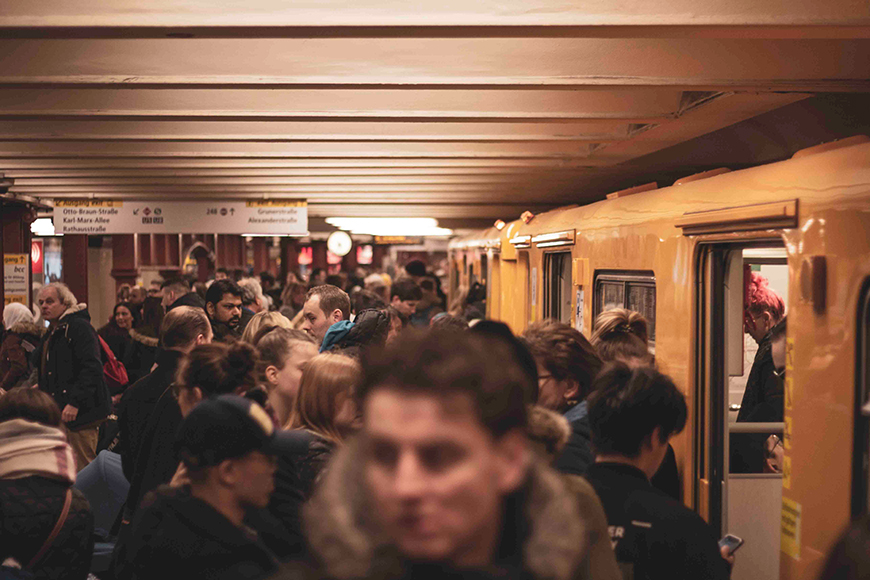
Event Photography
- Making events appear busier than they are
- Creating creative framing in otherwise visually uninteresting scenes
- Pulling presenters and speakers into focus by isolating them against backgrounds

Credit: Dimitrij Paskevic
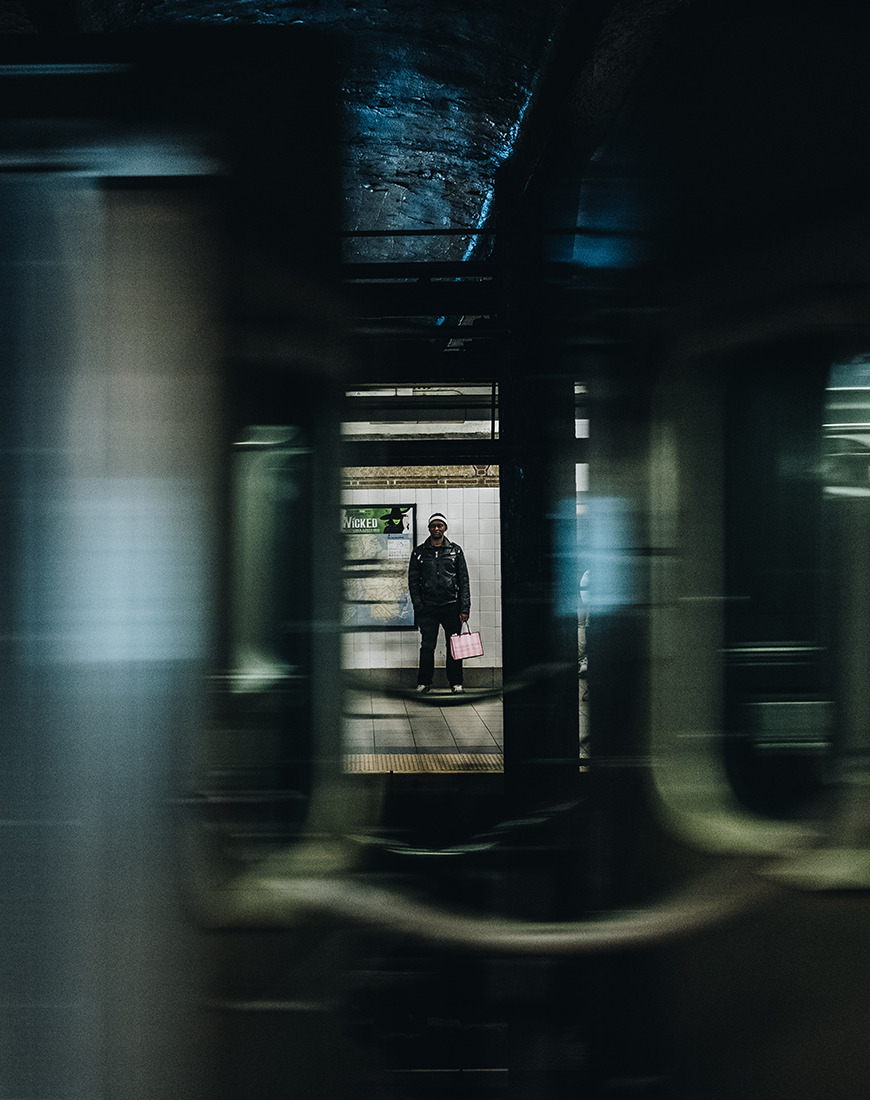
Narrative Photography
- Controlling the distance between elements to enhance a story
Credit: Habib Dadkhah
Comparison Examples of Compression in Photography
All of these photos were taken at the same distance from the subject, with the same lighting conditions, shutter speeds, ISO, and apertures.
Note in the two photos below how much more crowded and compressed the second scene is.

Photo taken at 24mm at f/8

Photo taken at 70mm at f/8
Note in the four photos how, even though the wooden blocks have very similar tones to the centre of the background, they become much more isolated and distinct as the lens compression takes effect.

Photo taken at 24mm at f/8

Photo taken at 35mm at f/8
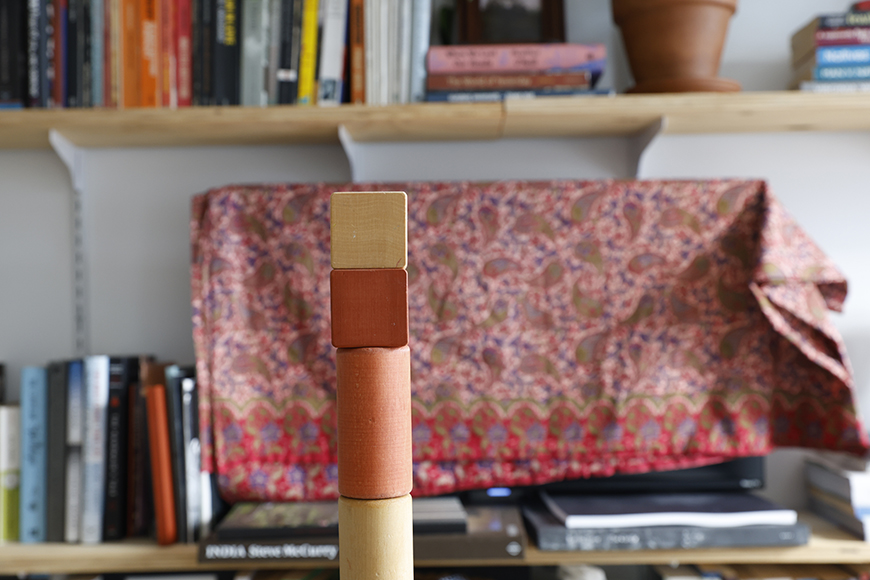
Photo taken at 50mm at f/8
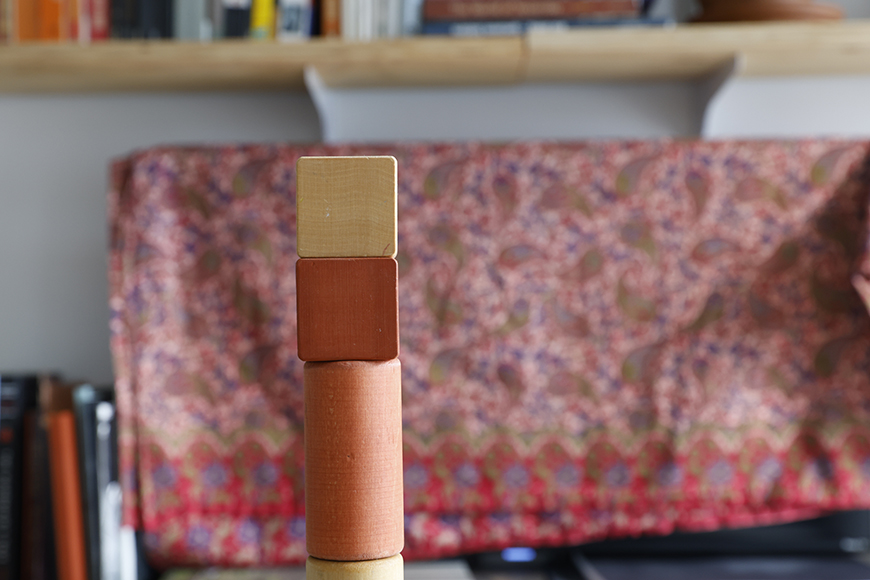
Photo taken at 70mm at f/8
How to Create Lens Compression in Photos

Credit: Bruno Van Der Kraan
As with anything in photography, the first thing you need to do is practice.
Use whatever gear you have (or consider renting a zoom or telephoto lens for a day), and get out there. Or stay at home.
The point is you need to find some close subjects and some subjects that are further away, and then figure out how you can make the background appear to come closer, depending on which focal length you use, or where you stand in relation to it.
If you’re using a zoom lens or telephoto lens, an easy way to start seeing how compression works is to first find a subject that is the same distance from you as it is from the background.
See how that looks in the camera.
Then back away further from the subject and zoom in more. You should see the background start to grow larger and become out of focus.
This basic setup of a distant subject, an even more distant background, and a telephoto focal length will create the perfect opportunity for at least a little bit of lens compression.
The greater the distance between you and your camera from the background, the bigger the background will seem. And, the more zoomed in your lens is, the more that effect will be magnified.
Bear in mind that you don’t always have to think about things in terms of making the background larger and more out of focus.
You can also do the same with a foreground if you want the distant background to be the subject of the image.
Think of this example:
You could be at a church wedding, standing near the altar, photographing the bride being brought down the aisle by her father.
Those two, and the people in the pews watching, would be what you wanted in focus.
By zooming in on them, you can have the waiting groom appear large in the foreground of the frame, out of focus.
This is also something you can practice when you’re figuring out how lens compression works.
You don’t need to go to a wedding, no, you can be anywhere. But try using lens compression as a creative device for foregrounds as well as backgrounds.
Does Lens Compression Work on iPhone?

Credit: Jakob Owens
Of course, with its relatively wide-angle lens and small aperture, it doesn’t work as well as it does on a DSLR or mirrorless camera, but you can work around that to get some form of lens compression.
First of all, you should use an app like Camera +, which will give you more manual control over your settings than the native iPhone camera app.
Then, you need to control your focal point. If we take the example of a nearer subject and a distant background, tap on your subject to make the iPhone focus on it.
This is another reason to use an app like Camera +. The native camera app sets focus and exposure from the same place, the same tap.
With Camera + (or apps like it), you can separate these and set focus and exposure metering using different points in the image.
Lock your focal point by pressing down on your focal point until the box flashes yellow and you see the ‘AE/AF Lock’ message appear on your screen.
That will help you compose your shot properly.
Then, if you follow the theory outlined earlier in the article, that is, zooming in or out or moving so that the relative distances between you, your subject, and its background change, you can get a compression effect.
If you’re shooting portraits, remember that the Portrait Mode of the newer iPhones helps you out a bit.
In that mode, the background is automatically blurred out to create the illusion of a shallower depth of field and therefore lens compression.
 Best Wide Angle Lenses in 2023 for Nikon, Canon & More
 Best Lens for Portraits (People Photography)
 Best Sony Lenses in 2023: Ultimate E-Mount Guide
 10 Best Canon Lenses in 2023 (EF Mount DSLR)
 12 Best Fuji Lenses in 2023 for Fujifilm X Mount (All Budgets)
 Best Nikon Lenses in 2023 (DSLR & Mirrorless) FX & DX

Jeff Collier is an experienced film photographer who enjoys experimenting with modern digital photography equipment, software and apps. He’s also an ex-world champion triathlete and avid cyclist, clocking hundreds of km each week in the beautiful Tweed Valley of northern NSW, Australia.

WELCOME TO SHOTKIT
Enter your email to be sent
today's Welcome Gift:
19 Photography Tools
🔥 Popular NOW:


Shotkit may earn a commission on affiliate links. Learn more.