


Downloadable F-Stop Chart – Understanding Lens Apertures
Use this freely downloadable F-stop chart as a handy reference when taking photos to calculate your exposure when deciding what aperture to set your lens.
Learn | Photography Guides | By Teryani Riggs
In this article, we’ll be focusing on aperture and its measuring unit – f-stops.
Photography and light are a bit like pen and ink – you need the one to use the other. Without light there is no photography, and how you capture light will define your photographic style.
If you leave your camera on auto, you’re letting it make many of the creative decisions for you. That’s where learning about the exposure triangle comes in.
There are three main aspects to capturing light: aperture, shutter speed, and ISO. Together these make up the exposure triangle – each element affecting the other.
We’ll get into just what exactly aperture and f-stops are a little later in the article.
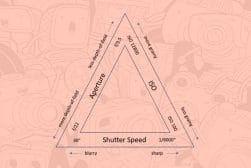
First, let’s take a look at the short version via the f-stop chart infographic below. It’s downloadable and will give you a quick cheat sheet of f-stops and how to choose the right one.
Table of Contents
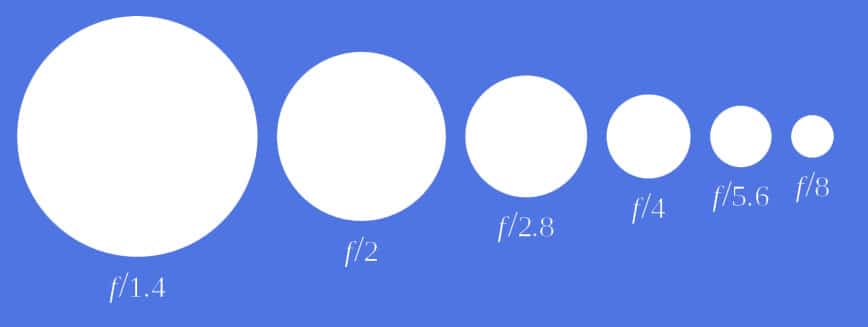
F-Stop Chart (Free Download)

Aperture Value Chart showing regular F-Stop range (Click to enlarge and download)
F-stops (also referred to as f-numbers) refer to how open or closed the opening in your lens is.
The wider the aperture – the opening in the lens – the smaller the f-number.
For example, in the chart above f/1.4 is quite wide open (a ‘wide’ aperture), while f/16 is little more than a pinhole (a ‘narrow’ or ‘small’ aperture).
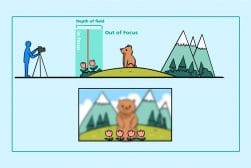
Next to the f-numbers is an arrow referring to the depth of field. Depth of field is the amount of your photo that appears sharp from front to back.
A very shallow depth of field blurs everything but the point you focus on.
A deep depth of field will keep most of the scene relatively sharp.
As you can see from the f stop infographic above, depth of field and aperture diameter are intimately connected.
The more open your aperture opening (like f/1.4 or f/2), the shallower your depth of field; the more closed (i.e. f/16 or f/22), the greater your depth of field and the greater amount of your image will be in focus.
What is Aperture?
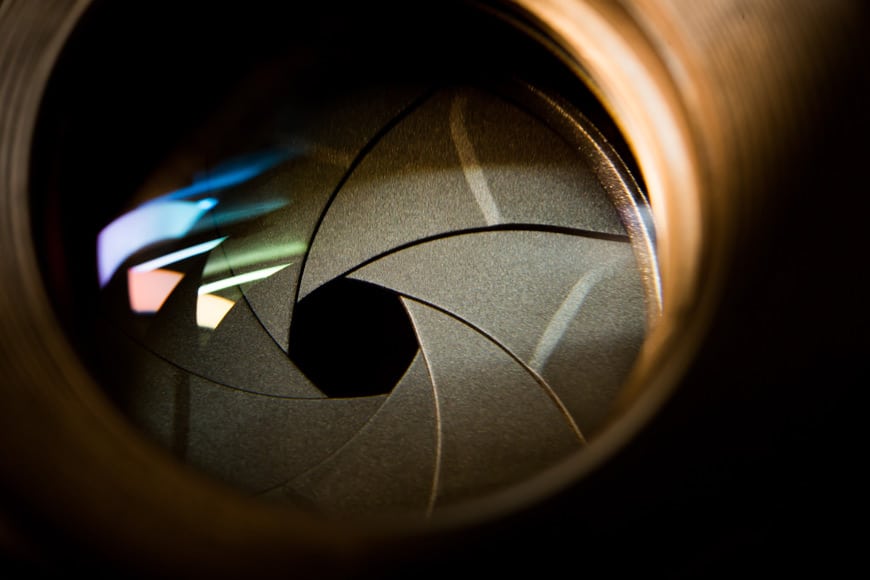
Photo Credit: Wan San Yip
Now that you’ve got the chart to refer to, let’s dive a bit deeper into just what aperture really is.
Simply put, aperture is literally the physical diameter of the opening in your lens. The larger the aperture, the more light that gets in to your camera’s sensor. With a smaller aperture, less light enters your camera.
On most cameras, it’s pretty easy to adjust the aperture. Simply switch to either aperture-priority mode or manual mode.
Aperture-priority mode is the easiest choice for beginners, as it allows you to choose your aperture while leaving your camera to determine the shutter speed (and usually ISO).
What is an F-Stop and how is it calculated?
Aperture chart | Credit: Cbuckley
F-stops (also known as f-numbers) are units of measurement that let you know the size of the aperture.
In other words, they tell you the size of the hole that light is traveling through to reach your camera sensor.
Mathematically speaking, the f-number is the ratio of the lens focal length divided by the diameter of the aperture. The result is a fraction where the “f” stands for focal length and the number following it is what you’re dividing it by.
For example, f/2 refers to your lens aperture being half-open. F/4 refers to it being 1/4 of the way open.
That means that if you’re using a 50mm lens, an aperture setting os f/2 would be a 25mm hole. In the same lens, f/4 would be 12.5mm, and so on.
Don’t worry, you won’t have to calculate these numbers every time you go on a shoot. Just keep a copy of the F Stop Chart and you should be good.
Practically speaking, all this means is that the smaller your f-stop number, the larger your aperture (a ‘wide’ aperture), and vice versa.
How do you read an F-Stop?
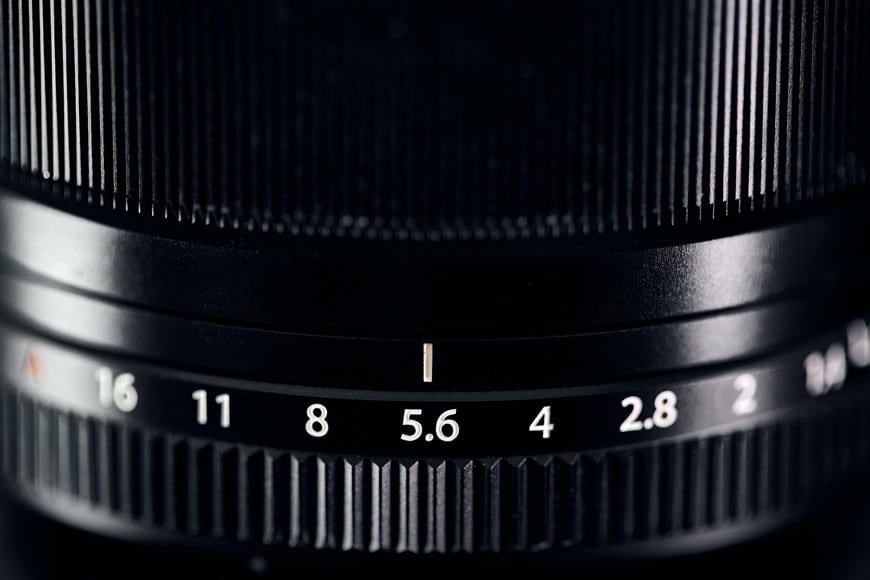
This lens only has full stops available for adjusting the f-stop. Lenses made for digital cameras will usually have f-stops in increments of thirds. | Credit: Agê Barros
The first step in learning how to read f-stops is understanding what a stop of exposure is.
Remember how light and photography go hand in hand? Well, a stop is how photographers talk about measuring light.
Moving up a stop means that you’re doubling the amount of light entering your camera. Moving down a stop is halving the light that enters your camera.
What’s confusing is that this kind of stop is different from the stop in “f-stop.” F-stops only refer to the size of the aperture. Unlike stops of exposure, they don’t simply double or halve, but instead, depend on the f ratio.
For example, going from f/2.8 to f/2 is one stop up. (Remember, a smaller f-number means a larger aperture!) Going from f/5.6 to f/8 is one full stop down.
If we were only limited to f-stops that were full stops, the scale would look like this:
f/1, f/1.4, f/2, f/2.8, f/4, f/5.6, f/8, f/11, f/16, f/22, f/32
As it is, we have many more options, most lenses have an aperture range that lets you adjust the aperture size one-third stop at a time, hence all the in-between options.
Tip: Remember, the bigger the bottom number, the narrower the aperture. A smaller bottom number of the f ratio signifies a larger aperture.
Once you memorize the sequence of full-stop f-stops, it’ll become super easy to adjust the other settings on the exposure triangle any time you change your aperture.
If you change a setting by a full stop one direction, you can always compensate by changing another setting on the exposure triangle a full stop in the opposite direction (or both of the other settings by a half stop each).
Tip: Mirrorless camera users have an added bonus when they shoot in manual mode. They can see in real-time the effects that changing their aperture diameter makes and adjust the other exposure settings simply by looking at the screen.
Remember, when we talk about stops in relation to exposure, we’re either doubling the amount of light that comes in or halving it.
Decreasing your shutter speed from 1/100sec to 1/50sec will double the amount of light coming in. That’s going up a stop.
It’s similar with ISO values. Halving or doubling ISO numbers will also halve or double the image exposure.
Let’s say you’re taking a photo that’s properly exposed at 1/50sec, f/8, ISO 100. You then decide you want to isolate your subject from the background more, so you open your aperture to f/5.6 – a full stop.
To compensate for the added brightness, you’ll need to stop down in either shutter speed or ISO.
Your ISO is already at 100, so it usually will make more sense to adjust your shutter speed (in this case increasing it to 1/100sec).
Not wanting to do the math? No problem!
A shortcut is simply to count how many clicks you move. For example, if you adjust your aperture dial three clicks darker, compensate by moving your shutter speed dial three clicks brighter. And so on. Having a copy of the aperture diagram above handy is also a good idea.
What should my F-Stop be set at?
So by now, you might be thinking, “This is all quite fascinating, but I just want to know where to set my f-stop!”
As with so many things in photography, the answer depends on which lens you’re using, what you’re shooting, and what creative effect you’re looking to achieve.
For example, most portrait photographers favor a shallow DOF to better isolate the subject from the background.
If you’re using a fast lens (one that has a maximum f-stop of f/2.8 or larger), this is generally between f/2 or f2.8.
If you find that you can’t get your entire subject in focus with these wider aperture values, try stopping down to f/2.8 or even as narrow as f/4.
Take a look at the photos below.
Each was shot with a Sony A7 III with a $250 Sony FE 50mm f/1.8. (While the maximum aperture of f/1.8 makes this a decently fast lens, the price point means it won’t likely equal the performance of Sony’s more expensive 50mm lenses.)
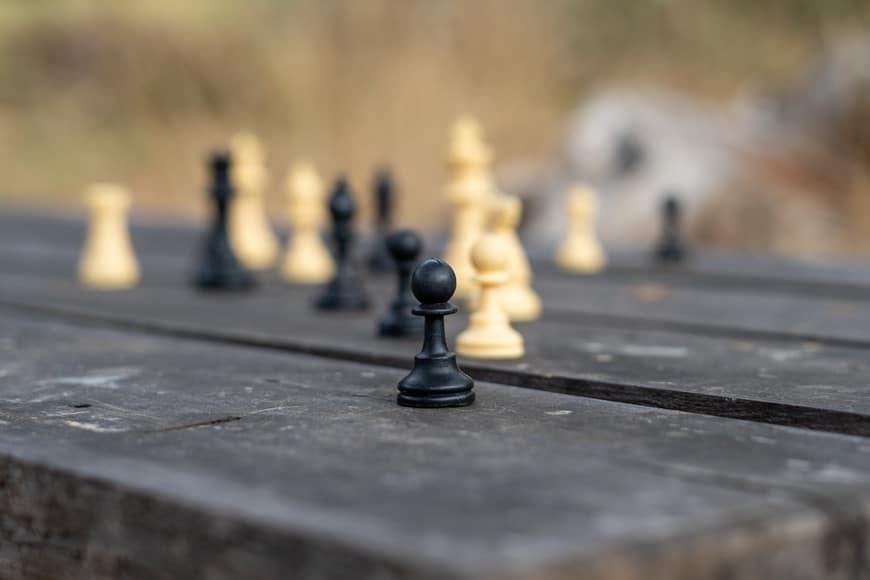
First up f/1.8, the maximum f stop for this lens.
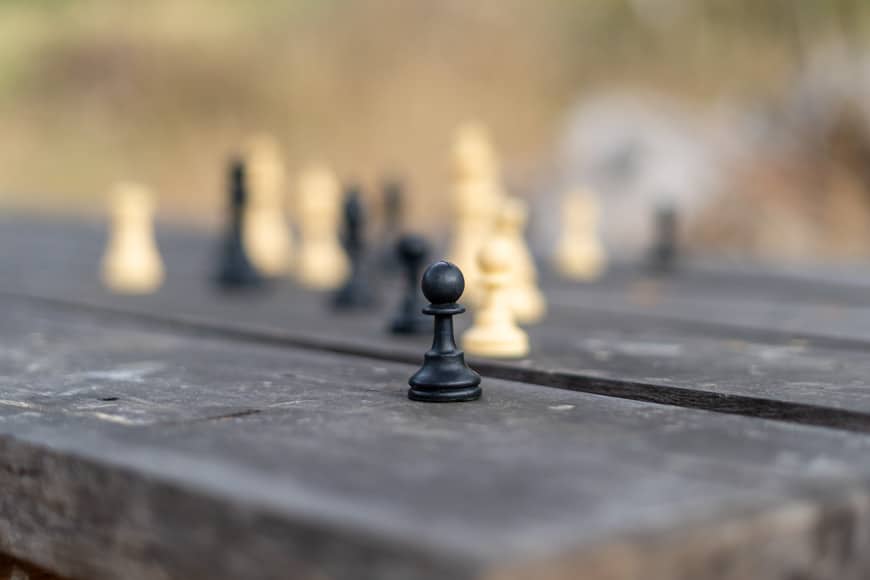
Shooting at the maximum aperture of f/1.8 with my Sony FE 50mm. Both the foreground and background are blurred.
This f-stop setting creates a super shallow depth of field. Both the foreground and background are nicely blurred, while the subject is nicely in focus.
The shallow depth of field ‘blurred background’ helps to separate the subject from the background, and gives an aesthetically pleasing look to the photo.
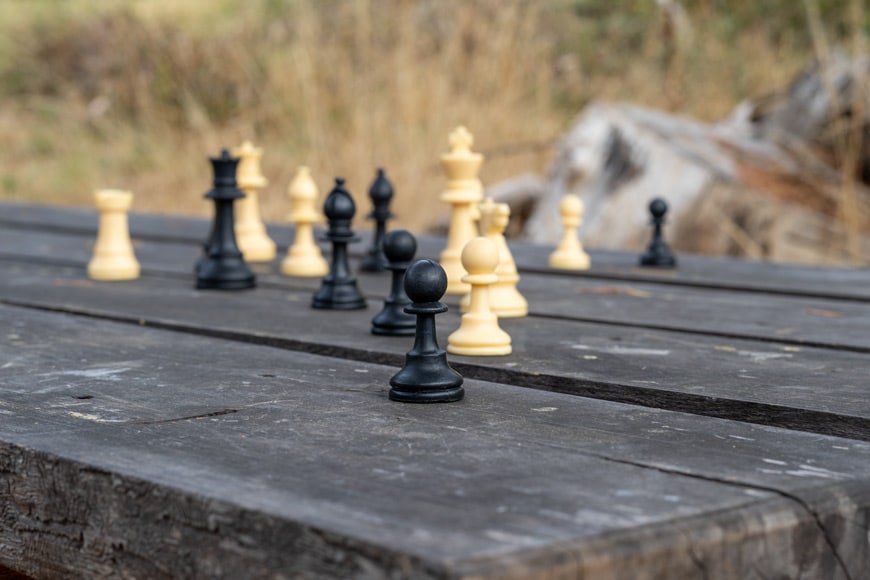
At f/2.8, the background pieces are a bit more defined. For example, you can begin to make out the white knight on the right. Also, a little bit more of the foreground is clearer.
At f/2.8 below, there’s a bit more definition in the other chess pieces, but the subject is still well isolated from the others. Both of these settings are excellent for portrait photography.
Keep in mind, a wider aperture means that more light is getting in – as I’m making these changes in aperture, I’m also adjusting my shutter speed so I can maintain the same overall exposure.
If you’re looking to do sports or wildlife photography or any other genre that needs a fast shutter speed, you’re going to want to look into fast lenses that allow you to work with a bigger aperture.
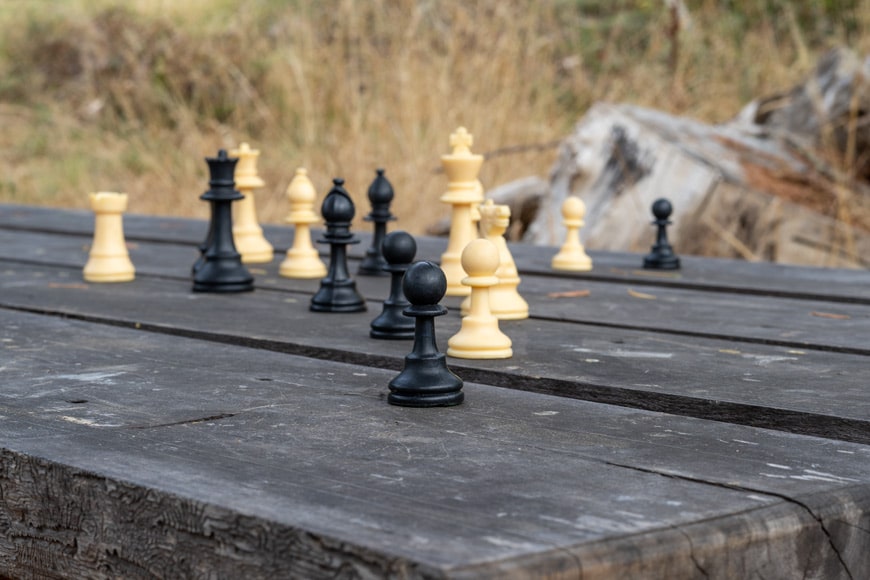
A little over a stop down (f/4.5), and the pieces become considerably more defined:

At f/4.5 you can start to make out all the pieces. The grain of the wood in the boards is also sharper.
If you’re wanting more of your scene in focus – say a group photo – you’ll probably want to start out with an f/stop of about f/5.6 or so.
For street photography, you may want to stop down even further. F/8 tends to be pretty close to the sweet spot on many lenses, offering enough front-to-back sharpness for most subjects.
In fact, there’s an old photography saying that says, “f/8 and be there,” meaning it’s better to just take the shot than miss because you’re not sure of what settings to use.
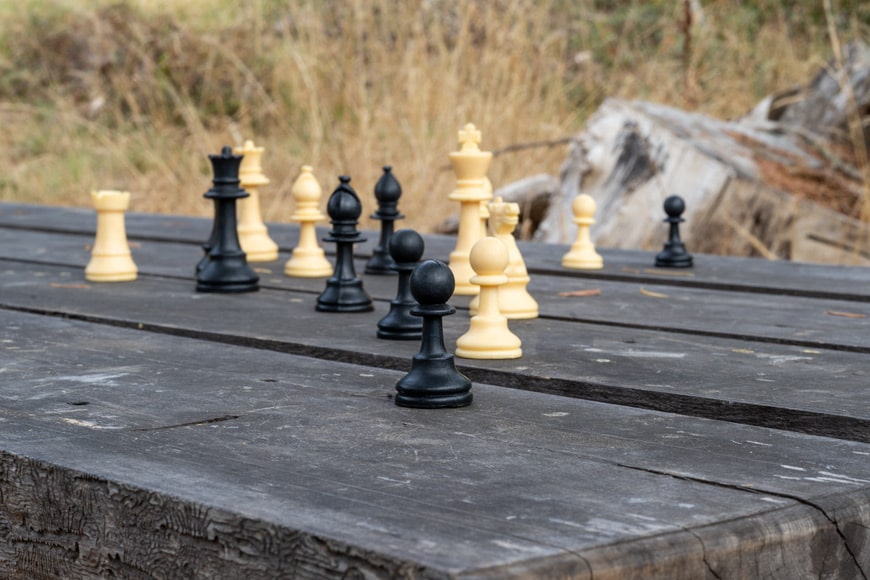
Leaping up to f/8, it’s easy to identify all of the pieces and the grass in the background is beginning to become defined.
Once you move into an f-stop number greater than f/11, you’re moving into the realm of landscape and cityscape photography, where having the majority of the scene in focus is a priority.
At f/13, the first three pieces are in focus, as is much of the foreground in front of the first piece. Also, the background is much more defined. You can begin to make out the stump and individual grass blades.
This particular lens, being cheap, doesn’t perform as well at small apertures as it does at aperture values closer to f/11. For example, at f/13 I’d expect much more of the pieces to be nicely in focus.
At f/16 the black queen is beginning to be in focus, the foreground is considerably sharper, and the various elements of the background are becoming more distinct.
F/16, while not quite the minimum aperture for this lens, is a pretty small aperture opening. You’ll generally need a tripod when working with such aperture sizes, as they need considerably more light.
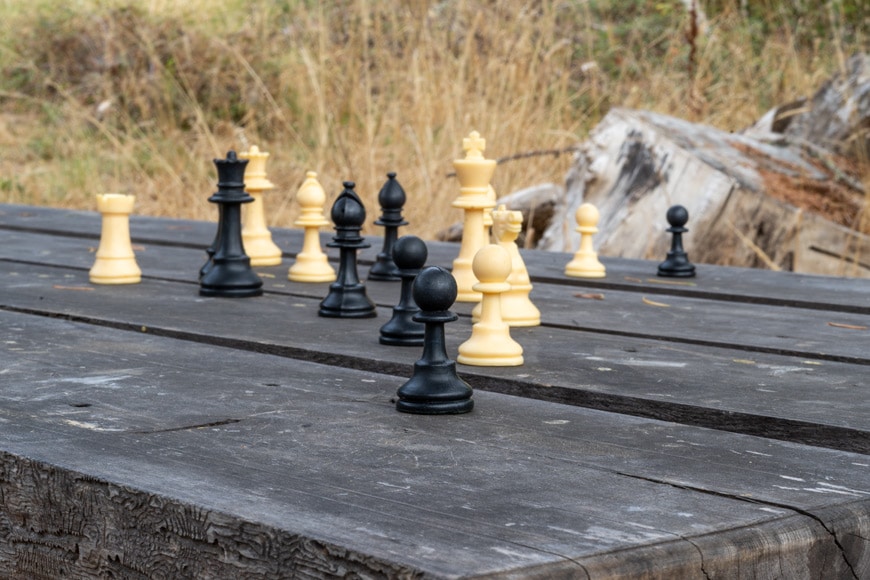
Shooting at f/22 the entire table is almost in focus (though not razor sharp). You can also see some of the grass tips.
F/22 is the minimum aperture on this lens and provides the deepest depth of field (not that impressive on this particular lens).
F-Stop and Depth of Field FAQs
What is one full f-stop?
Unlike a stop of exposure (where you’re either doubling or halving the amount of light), an f-stop refers to multiplying or dividing by the square root of 2 (1.41). For example, moving from f/5.6 to f/8 is a decrease of 1 stop of exposure. The camera aperture chart above shows this relationship.
How many f-stops is 2.8 and 4?
The difference between f/2.8 and f/4 is one full stop of exposure.
What f-stop is best for portraits?
For single subjects, an f-stop of f/2 or f2.8 will hit the sweet spot. For two people, use f/3.2 – f/4; for more than two people use f/5.6.
Which f-stop is sharpest?
Every lens is different, but in general the sharpest aperture of your lens – otherwise known as the “sweet spot” – is two to three f/stops from its widest aperture. Keeping an aperture diagram should be handy at this time.
Is f 2.8 good for portraits?
Yes, f/2.8 is a great aperture for most single-subject portraits.
Final Words
While your camera can often choose the proper exposure for you, it won’t necessarily make the most stunning creative choices.
Believe it or not, much of a photographer’s creativity lies in how they work with f-stops and aperture.
If you’re a total beginner, start out in aperture-priority mode. This will give you a chance to get familiar with using the aperture dial without worrying about the other settings of the exposure triangle.
I hope you enjoyed this brief foray into the world of apertures and f-stops and can make good use of the f-stop infographic that goes with it. It’s a handy cheat sheet for beginners.


Teryani Riggs (they/them) is an adventure, who loves all things wild and free. Teryani can often be found in the midst of a social/eco-justice campaign, hiking through wild backcountry, or hitchhiking around the world listening to other people’s stories. While their focus has historically centered on landscape, travel, and wilderness photography, they’ve also been hired to shoot genres as varied as historical fiction reenactments in the studio to product and food photography.


WELCOME TO SHOTKIT
Enter your email to be sent
today's Welcome Gift:
19 Photography Tools
🔥 Popular NOW:


Shotkit may earn a commission on affiliate links. Learn more.