


16 Tips to Get Tack-Sharp Images (Even in Low Light)
Everything you need to know about getting tack-sharp images, from the best settings to use and gear that will help to mastering your technique.
Learn | By Jeff Collier
Are you looking to get sharp images no matter what conditions you’re shooting in?
The quickest way to increase image quality is to focus on your sharpness.
Image sharpness is one of those core skills that’s easy to fix quickly, but difficult to master.

Easy to use app which makes your JPEG and RAW images much shaper, clearer and more vibrant with just a click.
This article is going to cover everything you need to know to get sharp images.
In my work as a professional photographer, I’ve shot everything from landscapes to portraits and even products—all need to be tack-sharp.
I’ve shot my fair share of blurry photographs, and I’m bringing years of tips, tricks, and fixes to make sure that you can shoot sharp images even in low-light conditions.
Table of Contents
What Makes an Image Sharp?

Credit: Luca Bravo
A sharp image is going to have clearly rendered detail that really makes the subject pop.
This is just as true for landscapes as it is for product photography and portraits.
There’s a lot that goes into image sharpness: composition, contrast, and even the software and skills you bring in post-production are all going to have an impact on the final sharpness of an edited photograph.
However, the single biggest thing when it comes to sharpness is focus.
Being able to get tack sharp focus is going to take your photos from blurry to professional in no time at all.
- Related: 16 apps to fix blurry photos
15 Tips for Getting Tack-Sharp Photos (Even in Low Light Situations)
First Tip: Clean Your Lens for Crip Images

Credit: Hassan Pasha
I always recommend photographers start with the easiest fix first.
Take out your air blower, your lens pen, and that microfiber cleaning cloth to make sure that your lens and filters are clean.
Dust, water spots from rain, and the natural oils that appear on our hands can smudge your glass. Crystal-clear images can only come from crystal-clear glass.
Taking care of your glass is going to make sure that your lenses last for years to come and constantly deliver clear images.
One last pro tip: take the leap and invest in that rain cover for your lens. Trust me, you’ll thank me later.
- Read more: How to clean your camera lens the right way
Second Tip: Turn On Image Stabilization (Especially if Using a Zoom Lens)
Image stabilization allows your lens or your camera body to make minute adjustments to the position of the sensor or lens elements.
These adjustments counteract the slight shake that happens when you hold your camera.
Image stabilization is an absolute must when shooting macro photography or when using a telephoto zoom lens.
I also recommend image stabilization when you’re working with models, and you want to get tack-sharp eyes.
The only time I recommend turning off image stabilization is when your camera is mounted on a tripod.
Image stabilization can actually cause blur when your camera is safely mounted on a tripod, and you’re doing longer exposures.
Third Tip: Use Your Tripod for Much Sharper Pictures

Credit: Trevor Mckinnon
Now that we’re talking about tripods make sure that you’ve always got yours with you.
I know pulling out a tripod can draw some attention, but it’s also the key to getting sharper images.
This is especially true if you’re going to be shooting in low light conditions and you need to use longer exposures.
Here’s a quick rule that you need to know that’ll tell you when it’s time to bust out the tripod to avoid camera shake.
This is called the reciprocal rule. Take the focal length of your lens and find the corresponding shutter speed.
A 600mm super-telephoto lens has a reciprocal shutter speed of 1/600. If you’re ever shooting slower than that reciprocal speed, it’s time to use the tripod.
Getting sharp photos can be as simple as using this affordable camera accessory.
- Read more: What’s the lightest travel tripod?
Fourth Tip: Turn Up Your ISO In Low Light Conditions

Credit: Ashton Bingham
ISO is your friend. This might be a little surprising to hear, especially if you’ve been shooting digital for a while now.
In the early days of digital photography, a high ISO meant lots of noise that was difficult to remove and edit.
Today’s mirrorless cameras are much better at handling high-ISO photography. Photo editing software is also much better at removing the types of distortion caused by a higher ISO.
Don’t be afraid to crank that ISO if your camera starts giving you shutter speeds that are causing blur. This can help lead to sharp photos.
- Read more: Beginner’s guide to mastering camera ISO
Fifth Tip: Turn Down Your ISO When It Gets Bright

Credit: Sharegrid
On the other hand, if your ISO is too high while shooting in bright conditions, your image is going to be ruined by being totally blown out and loaded with distortion.
Automatic ISO settings should prevent this from ever happening.
If you’ve been shooting in full manual mode, always make sure that you’re metering for the correct exposure and adjusting your ISO accordingly.
Sixth Tip: Enable Auto ISO for Sharp Photos

Credit: Antonio Lapa
There’s a badge of honor that photographers wear when they build up enough skills to shoot in full manual mode.
While full manual mode does allow you to produce the best possible images, some of those tech conveniences built into your camera are certainly worth using.
Enabling auto ISO allows your camera to meter and adjust the ISO accordingly. This is just simply linking your camera’s light metering to the ISO setting.
If you were shooting in full manual, you’d be using that meter to read the iso and adjust your settings anyway.
Why not just enable full ISO and get sharper images that much faster?
Seventh Tip: Use A Fast Shutter Speed for Sharp Photos

Credit: Mi Pham
A fast shutter speed is going to eliminate, or drastically reduce, camera shake as well as motion blur.
You should always try to shoot with the fastest shutter speed possible unless you have a good reason to slow things down.
Longer exposures can give you beautiful results, but they also require you to use a tripod as well as a remote trigger.
Without those two pieces of equipment, I always recommend going for a fast shutter speed and then adjusting your ISO and aperture to make up for the difference in exposure.
There’s no ‘right’ shutter speed, but using a faster one will help ensure the sharpest photos and crisp images all round.
- Read more: How to get motion blur in camera
Eighth Tip: Use Single Point Autofocus

Credit: Scott Carroll
There are several different types of autofocus that are pre-programmed in your camera.
I’ll cover each one in quick detail later in this article, but for now, I wanted to take a look at one of the most useful for sharper images.
Single-point autofocus gives your camera a single focus point to prioritize.
This allows you to produce the sharpest images and get the fastest autofocus results.
Ninth Tip: Use A Remote Release Or A Timer

Credit: Jorg Angeli
A remote release, or cable release if you’re shooting a film camera, allows you to press the shutter release button without having to touch the camera.
This is vital for long exposures and slow shutter speeds.
The minute amount of energy you put into the camera when you press down on the shutter button is enough to cause your camera to shake and spoil the sharpness of your image.
A remote trigger is going to be a lifesaver when it comes to getting clear images and taking sharp photos..
Tenth Tip: Try Mirror Lock-up (MLU) For DSLRs to Reduce Camera Shake

Credit: Brunno Tozzo
If you’re shooting on an SLR or a DSLR, mirror lock-up is a feature that you need to get familiar with.
MLU puts the mirror locked in the upright position when you shoot. This removes the very small amount of camera shake that happens when the mirror has to flip up.
This feature is especially important for longer exposures.
If you’re shooting on a newer mirrorless camera, mirror lock-up is going to be a thing of the past. your camera simply has no mirrors to worry about.
- Read more: Tips for long-exposure photography
Eleventh Tip: Shoot In Burst Mode to Maximise Image Sharpness

Credit: Raquel Garcia
Shooting in Burst Mode is also a great trick for getting clear images.
Burst Mode allows you to take multiple pictures by holding down the shutter button. Depending on the model of camera you have, you’ll be able to set how many images you can capture per second when you hold down the shutter.
The advantage of Burst Mode is that you’ll have a fistful of images to sort through to pick the one that has the best focus.
The only downside to burst mode is that you might need a bigger memory card— especially if you’re shooting in RAW.
DSLR photographers should know that Burst Mode will put more actuations on their shutter. This will wear it down more over time if you always shoot and burst mode.
- Read more: How to find your camera’s shutter count
Twelfth Tip: Enable Back Button Focusing

Credit: Imansyah Muhamad Putera
Focusing takes time, whether you’re shooting fully manual or using autofocus.
Enabling back button focus allows you to keep your focus even as you follow your subject.
Back button focusing allows you to reassign the focusing command to one of the unused custom buttons on the back of your camera body.
This means that your camera will not automatically focus every time you press down on the shutter.
This is great for letting you set your focus and then adjust your composition or track a fastly moving subject.
Thirteenth Tip: Find Your Lens’s Sweet Spot for Sharper Photos

Credit: Agence Olloweb
Every lens has an f-stop sweet spot where it’s going to yield the best results when it comes to sharpness.
Depending on the available lighting and the make and model of your lens, this is going to be between f/4 and f/8.
If you don’t know the sweet spot of your lens, f/6 is a safe bet.
- Related: Download this f-stop chart
Fourteenth Tip: Understand Depth of Field 101

Credit: Warren Wong
Every photographer I know loves beautiful bokeh, but you should be intentional with your use of depth of field in order not to spoil your sharpness.
Shooting with a wide-open (maximum) aperture like f/2.8 is going to create smooth bokeh, but it’s also going to create a very shallow depth of field.
That shallow depth of field can cause parts of your subject to be out of focus.
You should increase your f-stop until you hit an aperture that allows you to get all of your subject and focus while still creating that soft blur in the background in foreground.
This is a way to improve overall perceived image quality and get sharp photos – a win:win.
Fifteenth Tip: Try a New Lens for Sharp Pictures

Credit: Yearone
If you tried all of these other 14 steps and you still can’t get a tack-sharp image, it might be time to upgrade your lens.
Haze, fungus, and moisture trapped inside your lens could be spoiling the overall sharpness of your image.
Most budget lenses are capable of producing sharp images, but toy lenses and some more experimental models often ditch overall sharpness in favor of overall effect and aesthetic.
Play around with the lenses that are available to you to find one that helps you capture the images you’re looking for.
Read more: What are the 1o types of lenses you need to try?
Sixteenth Tip: Use Software to Get Sharper Images
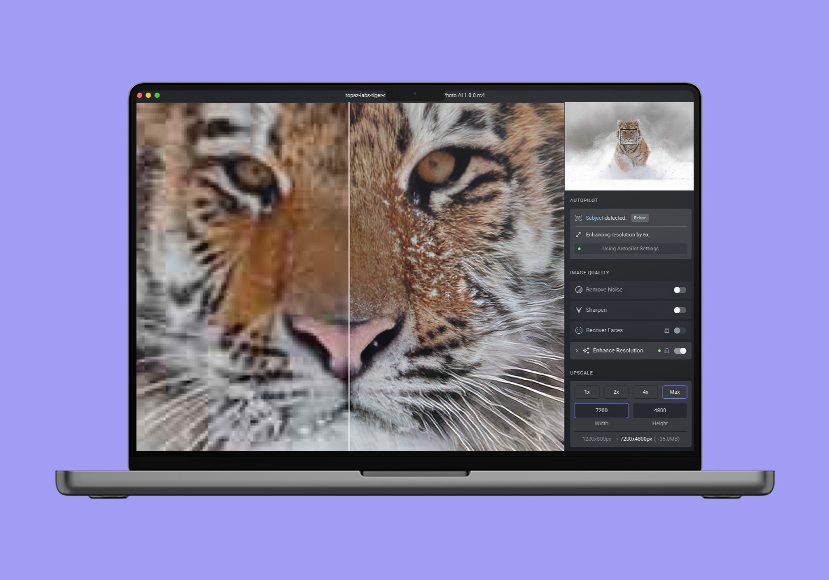
If you want to correct your blurry photos for maximum sharpness, there are various apps you can use to do it in post-production.
My current favorite app for getting sharp images with my landscape photography is called Topaz Photo AI.
(Previously, I used Topaz Sharpen AI, which was also excellent, but it’s recently been replaced by this all-in-one app that has some other tricks too.)
Topaz Photo AI is an easy-to-use app for Mac or Windows to help reduce noise and make your images look much better with just one click.
One of the automatic adjustments helps to sharpen images with AI post-processing wizardry – don’t ask me how it works… it just does!
- Read more: Topaz Photo AI review
Why Are My Images Blurry?

Credit: Alvan Nee
The biggest culprit when it comes to blurry images is going to be focus acquisition.
Learning how to focus on your subject is something that only comes after a lot of practice.
With that said, I’ve got a few things that you should check if you keep getting blurry images.
A long shutter speed is going to increase your risk of camera shake.
It’s also going to make it more likely that a moving subject will cause motion blur.
Your digital camera has a sweet spot when it comes to its ISO setting. If the iso is too high, you’ll get a lot of grain in your image that will spoil sharpness.
Taking care of your gear is incredibly important.
You can spend hours trying to perfect your focus only to realize that there’s a smudge on the UV filter covering your lens that’s been causing all of your shots to come out blurry.
What Gear do I Need to Take Sharp Photos?

Credit: Miss Zhang
Some essential gear for nailing sharp pics include a sturdy tripod, a remote release, and a basic lens cleaning kit.
The best lens for sharp images might be the lens you already own. Even your budget kit lens can get tack-sharp images.
The best camera for sharp images is going to have great software and build quality that supports a fast shutter speed.
I tell this to every new photographer I meet, but you can absolutely get tack-sharp photos with entry-level equipment if you take the time to master your settings.
What are the Best Camera Settings for Sharp Images?
Every photographer I know honestly has a few settings on their camera that still confuse them. However, your focus settings should be familiar to get crystal-clear images.
- Manual focus is pretty straightforward and puts you in total control of focus. You’ll be focussing using the ring on your lens
- AF-S, or Autofocus Single Shot, locks onto your focus points when you half-press the shutter button. This is great for subjects that are either still or moving slowly, such as landscapes or crowds walking by.
- AF-C, or Autofocus Continuous, allows the camera to continue to search for focal points. This is great for tracking fast-moving subjects.
- AF-A, or Autofocus Automatic, is a mixture of both autofocus options and lets your camera’s software decide the focus. This is an all-around solid option, but your camera might struggle to focus on its own in tough conditions.
The best shutter speed for a sharp picture can be determined using the reciprocal rule.
The reciprocal rule states that you should go no slower than a shutter speed equal to the focal length of your lens.
If you are shooting on a 50mm lens, your shutter speed should be 1/50 or faster in order to avoid motion blur.
The sharpest aperture for any lens is going to be between f/4 and f/8 depending on how much light is available and the focal length of the lens.
The best ISO setting for sharp Images is going to be the base ISO of your camera which should be somewhere around ISO 200.
FAQs for Sharper Images
What does it mean for a photo to be sharp?
The sharpness of an image can be defined as how clearly rendered the details are in the subject of that photograph.
Whether the subject is a portrait or a mountain landscape, it’s the individual details like focus, grain, and overall tone that come into play when considering sharpness.
The gear you use, the software you added on, and your skills as a photographer are all going to influence how sharp your photos are going to be.
How do you shoot sharp images with long lenses?
The most important thing you can do in shooting with a long lens is to use a tripod for extra stability.
You should also take the time to get familiar with the settings on your lens, including image stabilization, focus limiters, and different lens modes.
How do I get sharp images when using manual focus?
Manual focus takes a lot of skill, and the best thing that you can do to build up your talent is to practice shooting in manual.
Wide-angle photographers can try techniques like zone focusing while still-life photographers can take time slowly focussing their subjects.
Your manual focus also relies heavily on your diopter. If you wear glasses or contacts, make sure your diopter is adjusted accordingly.
How do photographers capture sharp images of far-away objects?
You can capture sharp images of faraway objects by centering your subject to get them in the brightest section of the image circle, using live view to focus with the LCD screen, and mounting your camera on a tripod for extra stability.


Jeff Collier is an experienced film photographer who enjoys experimenting with modern digital photography equipment, software and apps. He’s also an ex-world champion triathlete and avid cyclist, clocking hundreds of km each week in the beautiful Tweed Valley of northern NSW, Australia.

WELCOME TO SHOTKIT
Enter your email to be sent
today's Welcome Gift:
19 Photography Tools
🔥 Popular NOW:


Shotkit may earn a commission on affiliate links. Learn more.