


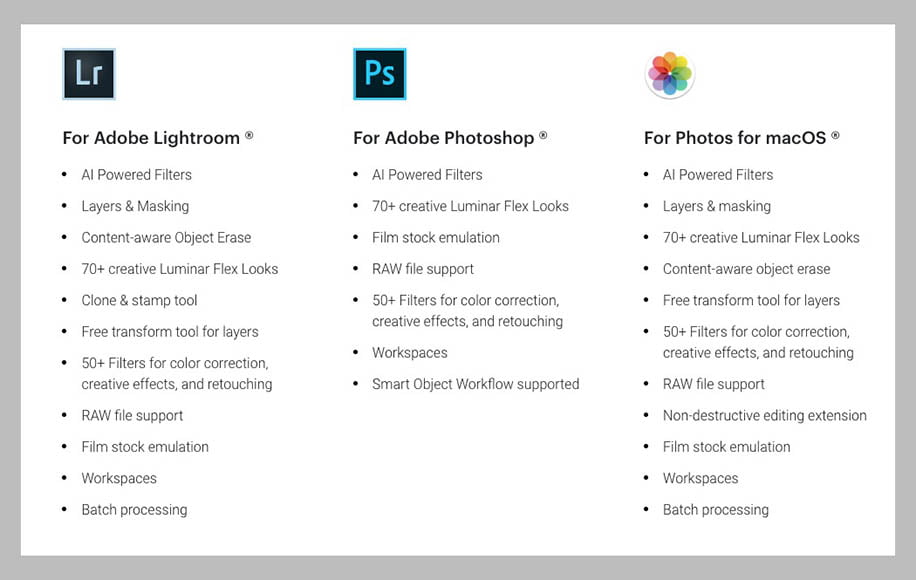
Luminar Flex is only a plugin was released in March 2019 as an alternative to Skylum’s standalone editor, Luminar 3.
This can be confusing to some customers, as all the current versions of Luminar come with a plugin option – including Luminar. They, like Flex, all work with Adobe Photoshop, Adobe Lightroom Classic, Photoshop Elements, and Photos for macOS.
Now, however, Skylum’s decided to separate the plugin from the standalone program, taking the two down different roads. Since the last udate to Luminar 3, all subsequent versions don’t have plugin support, and Luminar Flex will be developed separately, with separate updates.

If you’ve already purchased Luminar, Flex is a thankfully a free addition. If you’re a new customer however, you’re going to have to make a choice between the two.
Either way, there are some definite differences between Luminar Flex and previous Luminar plugin versions, as well as L3 itself.
What is Luminar Flex?
Luminar is an editing program that makes photo post-processing both effortless and graceful. It has everything from one-click adjustments using AI to professional tools that can make the minutest adjustment – see my full Luminar review to learn more.
Flex is the latest version of Luminar designed to be used by those who don’t want to give up their main editing programs, but still enjoy a lot of what Luminar has to offer. It’s marketed as a way to ‘Power Up Lightroom, Photoshop & Mac OS Photos.’
For those who do their primary image editing with Adobe products (or Mac OS Photos), Flex is an excellent addition. It allows you to keep your established workflow while providing some amazing additional tools.
Since Luminar Flex has no digital asset manager (i.e. catalog/library), it’s streamlined (in comparison with the Luminar 3 plugin) and works like the powerful, well-designed plugin it is.
With Luminar Flex you can do everything from basic image editing and lens corrections, to advanced layering and masking.
There are a number of crossover features with both Photoshop and Lightroom, but the increase in editing power it gives to both programs far makes up for it.
UPDATE: With the recent release of Luminar 4, users are now able to edit Adobe and Mac Photos images without the need of the separate Flex plugin.
If you’re a Luminar 3 user and intend to stick with V3, you’ll still need to use Flex. However, if you decide to upgrade to V4, it will no longer be necessary.
Features of Luminar Flex
How Luminar Flex can help speed up editing in your existing apps.
While many of Luminar Flex’s features will seem like duplicates to Lightroom’s, there are plenty of additional features that are well worth looking into. Here are a few:
AI Technology
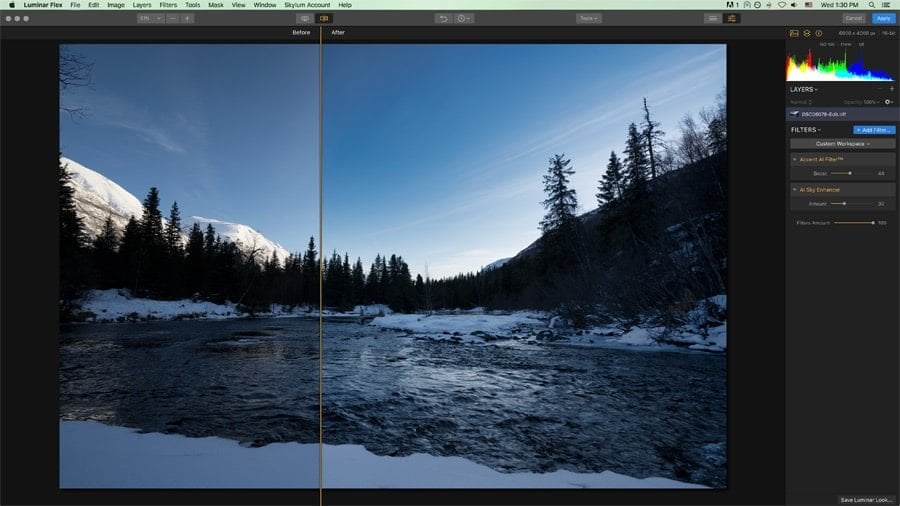
Luminar Flex comes with Luminar’s unique intelligent filters, including Accent AI and the AI Sky Enhancer. These provide quick improvements to landscape, street, and travel photos, but can be used on a variety of other genres as well.
When they provide the changes you’re looking for, these smart filters are true game changers.
Workspaces
One thing unique to Luminar Flex (and other versions of Luminar) is how it uses what it calls “Workspaces.”
Workspaces allow you to choose what filters you want to work with and organize them according to what kind of photography you’re doing.
Since Luminar comes with over 50 filters, having them all in your face would be a bit too overwhelming. For example, you’ll probably want different tools for landscape photo than for portraits. (Especially when using Luminar, as it has a number of landscape-specific filters.)
In the past, the plugin Workspaces matched the Luminar standalone program. Flex, however, has been redesigned.
For example, instead of the “Quick and Awesome” Workspaces in Luminar 3 (which only has about three filters), there’s now “Image Aware,” which includes all the AI filters Luminar offers.
The other Luminar Flex Workspaces are:
- Expert
- Black & White
- Intensify
- Drone & Aerial
- Film Lab
- Relight and Recolor
- Portrait
If none of these Workspaces are exactly what you’re looking for, you can clear the Workspace and add filters manually (as I usually do).
If you have a custom set of filters you use repeatedly, no problem. Create your own Workspace and set it as the default. In fact, you can create as many Workspaces as you like and even share them with others.
Just keep in mind, Workspaces are different than presets (known here as “Looks”). Think of a Workspace as what tools you want to use, whereas a preset is recording exactly what you’ve done with those tools so that you can use them on other images.
Layers and Blending Modes

Luminar Flex brings layer functionality to Lightroom.
One of the biggest advantages to using Luminar Flex (or any previous Luminar plugin) is that it brings layers and blending modes to Adobe Lightroom. That’s a serious plus.
The selection tools aren’t as robust as in Photoshop – you can only manually paint in your mask or use a gradient or radial mask – but they’re infinitely useful.
In the photo above, I first used a number of adjustments to the base layer and then used Flex’s Denoise filter on a separate layer to reduce the noise in the sky.
As a result, I got a creamy texture in the sky without reducing the sharpness of the foreground.
Of course, I could have done this with Flex’s masking options which are available for each filter. But as I was considering making other adjustments to the sky alone, making another layer was a better choice.
Add in the blending modes and textures and you have infinitely more options than in Lightroom alone.
Luminar Flex supports Smart Objects in Photoshop, as well.
Amazing Effects Filters
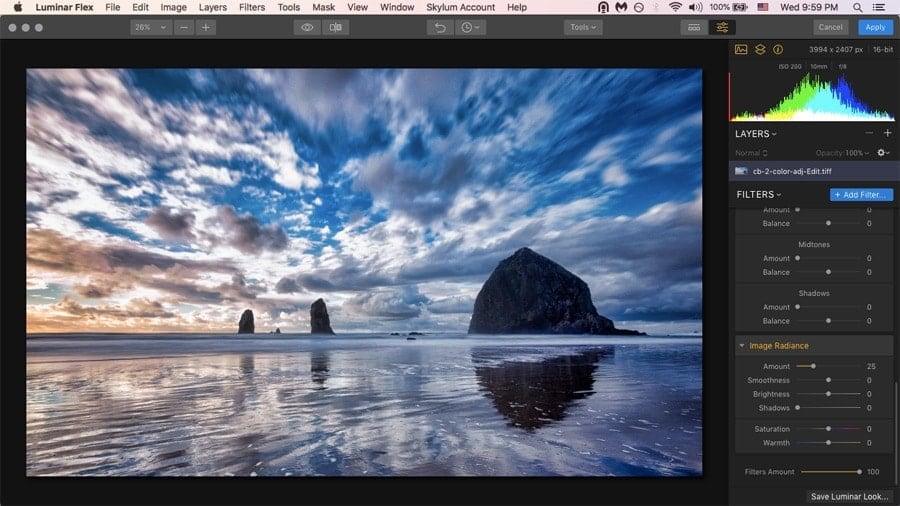
Beyond the AI filters, Luminar Flex comes with a number of effects filters that are particularly awesome, especially for landscapes. Image Radiance and the Orton effect, applied judiciously, are two of my favorites.
Another favorite of many photographers in the Sunrays filter, which allows you put truly realistic sun rays into an image – you can see some examples here on the Luminar homepage.
It’s vastly more convenient than trying to make sun rays in Photoshop – you’ll save a ton of time.
Flex also allows you to use LUTs, although any special ones you installed into previous version of Luminar won’t automatically transfer over. You’ll have to reload them.
There are also a number of filters that are similar to the presets that come with Lightroom, though you might find them easier to use and adjust in Luminar Flex, especially since you can use layers.
Luminar “Looks”

Luminar Flex comes with different “Looks” than Luminar 3.
All of the Luminar editing programs come with a series of “Looks” – one-click presets that give you a starting place for enhancing your image. (You can see how they work in this Luminar Tips article.)
You can control the intensity of the Look with a strength slider – something you can only do in Lightroom by using a separate plugin (see how in this Lightroom Tips article).
Additionally, clicking on a Look also loads all of its individual filters into the right-hand sidebar, so you can fine tune to get the perfect blend.
Luminar Flex comes with over 70 Looks to play with, divided into categories such as Professional, Aerial, Portraits, Landscapes, etc.
You can also create your own, and like Workspaces, share them with others. According to Skylum, a number of these Looks were created specifically for Flex.
In addition, new Looks are constantly showing up in the Luminar Marketplace, some of which are free and others for purchase.
Understandably, Looks can seem pretty overdone at 100%. You’ll definitely find yourself wanting to draw them back considerably, but even so, they provide a super fast and simple way to get your RAW photos looking great.
What is Luminar Flex best for?
Luminar Flex is excellent for landscapes, architectural, and travel photography.
If you’re already working with Lightroom or Photoshop, you’re probably wondering, can Luminar Flex benefit my workflow? Will it improve my images?
Flex’s primary strength for experienced photographers – and this has been true of Luminar all along – is adding impact to landscape photos. That’s where it really shines. A single slider can transform a relatively dull image to something that really stands out.
(Of course, many novice photographers overuse these effects, but hopefully they’ll learn moderation over time.)
When working with images where you just want a quick edit, Luminar Flex’s Accent AI filter is incredibly helpful. It seriously reduces editing time when paired with the right images. I often use it just to see what it will do.
Conversely, when I just need “standard” adjustments done to a run-of-the-mill image and don’t want to take the time, Accent AI is my go to.
If you’re new to Adobe products, Luminar Flex is also much easier to use. In fact, for me there are a number of things that are easier in Flex than in Photoshop or Lightroom.
And while Flex adds layers and blending to Lightroom, it also adds Lightroom-like adjustments to Photoshop. So if you need to open a photo in Photoshop for something but don’t want to go through Lightroom, all the slider adjustments are right at your fingertips (including lens corrections).
Another thing about Luminar Flex is that it can take you to places that you won’t expect. By experimenting with the filters, you can do things to your photos that you can only dream of in Lightroom, and would probably never figure out in Photoshop.
That being said, Flex is different enough from both Lightroom and Photoshop to need some playing around with to really see its value.
I confess that when I first started with Luminar in 2017, I was mostly annoyed with it. It’s only after much playing around and experimentation that I found how useful it really can be.
Luminar Flex vs Luminar 3
Plugin or Standalone, it’s up to you.
As mentioned before, Luminar 3 is Skylum’s flagship app intended to eventually match and exceed Adobe Lightroom.
It’s meant to be a full scale beginning-to-end editing program and was designed for people who aren’t intending to use other programs as their main go-to editors.
Here are a few other differences between Luminar Flex and Luminar 3:
- Luminar 3.1.0 does batch processing. Flex can only work on one photo at a time. You won’t be able to create a look and then automatically transfer it to other images or groups of images.
- If you’re a smart object user, Luminar Flex is the way to go. Luminar 3 doesn’t yet have smart object capability.
- Flex, at least on my machines, is noticeably faster than Luminar 3 – especially when loading up. Luminar 3 needs to update the library each and every time it loads, which takes time.
As mentioned before, if you’ve already purchased Luminar 2018 or Luminar 3 you won’t have to decide between 3 and Flex, since it’s included in your purchase.
If you’re new to Luminar, however, you will now have to choose.
Reasons to choose Luminar Flex over Luminar 3:
- You plan to stick with Lightroom/Photoshop/Elements/Photos and only want to use Luminar for occasional effects.
- You’d like to transition to Luminar 3 eventually, but would like it to have a few more updates under its belt first. (This option is more for those who’ve already got both.)
Keep in mind, however, that Luminar Flex is not on the same development schedule as Luminar 3. For example, Luminar 3 has already gotten the new Accent AI 2.0 – a considerably better version. Luminar Flex, however, is still on Accent AI 1.0.
When asked, Skylum representatives can’t say when he next Flex update will be. This has some of us shaking our heads.
So here’s what it comes down to: If you’re looking to replace Lightroom, Luminar 3 is a better choice in the long run. If you want to keep using your Adobe products, choose Luminar Flex.
Luminar Flex Dicount

Look for the ‘Add code’ button during checkout for your 10% saving.
Skylum has been kind enough to offer all Shotkit fans an exclusive 10% discount on Luminar Flex – all you have to do is click here, then enter the code SHOTKIT at checkout for your saving.
There are also ‘Signature Edition’ and ‘Creative Pro’ options at checkout, which bundle other Skylum software along with your Luminar Flex purchase for additional savings – at the time of writing, the SHOTKIT code will save you 10% off both of these options too :-)
Luminar Flex Review | Final Words

Ultimately, Luminar Flex is for photographers who want access to Luminar’s features but not transition to Luminar 3.
For this, Flex works wonderfully. (There’s a reason previous versions won a number of “best mac plugin” awards.) If Skylum continues to develop it, it’s got plenty of promise.
In addition, you’ll especially love a number of Luminar Flex’s effects if you’re a landscape, travel, or architectural photographer. And, if you’re a Lightroom user, the ability to use layers cannot be understated – it’s awesome.
On the Photoshop-side of things, many of Flex’s effects will be quicker and easier to implement than doing things by hand in Photoshop.
All in all, it’s a top-notch plugin. Definitely worth it if you don’t plan to transition to Luminar 3, and with a 60 day money back guarantee, it’s a no-brainer.


Usnea Lebendig is an experienced photographer and reviewer who loves to photograph professionally and in moments where the world’s beauty and/or strangeness leaps in front of the lens.

WELCOME TO SHOTKIT
Enter your email to be sent
today's Welcome Gift:
19 Photography Tools
🔥 Popular NOW:


Shotkit may earn a commission on affiliate links. Learn more.