


Photo Mechanic Review
Is Photo Mechanic the tool you need to streamline your photography workflow and better manage your media files? Find out in this real-world review!
Software | By Ana Mireles
This is my impartial review of Photo Mechanic, a piece of software that’s been essential for thousands of professional photographers over the years.
Now in its 6th iteration, Photo Mechanic is still leading the pack as the fastest way to browse and import your photos here in 2023.

Save time and streamline your workflow with this lightning-fast tool for viewing, organising and exporting your photos.
Every photographic workflow is divided into four or five stages.
First – although this isn’t necessary for all types of photography – there’s the planning and organisation.
After that comes the photo shoot, the actual making of the photos. From there, you need to review and manage all the images to select, mark, rate, and whathaveyou.
From that phase, you move on to post-production or photo retouching. Finally, you have another part of management where you need to resize, watermark, export, send to the client, post or publish, etc.
The two parts involving management are the least favourite for most photographers. That’s why a good browser software is needed, and this is where Photo Mechanic comes in.
Table of Contents
What is Photo Mechanic?
- Extremely fast
- Doesn’t require powerful computer
- Easy to use
- Multiple simultaneous imports
- Great compatibility
- Great value for money
- No mobile version
- Doesn’t support Hasselblad files
- No machine learning or AI for automatic keywords
Photo Mechanic is a Mac and Windows media browser designed by Camera Bits that allows you to manage your files.
With it, you can quickly see and compare your images. Also, you can tag and assign votes to them, add metadata, export for sharing with different sizes, watermark them, and otherwise manage lots of photographs hassle-free.
Since the scope of the program is to speed up the workflow to cull and handle large amounts of files, almost any photographer can benefit from it.
Photo Mechanic 6 dubs itself the World’s Fastest Photo Browser, and legions of fans attest to this.
Photo Mechanic is particularly useful for those who have long photo sessions – for example, wedding or event photographers who shoot 1000+ images per gig. Sports and wildlife photographers can also save a lot of time by more easily browsing the huge amounts of files they produce.
Photo editors can use it too. Actually, this was the trigger that sparked Dennis Walker – founder and owner of Camera Bits – to create the software.
During the Super Bowl of 1998, he saw the struggle that photojournalists and photo editors in the pressroom were facing trying to handle all the files being produced and having to be published as fast as possible.
Now, there’s also an upgraded version called Photo Mechanic Plus, which includes all the features and speed of the original, as well as a powerful image database to index, find and manage hundreds of thousands of images.
What’s new in Photo Mechanic 6?
In March 2019, Camera Bits released version 6 of Photo Mechanic, making it up to 3x faster. Other upgrades include:
- 64-Bit for better caching of images
- General image caching improvements for faster viewing
- Copy only the images you need from your memory card
- Less distracting UI
- Fullscreen support on MacOS and Windows
- Reverse Geocoding to insert city, state and country names into metadata
- Better crop tool
- Better slide shows
- Code replacements
Features
-
Ingesting and Browsing

Once you launch Photo Mechanic, you have to choose the source folder; this can be something that’s already on your computer or a plug-in memory card. Then, open a Contact Sheet.
The process is impressively even if you’re working with Raw files. This is because Photo Mechanic creates the preview images from the JPEG that’s embedded in your Raw.
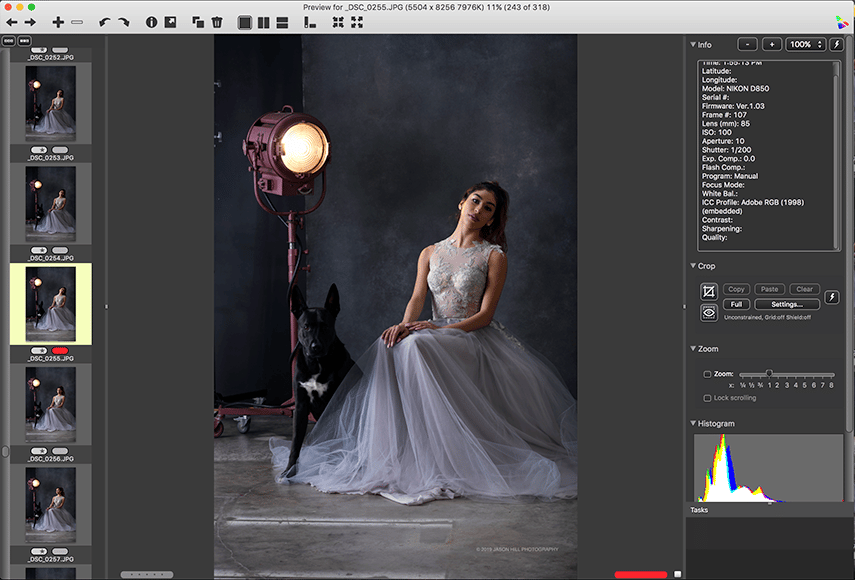
If you want to see a single image, double click on it to open the Preview Window. From there, you can browse through all of your files using the arrow keys. This process is also silky smooth, and the images load immediately because they are JPEGs.
You can use the keyboard shortcut Z to zoom in and check for critical focus or specific details.
Keep in mind that being the JPEG version, you gain speed but you won’t see the full resolution. This means that when you zoom in, the image may look pixelated with some jagged edges. When you open your original file, it won’t look like that.
You can also Live Ingest when you’re shooting tethered or wireless. Then the images get imported, copied and deleted from the source.
-
Culling
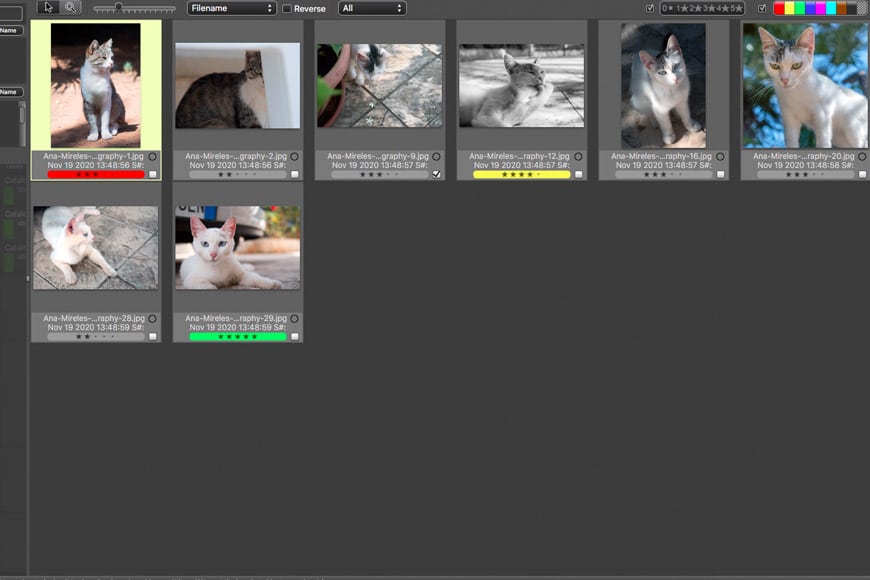
While you’re browsing your images, you want to be able to do the culling too. For that, you can use the number keys to assign colours and classify your files. There’s also a star rating system, or you can tag them.
The stars and the colour values are saved in the metadata; this way, you can see them later in other programs like Lightroom.
If you’re tossing up between two images, you can compare them side by side using the shortcut V or H. You can also check the histogram for clippings. This is helpful when you’re evaluating bracketed exposures.
You can then filter the images showing on the contact sheet to see only the ones with certain colours or star values.
-
Keywording
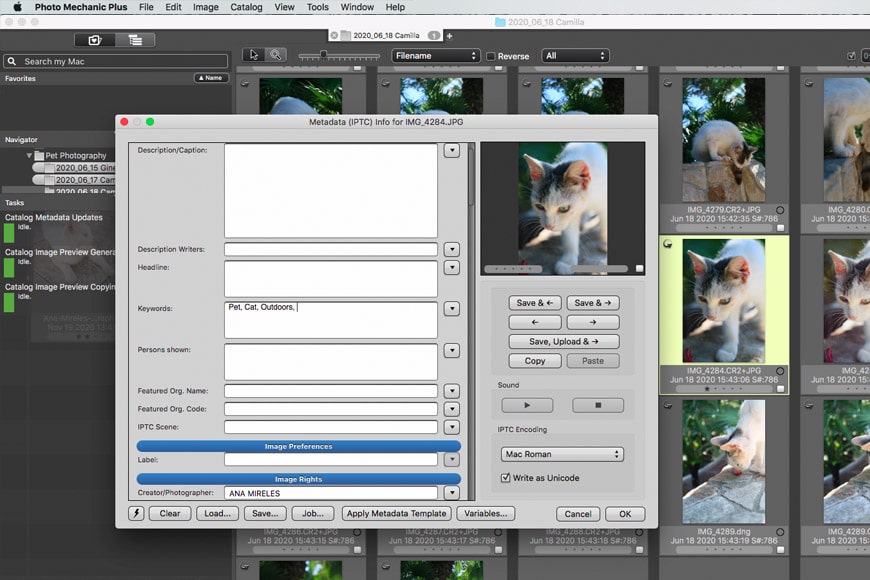
Adding keywords is an essential task for managing a photo library. This is as true for enthusiasts as it is for professionals, so you want to make the process as efficient and ‘painless’ as possible.
To do this in Photo Mechanic, press the ‘I’ key when an image is selected, or press the I icon on the photo. This will open the IPTC info window, where you can type the desired keywords. To make the process quicker, use the arrow keys to move to the next image.
You can also batch-keyword. To do this, first select multiple images on the contact sheet, or press Cmd+A to select all the images on the contact sheet. Then press Cmd+I to open the IPTC window and type in the keywords shared by all the selected images.
Variables are another helpful tool for keywording. For example, if you’re organizing an archive and you want your images to be searchable by year, simply type {year4} (the ‘4’ formats the year with four digits). This way, you’ll add the creation date from the metadata as a keyword. You can do this for all sorts of information like focal length, aperture, etc.
The IPTC Stationery Pad can be saved as a template if you think you’ll be using the same information and settings in future ingestions.
-
Captioning
I don’t use this function often, but I see how it can be a time-saver. Sports photojournalists that need to caption the players on the images, or celebrity photographers who work with tons of VIP names and need to add partners and titles into the captions… For them, it would certainly save a lot of typing.
With Photo Mechanic’s caption replacement, you only need to do the work once in a separate file where you assign codes. Then you can upload it, and the program identifies the code you type and replaces it with the full information assigned to it on the file.
-
Sharing

Once you’ve done your culling and managed the metadata, the selected images usually need to go into a photo editor. From Photo Mechanic, you can send them directly to Lightroom, Photoshop, or your favourite software. You can connect it with up to ten pixel-editing programs.
You can also send files to clients with specific size, resolution and even a watermark without having to save all the different versions on your computer. There’s also the possibility to save them if you want to.
This feature is not only useful for clients, but it’s also a good way to manage your portfolios and websites since you can FTP to some of the most common providers such as Smugmug, Zonefolio, etc.
Thanks to this, this you don’t have to save multiple versions of the same file in original, low-res, size x, size y, watermarked, non-watermarked, etc., saving you a lot of storage space and future headaches.
Overall Performance
The overall experience using Photo Mechanic is fantastic. The ingestion of the images and the creation of the contact sheet were much faster than Lightroom – which is the software I used before.
Being able to start editing as soon as images enter the software from my cameras memory card is a great feature, and something that doesn’t work this well in other image editors (if at all).
Flipping through the images in single or comparison preview mode runs really smooth – even when I had other programs running at the same time. That’s very impressive considering that I was doing this on an old laptop with only 4GB of RAM.
Since the first use, I was able to do most of my normal management without the help of extra tutorials. The interface is clean and intuitive.
For any doubts, I went to the Camera Bits website where they have a fantastic Knowledge Base. Even there, everything is easy to find and feels very customer-driven.
Once I had my metadata and exporting templates set up, the workflow became very efficient. If you have a large influx of images in your day to day work, Photo Mechanic will definitely speed up the job.
Value for Money
In my opinion, Photo Mechanic is a great piece of software that’s completely worth its price. It saves you a lot of time, and as they say, time is money. More than that, it saves you a lot of tedious work, and that is – at least for me – the most valuable thing.
For $139 you get the full license for the most recent version. If you already have a previous version, you can just buy the update for $89.
Other programs are always pushing you to update not only their software but also your operating system. Photo Mechanic doesn’t do this, which I like a lot.
It makes the price even fairer because you know you’ll be able to use it for a very long time, giving you great value for money.
Is it the right investment for you? Well, that depends on how many images you handle and how much management and organizing you do to them.
To find out if Photo Mechanic is right for you, you can download a fully functional 30-day free trial – no credit card needed. You don’t have to create an account either, just provide an email address where they’ll send you the download link.
I find this to be a great way to try out the software before you buy, and it also includes a free trial of Photo Mechanic Plus to see if that’s right for you too.
Indeed, you would still need a program to edit (and batch edit) such as Lightroom… so you may be wondering, why would you pay for two different software programs?
Simple – because Lightroom is much slower. If you Import, Review, Cull, and Edit in Lightroom you’ll be wasting an enormous amount of time.
This way you can do all the heavy work in Photo Mechanic and send to Lightroom only the selected images that you want to edit or retouch.
Photo Mechanic Review | Conclusion
I definitely recommend Photo Mechanic for anyone who has to work with large numbers of photos, especially if they have short deadlines.
I find the program is well designed for the photographer and photo editor’s needs. Camera Bits knows their target client, and it shows in all the features included.
They’re also easy to contact and open to suggestions. You can visit the feature request board to suggest ideas and see the status of other users’ requests to see if they’re planning to implement them or not.
This way, if you’re missing anything that would help you out on your workflow, you’ll know if it will be fixed.
 12 Best Adobe Lightroom Alternatives in 2023 [User Tested]
 Understanding Metadata in Photography (2023 Update)
 What’s the BEST Way to Buy Lightroom in 2023? (For All Budgets)
 Lightroom CC Mobile Guide
 Adobe Lightroom Review – Still the Best Image Editor in 2023?
 Everything to Know about the XMP File Format in 2023

Ana Mireles is a Mexican researcher that specializes in photography and communications for the arts and culture sector.

WELCOME TO SHOTKIT
Enter your email to be sent
today's Welcome Gift:
19 Photography Tools
🔥 Popular NOW:


Shotkit may earn a commission on affiliate links. Learn more.