


How to Smooth Skin in Photoshop
Master the art of retouching skin in Photoshop! Follow this tutorial to give your subjects smooth, blemish-free skin that looks natural.
Photoshop | Software | By Ana Mireles
Who hasn’t had a pimple appear on the morning of a big day? No, this isn’t an ad for a face cream… It’s better. It’s a way to clear up any imperfections from a portrait photo, even if the model had a pimple on the day.
Let’s face it, nobody is perfect – so if you do wedding photography or any kind of portrait photography, you’ve had to smooth a subject’s skin in Photoshop.
That said, there’s a difference between enhancing your subject and making everybody look ‘fake-perfect’. That’s why, in this article, I’ll show you a technique that will help you to get control over the results of your retouching.
Using this Photoshop technique, your images will look more professional and your clients won’t have to worry about anything on the day of the photoshoot.

Download the latest version of Adobe Photoshop to follow along with this simple tutorial.
Start a free 7-day trial today
Table of Contents
How To Smooth (and Soften) Skin With Photoshop


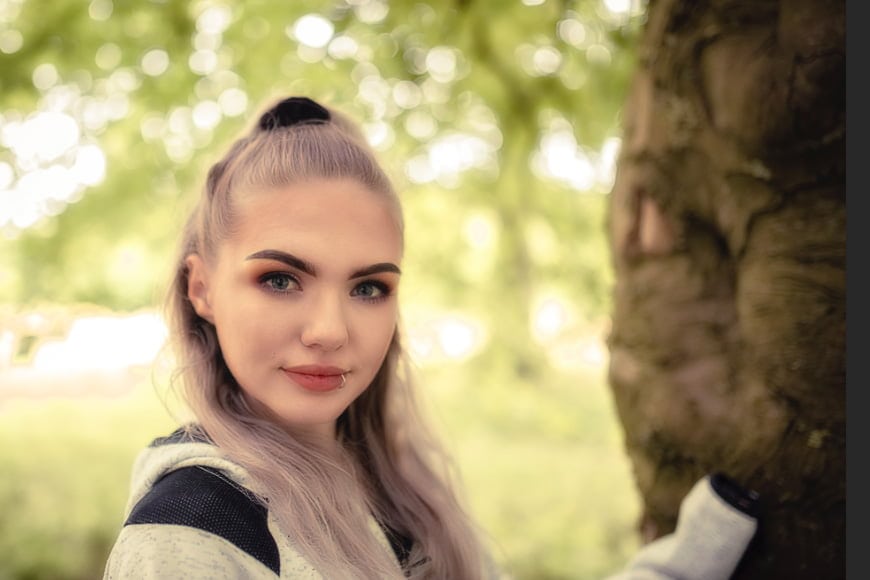
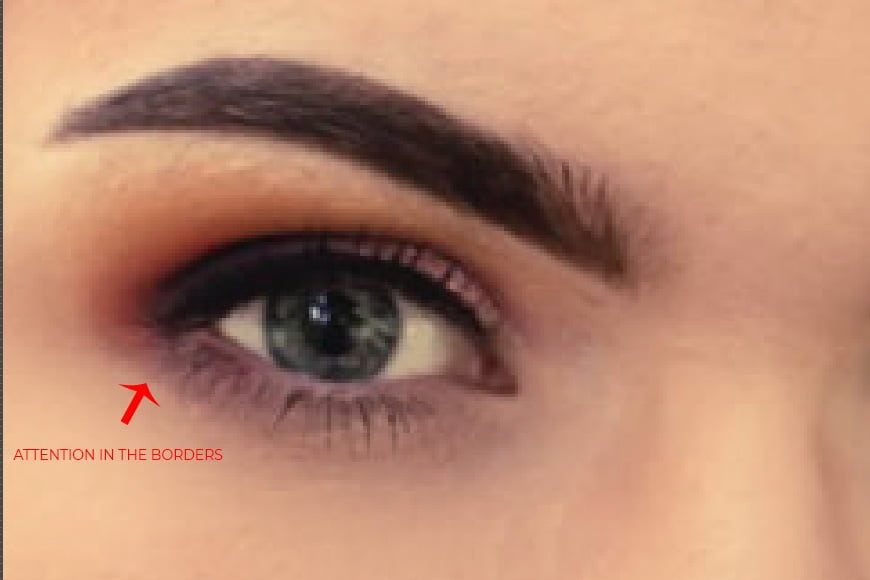
Credit: Mike Austin
Almost every portrait photographer is faced with the task of retouching a model’s skin.
Unless your photography style is raw and untouched, this is something that has to be done to professional models after a fashion photo-shoot as well as for brides in their wedding photos.
Regardless of the genre, the important thing is that the result is realistic. You don’t want your subject looking like a plastic mannequin. Also, you have to consider the ethical implications of this kind of work. You wouldn’t want to overdo it.
In any case, it’s important to use a technique that gives you full control over what you’re doing.
There are many ways to smooth skin in Photoshop, and this level of control is one of the advantages of Photoshop over Lightroom.
The following technique is one that I like because it’s easy to do and you can apply as much or as little retouching as needed.
Let’s get started.
Step 1: Duplicate the Layer
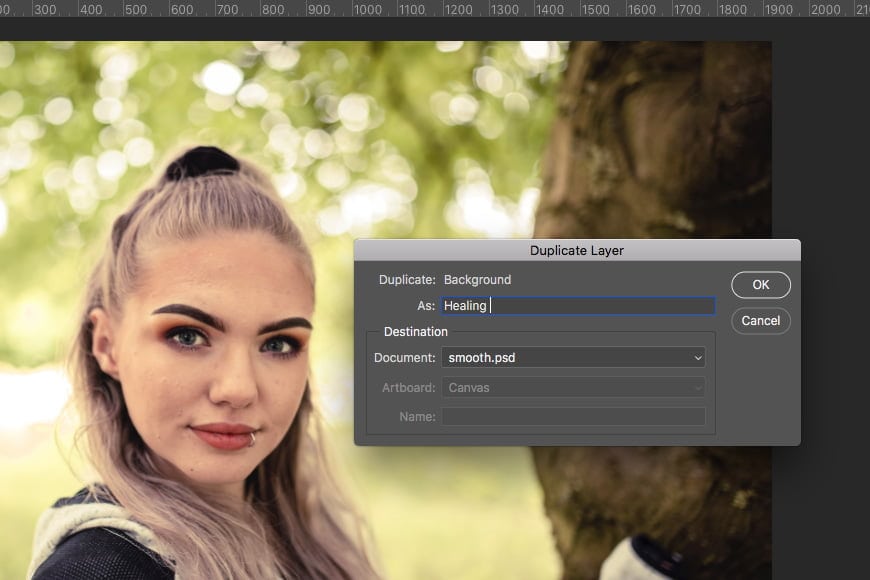
Open your image in Photoshop and duplicate the background layer. This will create a copy of your image where you can work without touching the original.
This is a non-destructive workflow which is the most advisable way of working. Also, it will allow you to apply masks and do local retouching if needed.
There are several ways to duplicate your layer. You can right-click on top of the layer and choose Duplicate Layer from the menu.
This will open a dialogue box where you can rename the new layer. I recommend you do this because portrait editing can require many layers and you can lose track of what you did in each one.
In this case, we’re going to use this layer to remove blemishes with the healing spot and healing brush tools. Therefore I’m going to name it ‘Healing’, but you can call it ‘Blemishes’ or whatever works for you.
Another way to duplicate the layer is by dragging it onto the Create New Layer button at the bottom of the Layers panel. If you do it this way, then you can rename the layer once it’s created.
Just double-click on the name of the layer, which by default is called ‘Background Copy’, and rename it.
Step 2: Remove Blemishes
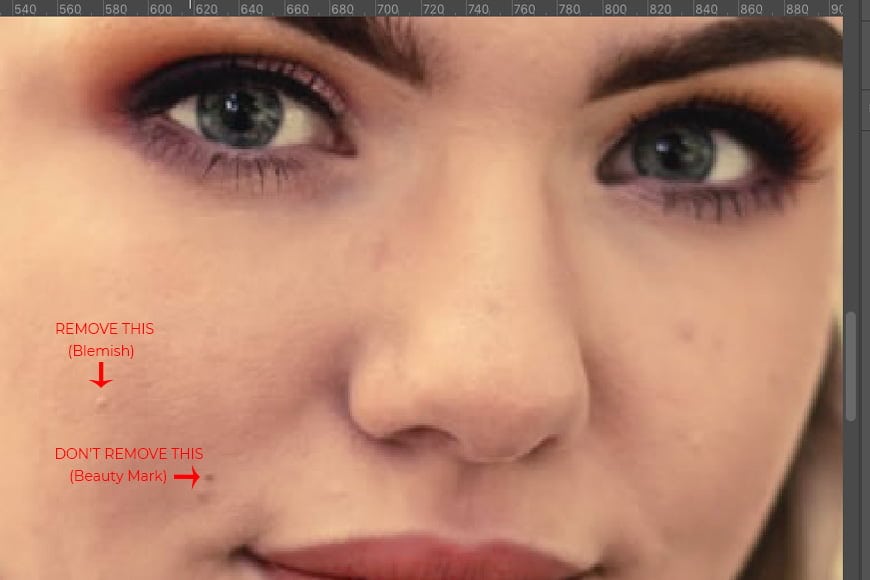
In this step, you’re going to remove any blemishes from your model’s skin. Be careful not to erase any moles, scars, freckles, or any particular feature from a person’s face unless you’re asked to.
What you’re looking for here is to remove any temporary imperfections, not birthmarks, or anything that can be part of someone’s identity.
Having said this, let’s get started. You’ll want to zoom-in for this kind of editing. The best tools to work with are the Healing tools.
- Related: Why can’t I zoom in on Photoshop?
In general, as a toolset, they work by blending in the new pixel information with the information that already exists.
This will give you a more natural result than just cloning, which entirely covers the old pixels with the new ones. With the healing brushes, you preserve the skin texture.
You can start by using the Spot Healing Brush. All you have to do with this tool is to click on top of the blemish. Photoshop will automatically sample the pixels surrounding that area and match the transparency, luminosity, etc. from the spot to heal and blend the area. As a result, the blemish will disappear.
Make sure the brush size is not too big or you’ll end up with weird stains. Just fix the part that needs fixing. This way you leave most of the skin untouched.
Sometimes the result is not perfect. If this happens, then you can switch to the Healing Brush. This works just like the Spot Healing Brush, except that in this case, you get to choose which pixels to sample.
To determine the pixels you want to sample, just press Alt and click on them. Then let go of the Alt key and click on the blemish you want to remove.
That’s it. Keep switching between these two until you’re satisfied with the results. Remember to zoom out every once in a while to see the overall result and ensure that the corrections are blending in nicely.
You can also review your work by clicking on the eye icon next to the layer. This will activate and deactivate the layer for you to see the before and after versions.
If you find yourself editing an area where you need to preserve detail – for example, if there’s a tattoo – then you should use the Clone tool.
You can use it just like the Healing Brush, but Photoshop won’t blend in the pixels. It will just copy the sample and paste it on top.
Make sure you’re using a brush with soft edges so that the outer parts do blend in and the edit remains imperceptible.
Now we’ll move on to the rest of the skin smoothing. If you’d like to learn more about specifically how to remove blemishes in Photoshop, check our guide.
Step 3: Duplicate Layer
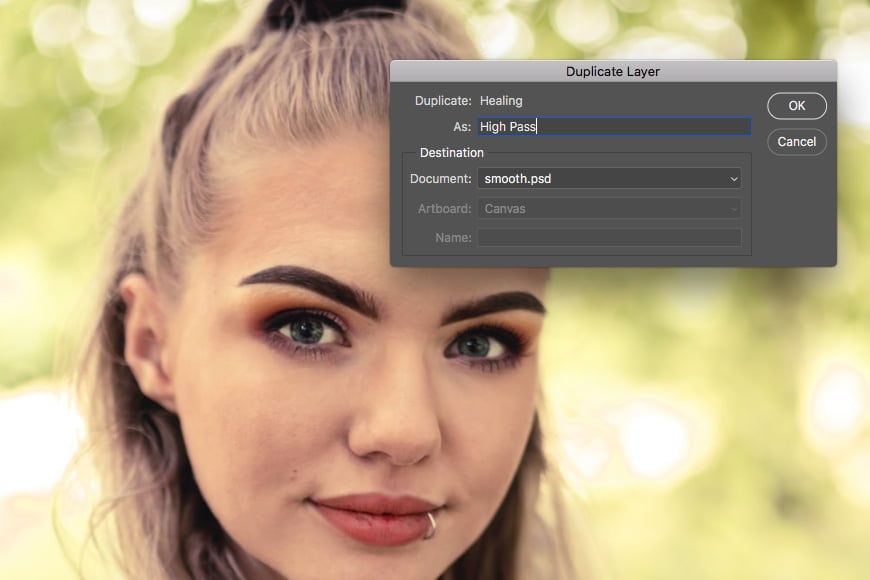
Every edit that you do should be in a different layer. So, once you’re done removing blemishes, duplicate the layer you just worked on (in our example we called this the ‘Healing’ layer).
This time name it ‘High Pass’ (which is the filter you’re going to use), or something like ‘Smooth Skin’ (which is what you’re going to achieve). Anything that will make it recognizable if you add more layers and then need to come back to adjust something.
Step 4: Convert to Smart Object
Ok, now this layer needs to be converted into a Smart Object. This way the filters you’ll apply in the next step will become Smart Filters and you can always come back to adjust them if you’re not satisfied with the results.
To do this you can right-click on the layer and choose the Convert to Smart Object option. Otherwise, you can use the menu Filter and choose Convert for Smart Filters.
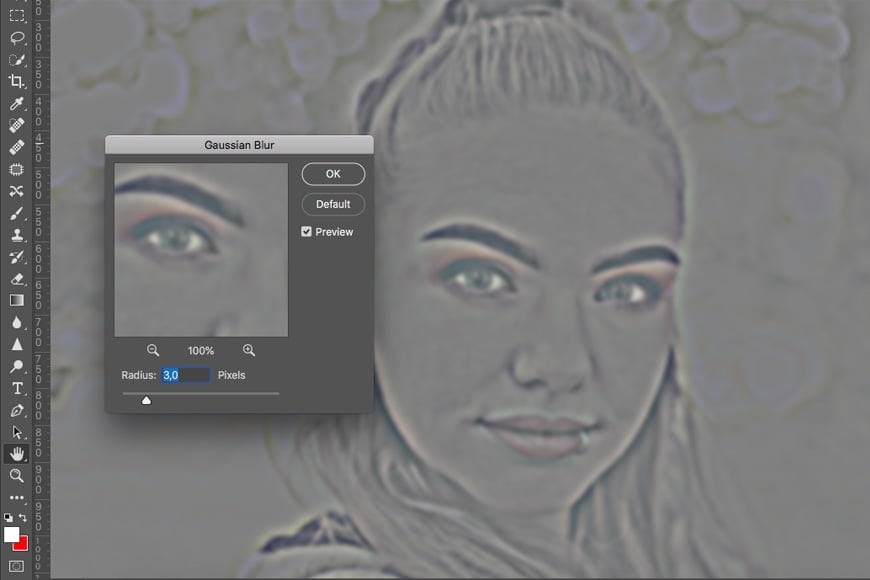
Step 5: Apply the High Pass filter
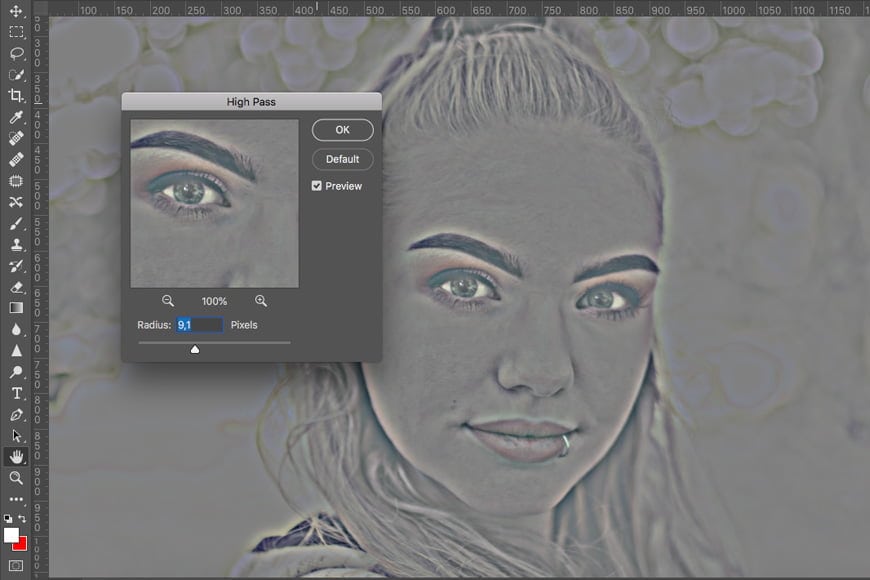
To open the High Pass dialogue box, go to the menu Filter, Other, High Pass. Here you’ll have a preview window and a slider that controls the radius value.
You’re probably familiar with this filter if you’ve ever tried to sharpen an image in Photoshop as this is the most common use for this tool.
This time it will have the opposite use – i.e. smoothing the skin – so the process will be different.
High Pass places a neutral grey layer on top of your image. By moving the radius value you’ll identify the edges of the image and they’ll show up within it.
Something is considered an edge when there’s a change in contrast, and the radius determines how many pixels around that are going to be considered.
When you use it to sharpen, you don’t want the radius value to go too high. But since we’re smoothing here and not sharpening, we’ll have to set it higher.
The exact number will be different for each picture because of the lighting, components, and resolution. But it should look something like the screenshot I’m showing you here.
When you’re satisfied, click OK to apply the filter.
Step 6: Apply Gaussian Blur
Now, you’re going to apply a Blur filter on top of your High Pass filter. The best result comes by using the Gaussian Blur.
Click on the menu Filter, Blur, Gaussian Blur to open the dialogue box. You can see the effect in the preview window and also in the full image if you have the Preview option activated.
Move the slider to determine how much blur you want. This of course depends on the result you’re looking for, but usually a third or a fourth of the value used in the High Pass will be OK.
Remember that this too will be a smart filter, so don’t get too worried. It will remain editable and you can open this dialogue box again to change this value if necessary. Click OK to apply.
Step 7: Invert

Invert the colors of the layer by going to the menu Image, Adjustments, Invert. You can also use the keyboard shortcut Cmd + I, and follow our guide on how to invert a selection in Photoshop.
Step 8: Change Blending Mode
So far the smoothing effect is not visible on your original image. To change this, you need to blend this grey layer created by the High Pass with the underlying blemish removal layer.
Open the Layer Blending modes and hover over them to find the one that looks best. The Overlay mode usually works very well.
Step 9: Blend If
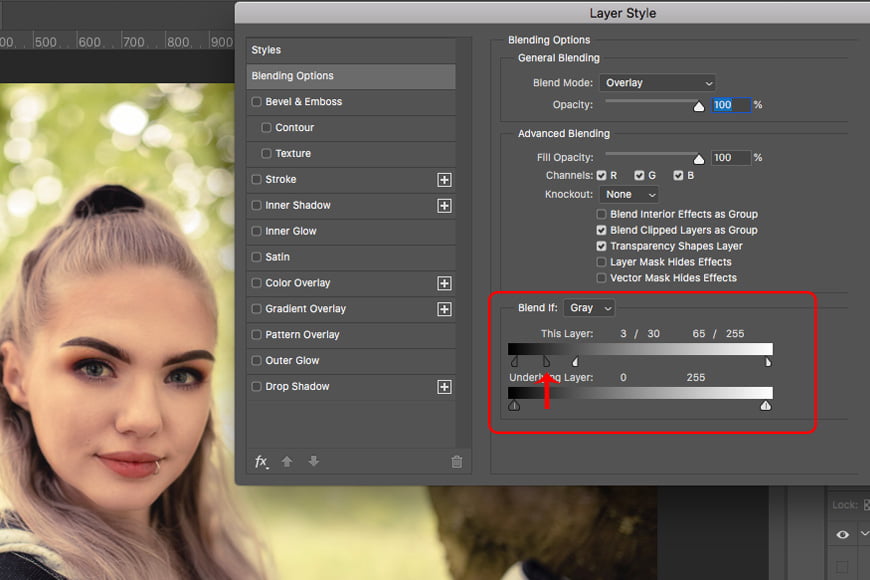
Now your image will be smooth but it will have some haloing giving it a dream-like effect.
To fix that you need to open the Layer Style dialogue box. You can do this by double-clicking on the layer. Make sure you do it in the empty space because if you click on the thumbnail you’ll open a different window.
In this Layer Style box, you’ll find the Blending Options panel. On the bottom, you’ll see two sliders under the Blend If section.
The top slider controls the current layer and the second one is for the underlying layer. For this effect, you only need to move the current layer slider.
It’s best to split the controls in two; this way you can set a beginning and end to the adjustment you’re doing. Do this by holding the Alt key before you slide it.
Move the slider controls as much as you need to to get rid of the halos. This will be different on each photo depending on the values you put in the filters.
When you’re done, apply the changes.
Step 10: Add a Layer Mask
Not everything in your picture needs to be smooth. We’re just trying to retouch the skin, so nothing else should be affected by the filters.
To control the areas that will be smooth you can use a Layer Mask. This way you just hide the parts of the layer that you don’t need, but you never erase anything.
Make sure you’re working on the Smooth layer and click on the Add Layer Mask icon at the bottom of the Layers panel.
You won’t see any changes in your image yet. But a white rectangle will appear next to the thumbnail in the image.
Click on it to ensure you’re working on the mask and not in the layer. Then go to the menu Edit, Fill to open the dialogue box.
Choose black and click OK. This will hide the layer, so you won’t be able to see the smoothing you’ve done. Don’t worry though, everything is still there.
Layer masks allow you to hide anything that is colored in black. Whatever is colored in white will be visible. And anything in the grayscale will have different degrees of transparency.
Step 11: Paint the Layer Mask
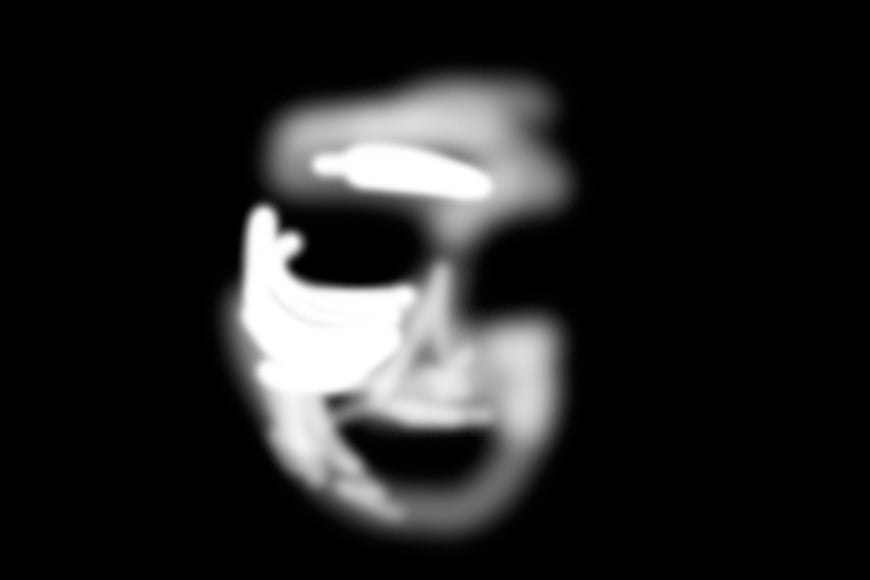
Since your Layer Mask is completely black now, the entire layer is hidden. To start smoothing the skin in a controlled way, you can paint white the areas where you want the smooth effect to be visible.
Grab the Brush tool to do this. Set the foreground color to white if it isn’t already. You can do this by clicking on the color swatch. Then, in the color picker box that opens select the white and click OK.
Otherwise, you can click in the small black and white squares next to the color swatch. This will bring back the default colors: black as foreground and white as background. To invert them click on the small double-arrow next to it. Now white will be the color of your brush.
In the options bar on the top, you can change the settings for the Brush tool. Adjust the size so that you can work comfortably without accidentally brushing into unwanted areas.
You might have to adjust the size as you work – bigger for the cheek and forehead, smaller for the upper lip and eyelid, and so on.
Also, make sure the brush has soft edges. This will do a better job of blending things instead of leaving very noticeable brush strokes.
Finally, I suggest using a low flow to have better control over what you’re doing. This allows the white to be applied a little bit at a time when you pass over a surface.
Keep in mind that this value will be different if you’re working on a tablet instead of with a mouse. You’ll also want to adjust the settings accordingly for pen pressure sensitivity.
That’s it! Start painting back the smoothness of the skin until you’re satisfied. To see how things are going you can toggle on and off the layer that you’re working on.
Also, you can see the mask by pressing Alt and clicking on it. This way the picture disappears revealing only the mask that you’re painting.
Step 12: Fine-Tune
Now that the smoothing effect is done it’s time to do some fine-tunning. First, zoom out and check that you didn’t miss any spots.
Also check that you didn’t smooth something that you didn’t want to, for example, the eyes. If you want to correct this just paint black that area in the Layer Mask to hide it again.
Sometimes this effect can lighten the skin too much. Keep this in mind and make the necessary adjustments to respect the skin tone of your model. You can control this by adding a Curves adjustment layer.
You can continue adding as many adjustment layers and layer masks as you need.
Step 13: Group Layers
Retouching a portrait is often a series of steps that apply to different parts of the face, then the body, and even the clothing.
Because of this, it’s important to have an efficient workflow and a clean workspace. So far I’ve been advising you to name your layers so that you can keep track of them.
Now that you’re done with this step, you put the layers of this process inside one group. To do this, select the layers you created during this tutorial.
Then, go to the menu Layers, Group Layers. Or you can click on the folder icon you can find at the bottom of the Layers panel.
By default, it will be called Group 1 (if this is the first group you make). Rename it so it’s clear what it contains – for example, ‘Smooth Skin’.
Now you can continue with other edits on your portrait. The most common include teeth whitening, correcting red-eye, smoothing wrinkles in clothing, and so on.
Keep each set of edits in a different group to manage your layers. You can also color-code them.
Final Words
As you can see, smoothing skin in Photoshop can be very easy. However, this and other ‘beauty’ retouching needs to be done carefully.
You need to figure out how much the client wants and how much you’re comfortable doing and never go over that balance.
When you’re applying skin retouches, always consider the subject and the context. It’s not the same to retouch for fashion than for a family portrait.
Also, the skin of a teenager, an adult, and an elderly person should be smoothed differently because the real skin won’t be the same in every age group.
You don’t want a child to look like they have a ton of makeup on, the same way that you wouldn’t smooth every wrinkle of an 80-year-old person’s face.
Cultural factors come into play as well. Beauty standards change from culture to culture. So, like Uncle Ben said to Spiderman, “With great power comes great responsibility” – and Photoshop makes you very powerful. Use it wisely!
Finally, if you’re looking for a faster way to make these edits, check out Skylum Luminar AI (reviewed here).
Download the latest version of Adobe Photoshop to follow along with this simple tutorial.
Start a free 7-day trial today


Ana Mireles is a Mexican researcher that specializes in photography and communications for the arts and culture sector.


WELCOME TO SHOTKIT
Enter your email to be sent
today's Welcome Gift:
19 Photography Tools
🔥 Popular NOW:


Shotkit may earn a commission on affiliate links. Learn more.